Building a chat interface for mobile apps can get complex quickly.
What starts as a simple message list and input box soon expands into typing indicators, read receipts, media attachments, presence updates, and real-time synchronization across devices. Then you run into mobile-specific challenges, keyboard avoidance, scroll behavior on long message lists, and subtle differences between iOS and Android.
For React Native developers, assembling these elements manually can take significant development time.
UI kits help speed things up, but they still require wiring multiple components together before the experience feels complete.
The CometChat UI Kit Builder for React Native takes a different approach.
Instead of assembling chat UI components manually, you design the interface visually, configure features, customize themes, and sync those settings directly into your React Native app.
By the end of this guide, you’ll have a fully configured chat UI running inside your mobile application.
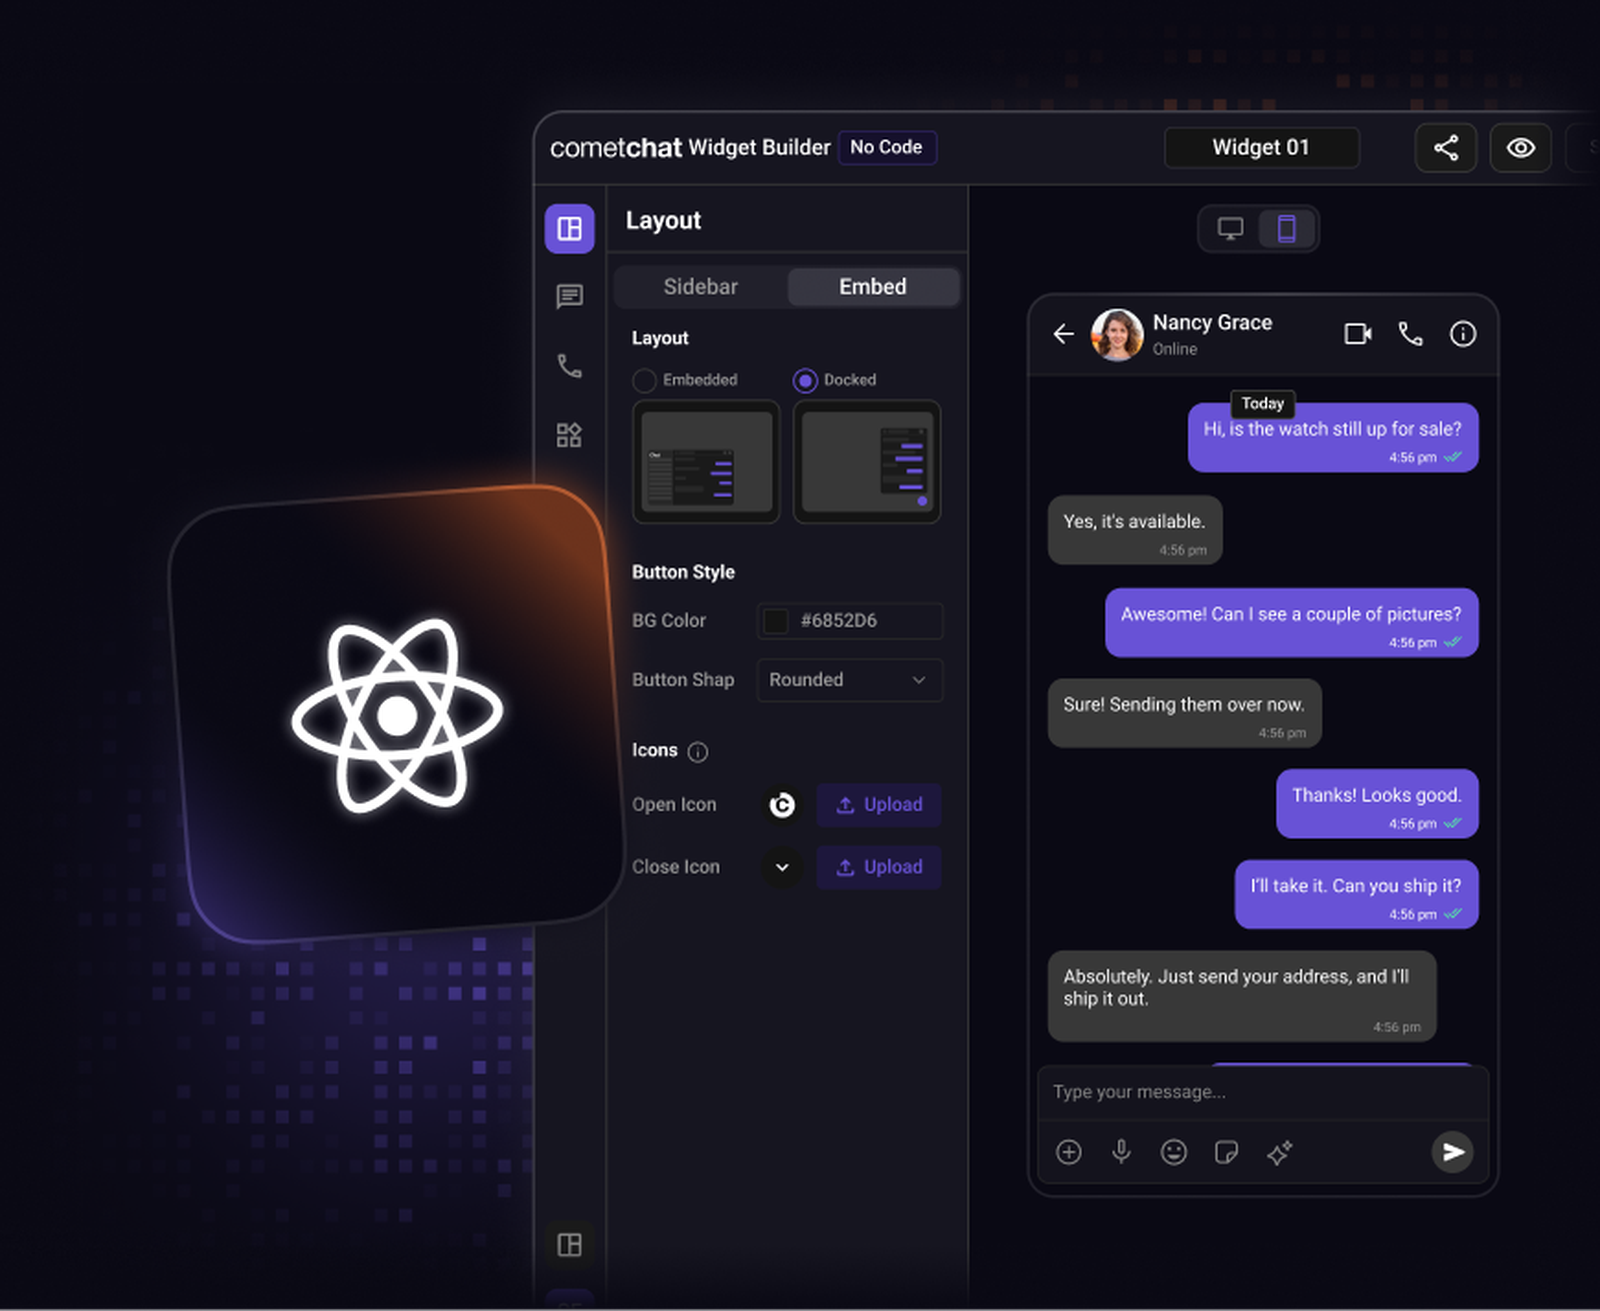
What is the CometChat UI Kit Builder for React Native?
The CometChat UI Kit Builder for React Native is a visual configuration tool that lets you design and control your chat experience before writing UI code.
Instead of toggling features inside individual components, you configure everything through a visual interface and sync that configuration directly with your app.
Under the hood, it works with the @cometchat/chat-uikit-react-native package, which provides production-ready react native chat components along with real-time messaging infrastructure.
Configure chat layouts
Toggle messaging and calling features
Apply brand themes
Control engagement features
Sync configuration using QR codes or JSON
This allows React Native teams to move from idea to a working chat interface much faster, without assembling UI components manually.
Why Use the Builder for React Native?
Most React Native teams follow a familiar workflow when building chat:
Install a UI kit
Import chat components
Wire them together
Configure features manually
Apply custom styling
It works. but it takes time before you see a usable interface.
The Builder simplifies this workflow.
Instead of configuring everything inside your codebase, you configure the chat experience visually and sync those settings into your app.
This shift has a few practical advantages:
Faster development: Skip the manual assembly of multiple UI components just to get a working layout.
Real-time UI preview: See how layouts, themes, and features behave before deploying.
QR-based configuration sync: Import chat configurations instantly into your React Native app without manual setup.
Consistency across environments: Ensure layout, theme, and feature settings remain aligned across development and testing.
In practice, teams can go from UI concept to a working mobile chat interface in a few hours.
Prerequisites
Before getting started, make sure your environment includes:
Node.js 18+
React Native 0.77+ (CLI or Expo bare workflow)
Android Studio with SDK 33+
Xcode 14+ with CocoaPods (for iOS development)
A CometChat account with App ID, Auth Key, and Region
Step 1: Run the Builder Sample App
The easiest way to get started is by running the React Native Builder sample app.
This sample app lets you experiment with different chat configurations and preview them instantly on a device or emulator.
Typical workflow:
Clone the Builder sample project
Install dependencies
Run the app on Android or iOS
Log in using your CometChat credentials
Once the app launches, you’ll see the Builder interface where you can start configuring your chat experience.
Step 2: Configure Chat and Calling Features
Inside the Builder, you can control the features that power your chat experience.
Core messaging features include:
1:1 messaging
Group conversations
Message reactions
Typing indicators
Read and delivery receipts
Media sharing
Mentions and tagging
These are backed by CometChat’s real-time infrastructure, so message delivery and synchronization are handled out of the box.
Optional engagement features:
Voice and video calling
Message editing and deletion
Notifications
Layout-level behavior controls
Instead of editing component logic, you enable or disable these features through simple toggles in the Builder UI.
Step 3: Customize Layout and Theme
Mobile chat UI needs to feel native to your app, not like an embedded feature.
The Builder allows you to customize:
Layout structure: Choose between tab-based navigation, simplified chat views, or multi-section layouts.
Color themes: Apply your brand colors across message bubbles, headers, and UI elements.
Typography: Configure fonts and text styles used throughout the chat interface.
Light and dark modes: Support system-based theme switching for a native mobile experience.
All changes are reflected instantly in the preview, making it easy to iterate on design before syncing it to your app.
Step 4: Import the Builder Configuration
Once your chat UI is configured, you can import the settings directly into your React Native project.
The Builder supports two configuration methods:
QR Code Import: Scan a QR code from the Builder interface to sync the configuration instantly with your app.
JSON Configuration: Export the configuration as a config.json file and add it to your project manually.
This configuration typically includes:
Feature selections
Layout settings
Theme configuration
UI behavior preferences
Because the React Native UI Kit understands this configuration schema, your chat interface automatically adapts to these settings.
Step 5: Integrate the Configuration into Your React Native App
After exporting the configuration, integrate it into your project.
1. Copy the Builder configuration
Move the exported files (such as config.json) into your codebase.
2. Initialize the CometChat SDK
Configure the SDK with your app credentials.
3. Apply the Builder theme
Wrap your application with the theme provider configured using the builder settings.
4. Enable UI Kit components
Use the imported configuration to control which chat components render in your app.
Because the configuration is centralized, your UI automatically reflects the settings defined in the Builder.
A Faster Way to Build Chat for Mobile
Building chat UI for mobile apps usually means assembling multiple components, handling state, and dealing with platform-specific behavior.
The CometChat UI Kit Builder simplifies that workflow.
Instead of wiring everything manually, you:
Design the interface visually
Configure messaging features
Apply themes and layouts
Sync the configuration directly into your app
For React Native teams, this is a faster path to shipping chat.
You still retain full control over the UI and SDK when you need deeper customization, but you start with a working interface from day one.
Try the CometChat UI Kit Builder.

Shrinithi Vijayaraghavan
Creative Storytelling , CometChat