Adding chat to a web application can become more complex than expected.
What starts as a simple message list and input field quickly expands into typing indicators, delivery receipts, media sharing, user presence, and real-time synchronization across devices.
Even when using UI kits, developers still need to assemble components, configure features, and customize styles before the chat interface feels complete.
The CometChat UI Kit Builder for Next.js simplifies this workflow.
Instead of manually wiring UI components, you can design your chat interface visually, configure messaging features, customize themes, and export ready-to-use components for your Next.js application.
What is the CometChat UI Kit Builder for Next.js?
The CometChat UI Kit Builder for Next.js is a visual configuration tool that helps developers create chat interfaces quickly using prebuilt UI components.
It works on top of the CometChat React UI Kit, which provides modular messaging components designed for modern React frameworks like Next.js.
Instead of manually assembling chat UI components, the Builder lets you configure the chat experience visually and export the required code and configuration into your Next.js project.
With the Builder, you can:
Enable or disable messaging features
Customize themes and typography
Export UI components ready for integration
Build scalable chat experiences faster
This approach allows teams to focus more on product functionality rather than building chat UI from scratch.
Why Use the Next.js UI Kit Builder?
Many teams add chat to their Next.js applications using a traditional workflow:
Install the chat SDK or UI kit
Import messaging components
Wire them together
Configure features manually
Apply styling and theming
While this works, it often takes time before the chat experience becomes fully functional.
The Builder simplifies this workflow.
Instead of assembling UI components first, you configure the chat interface visually and export ready-to-use components for your project.
This provides several advantages:
Faster setup - Prebuilt UI components reduce development time.
Visual configuration - Preview layouts and features before integrating them into your application.
Flexible customization - Enable only the features your product needs.
Built for modern frameworks - Works seamlessly with React-based frameworks like Next.js.
In practice, teams can move from UI concept to a working chat experience in a few hours instead of days.
Prerequisites
Before getting started, ensure your development environment includes:
Node.js 18+
A Next.js project setup
React 18+
A CometChat account with App ID, Auth Key, and Region
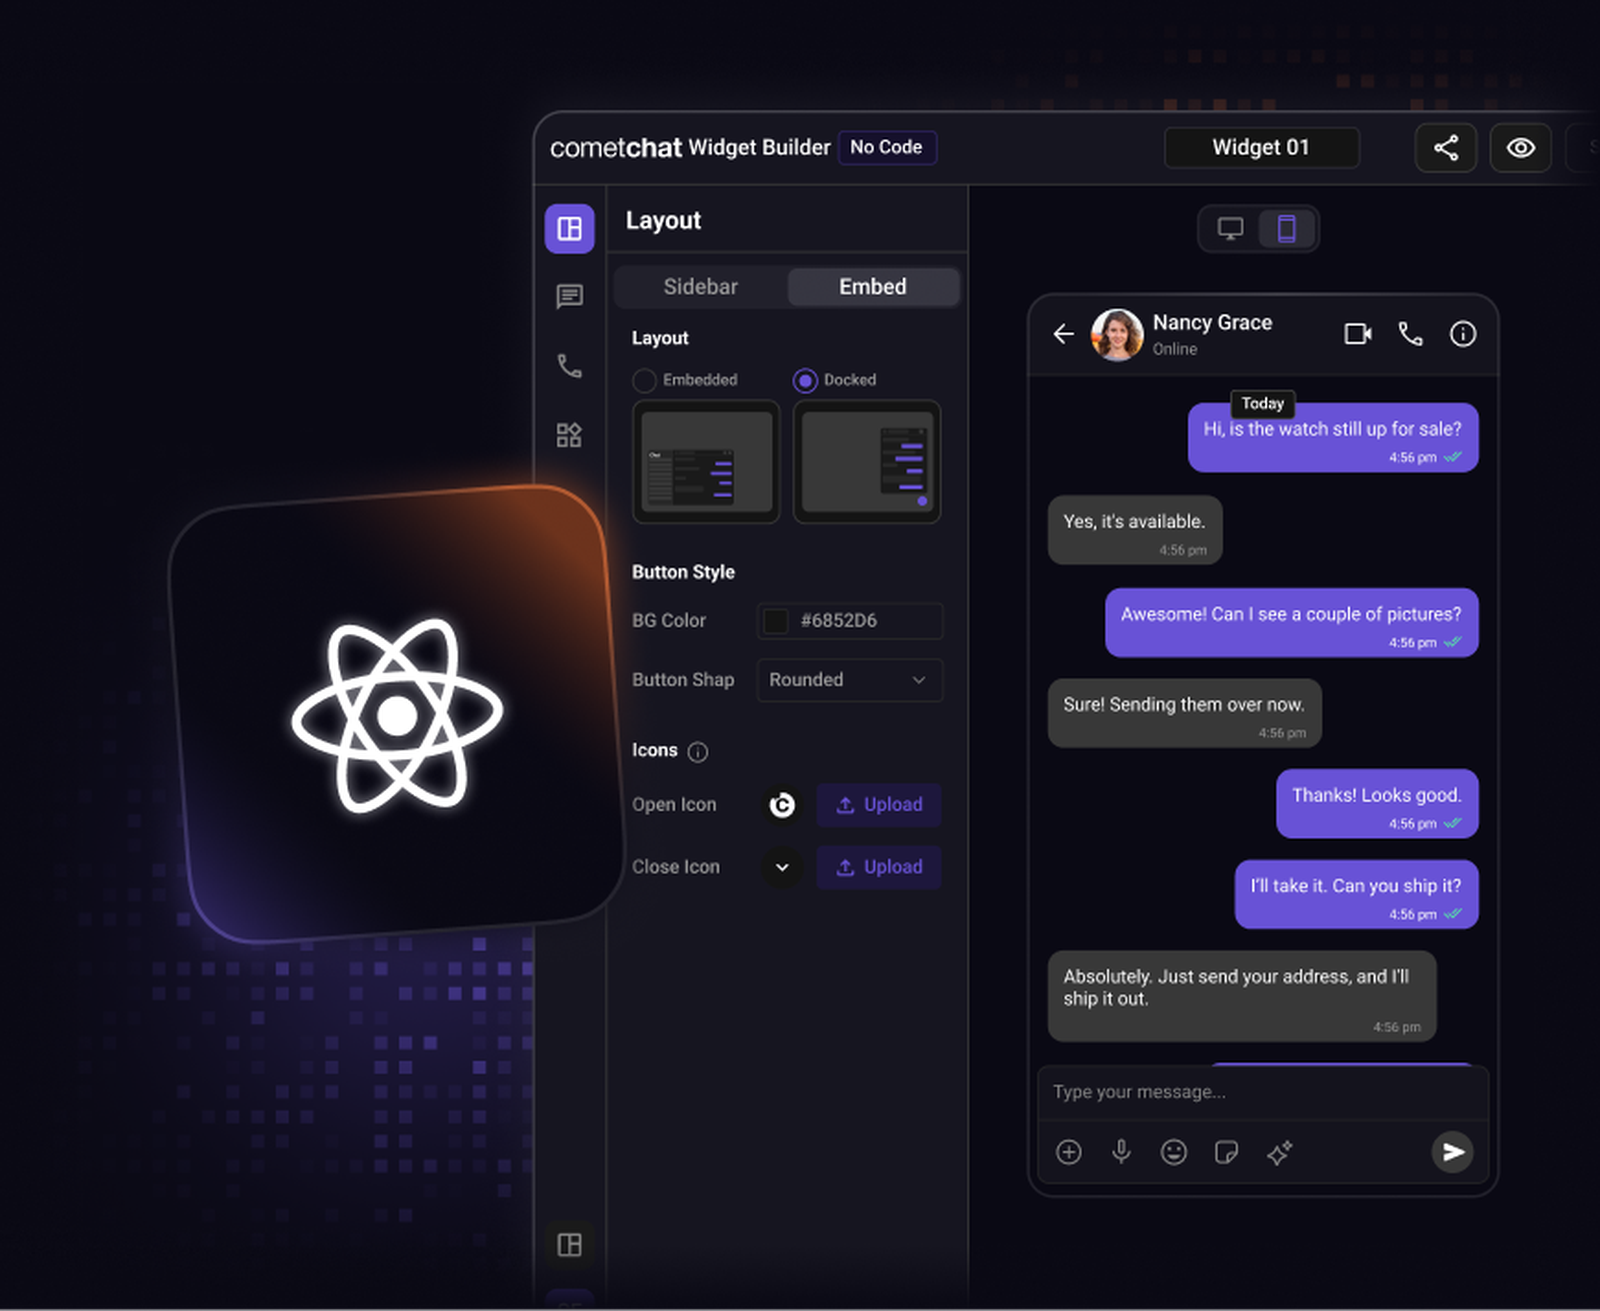
Step 1: Configure Your Chat UI in the Builder
Start by opening the CometChat UI Kit Builder.
The Builder provides a visual interface where you can configure your chat experience without writing UI code.
Here, you can adjust settings such as:
Chat layout
Messaging features
UI components
Visual styling
This allows you to preview the chat interface and experiment with different configurations before integrating it into your Next.js application.
Step 2: Configure Messaging Features
Inside the Builder, you can toggle the features that power your chat experience.
Core messaging capabilities include:
1:1 messaging
Group chats
Typing indicators
Read and delivery receipts
Message reactions
Media sharing
Mentions and tagging
You can also enable additional engagement features such as:
Polls and surveys
Custom message types
Notifications
Message translation
All of these features can be enabled or disabled directly from the Builder interface, without modifying your code.
Step 3: Customize Theme and Styling
To ensure the chat interface matches your product’s design system, the Builder allows you to customize key visual elements.
Colors - Define brand colors for message bubbles, headers, and UI elements.
Typography - Customize fonts and text styles across the chat interface.
Layout styling - Adjust spacing, backgrounds, and overall component appearance.
These options help your chat UI blend seamlessly with your existing Next.js application.
Step 4: Export the Builder Code
Once your chat interface is configured, you can export the generated code from the Builder.
The exported package typically includes:
React UI components
Chat configuration settings
Theme configuration
Layout structure
Since these components are built on top of the React UI Kit, they integrate smoothly into your Next.js project.
Step 5: Integrate the Chat UI into Your Next.js App
After exporting the code, you can integrate it into your Next.js project.
Install the required dependencies
Import the chat UI components
Add the exported components into your Next.js application.
Initialize the CometChat SDK
Before rendering the chat interface, initialize the CometChat SDK.
Render the Chat Interface
Finally, render the chat UI inside a page or component.
Once initialized, your application will be able to send and receive messages in real time.
Build Chat into Your Next.js App Faster
Building chat from scratch can involve assembling many UI components and configuring complex messaging behavior.
The CometChat UI Kit Builder for Next.js simplifies this process.
Instead of manually wiring components, you can:
Design the chat interface visually
Configure messaging features
Customize themes and layouts
Export ready-to-use components
This allows developers to move quickly from prototype to production-ready chat inside their Next.js applications.
And because the UI is built on top of CometChat’s messaging infrastructure, it’s designed to scale as your application grows.