This tutorial is outdated. We're currently working on an updated version. In the meantime, for instructions on building a chat app using CometChat, please visit our documentation.
App and web development have come a long way over the last few years. We use a lot of chat applications every day, including Facebook, Twitter, WhatsApp, Linkedin, and Messenger. One of the most widely used features is live chat, voice and video calling. Using the CometChat communications SDK and Firebase backend services, and Ionic React, you will learn how to build one of the best chat app on the internet with minimal effort.
Follow along the steps to build a Ionic chat app that will allow users:
Users
1. A way for end-users to signup, login, and sign out (email & password is sufficient)
2. A way for users to create a short profile.
Chat
1. Use the official CometChat Ionic SDK to configure the following -
List of Users/Contacts is visible to all users with a search bar
All users can text chat and share images, ...
All users can initiate voice & video call each other and groups
Users can create groups and add/remove other users
Group chat via text, voice, and video must be enabled for all users.
Include some chat features like unread message count, typing indicators, and read receipts
2. Login the logged-in user to CometChat
3. Customize UI to a user friendly and attractive state
4. Add API call when a user registers so that the user is created in CometChat
Prerequisites
To follow this tutorial, you must have a degree of understanding of the general use of React, Ionic, Capacitor. This will help you to improve your understanding of this tutorial.
Step 1: Installing the App Dependencies
Step 1: Make sure Node.js installed on your machine.
Step 2: Capacitor CLI with version 2.4.1 must be installed globally on your machine.
Step 3: Install Ionic CLI globally. You can install the latest version of it.
Step 4: Create a new Ionic project by following Ionic documentation and Capacitor documentation. The project’s name could be anything, for example IonicChatApp, etc.
Step 5: In this project, we need to use the following libraries. You can following the corresponding links to install them in our project.
Firebase SDK (In this project we use Firebase - version 8.9.1). You can install the Firebase SDK with that version by running the following statement.
npm install --save firebase@8.9.1
Step 2: Configuring CometChat SDK
Create your CometChat account.
Add real-time chat with minimal effort using CometChat
From the dashboard, add a new app called "ionic-chat-app".
Select this newly added app from the list.
From the Quick Start copy the APP_ID, REGION, and AUTH_KEY, which will be used later.
Also, copy the REST_API_KEY from the API & Auth Key tab.
Navigate to the Users tab, and delete all the default users and groups leaving it clean (very important).
Create a file called **env** in the root folder of your project.
Import and inject your secret keys in the **env** file containing your CometChat and Firebase in this manner.
REACT_APP_FIREBASE_API_KEY=xxx-xxx-xxx-xxx-xxx-xxx-xxx-xxx
REACT_APP_FIREBASE_AUTH_DOMAIN=xxx-xxx-xxx-xxx-xxx-xxx-xxx-xxx
REACT_APP_FIREBASE_STORAGE_BUCKET=xxx-xxx-xxx-xxx-xxx-xxx-xxx-xxx
REACT_APP_COMETCHAT_APP_ID=xxx-xxx-xxx-xxx-xxx-xxx-xxx-xxx
REACT_APP_COMETCHAT_REGION=xxx-xxx-xxx-xxx-xxx-xxx-xxx-xxx
REACT_APP_COMETCHAT_AUTH_KEY=xxx-xxx-xxx-xxx-xxx-xxx-xxx-xxx
As mentioned above, you need to install Capacitor CLI with version 2.4.1
npm install -g @capacitor/cli@2.4.1Install Ionic
npm install -g @ionic/clicd to your root folder and hit npm i to install the packages.
Run the following statement.
cap syncRun cd to the ios/App folder then run pod install to install the pods. Once pods are installed run cd .. to go back to the root folder.
build the project by running the following statement.
ionic buildCopy the build folder to your native platform
cap copyMake sure to include .env file in your gitIgnore file from being exposed online.
Run the project by using Android Studio/Xcode. Fore more information you can refer to the Ionic documentation
Step 3: Setting Up Firebase Project
According to the requirements of the Ionic chat application, you need to let users create a new account and login to the application, Firebase will be used to achieve that. Head to Firebase to create a new project and activate the email and password authentication service. This is how you do it:
To begin using Firebase, you’ll need a Gmail account. Head over to Firebase and create a new project.
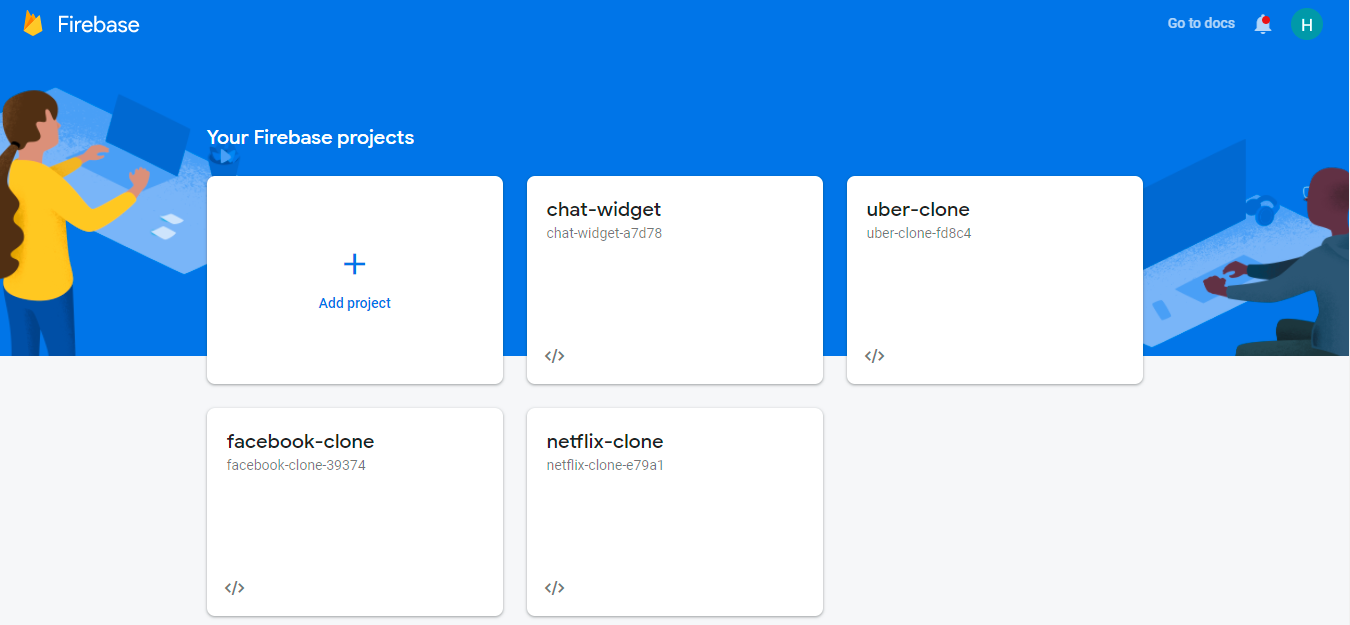
Firebase
Firebase provides support for authentication using different providers. For example, Social Auth, phone numbers, as well as the standard email and password method. Since you will be using the email and password authentication method in this tutorial, you need to enable this method for the project you created in Firebase, as it is by default disabled.
Under the authentication tab for your project, click the sign-in method and you should see a list of providers currently supported by Firebase.
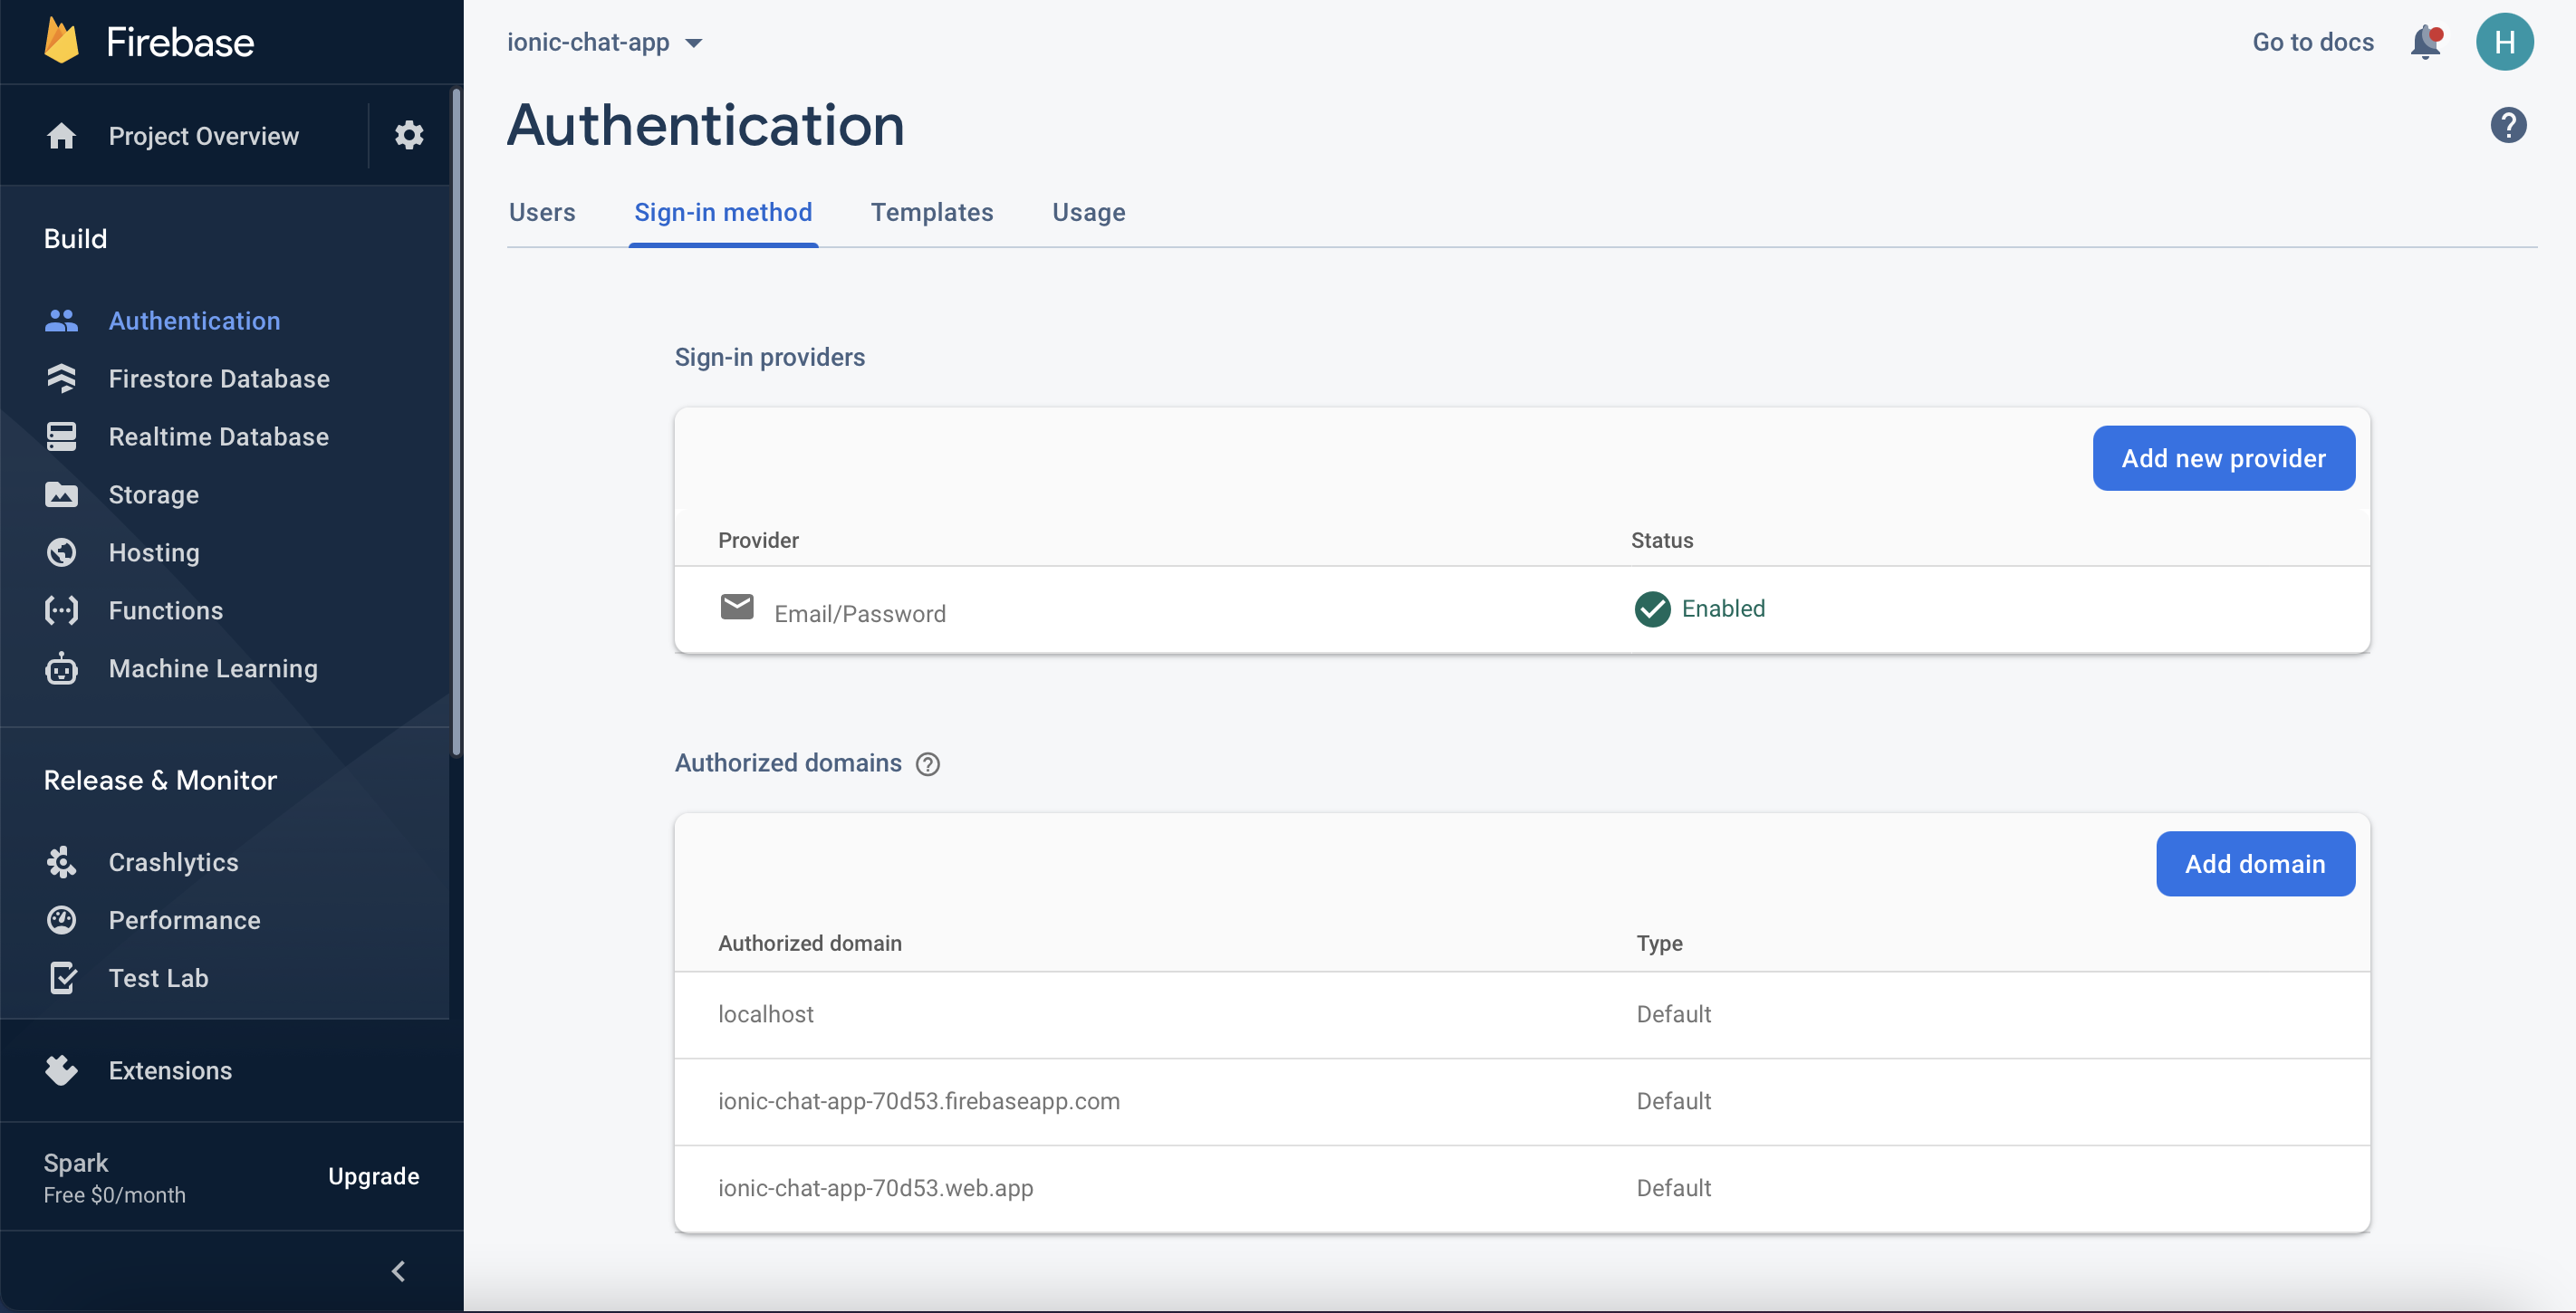
Firebase Authentication
Next, click the edit icon on the email/password provider and enable it.
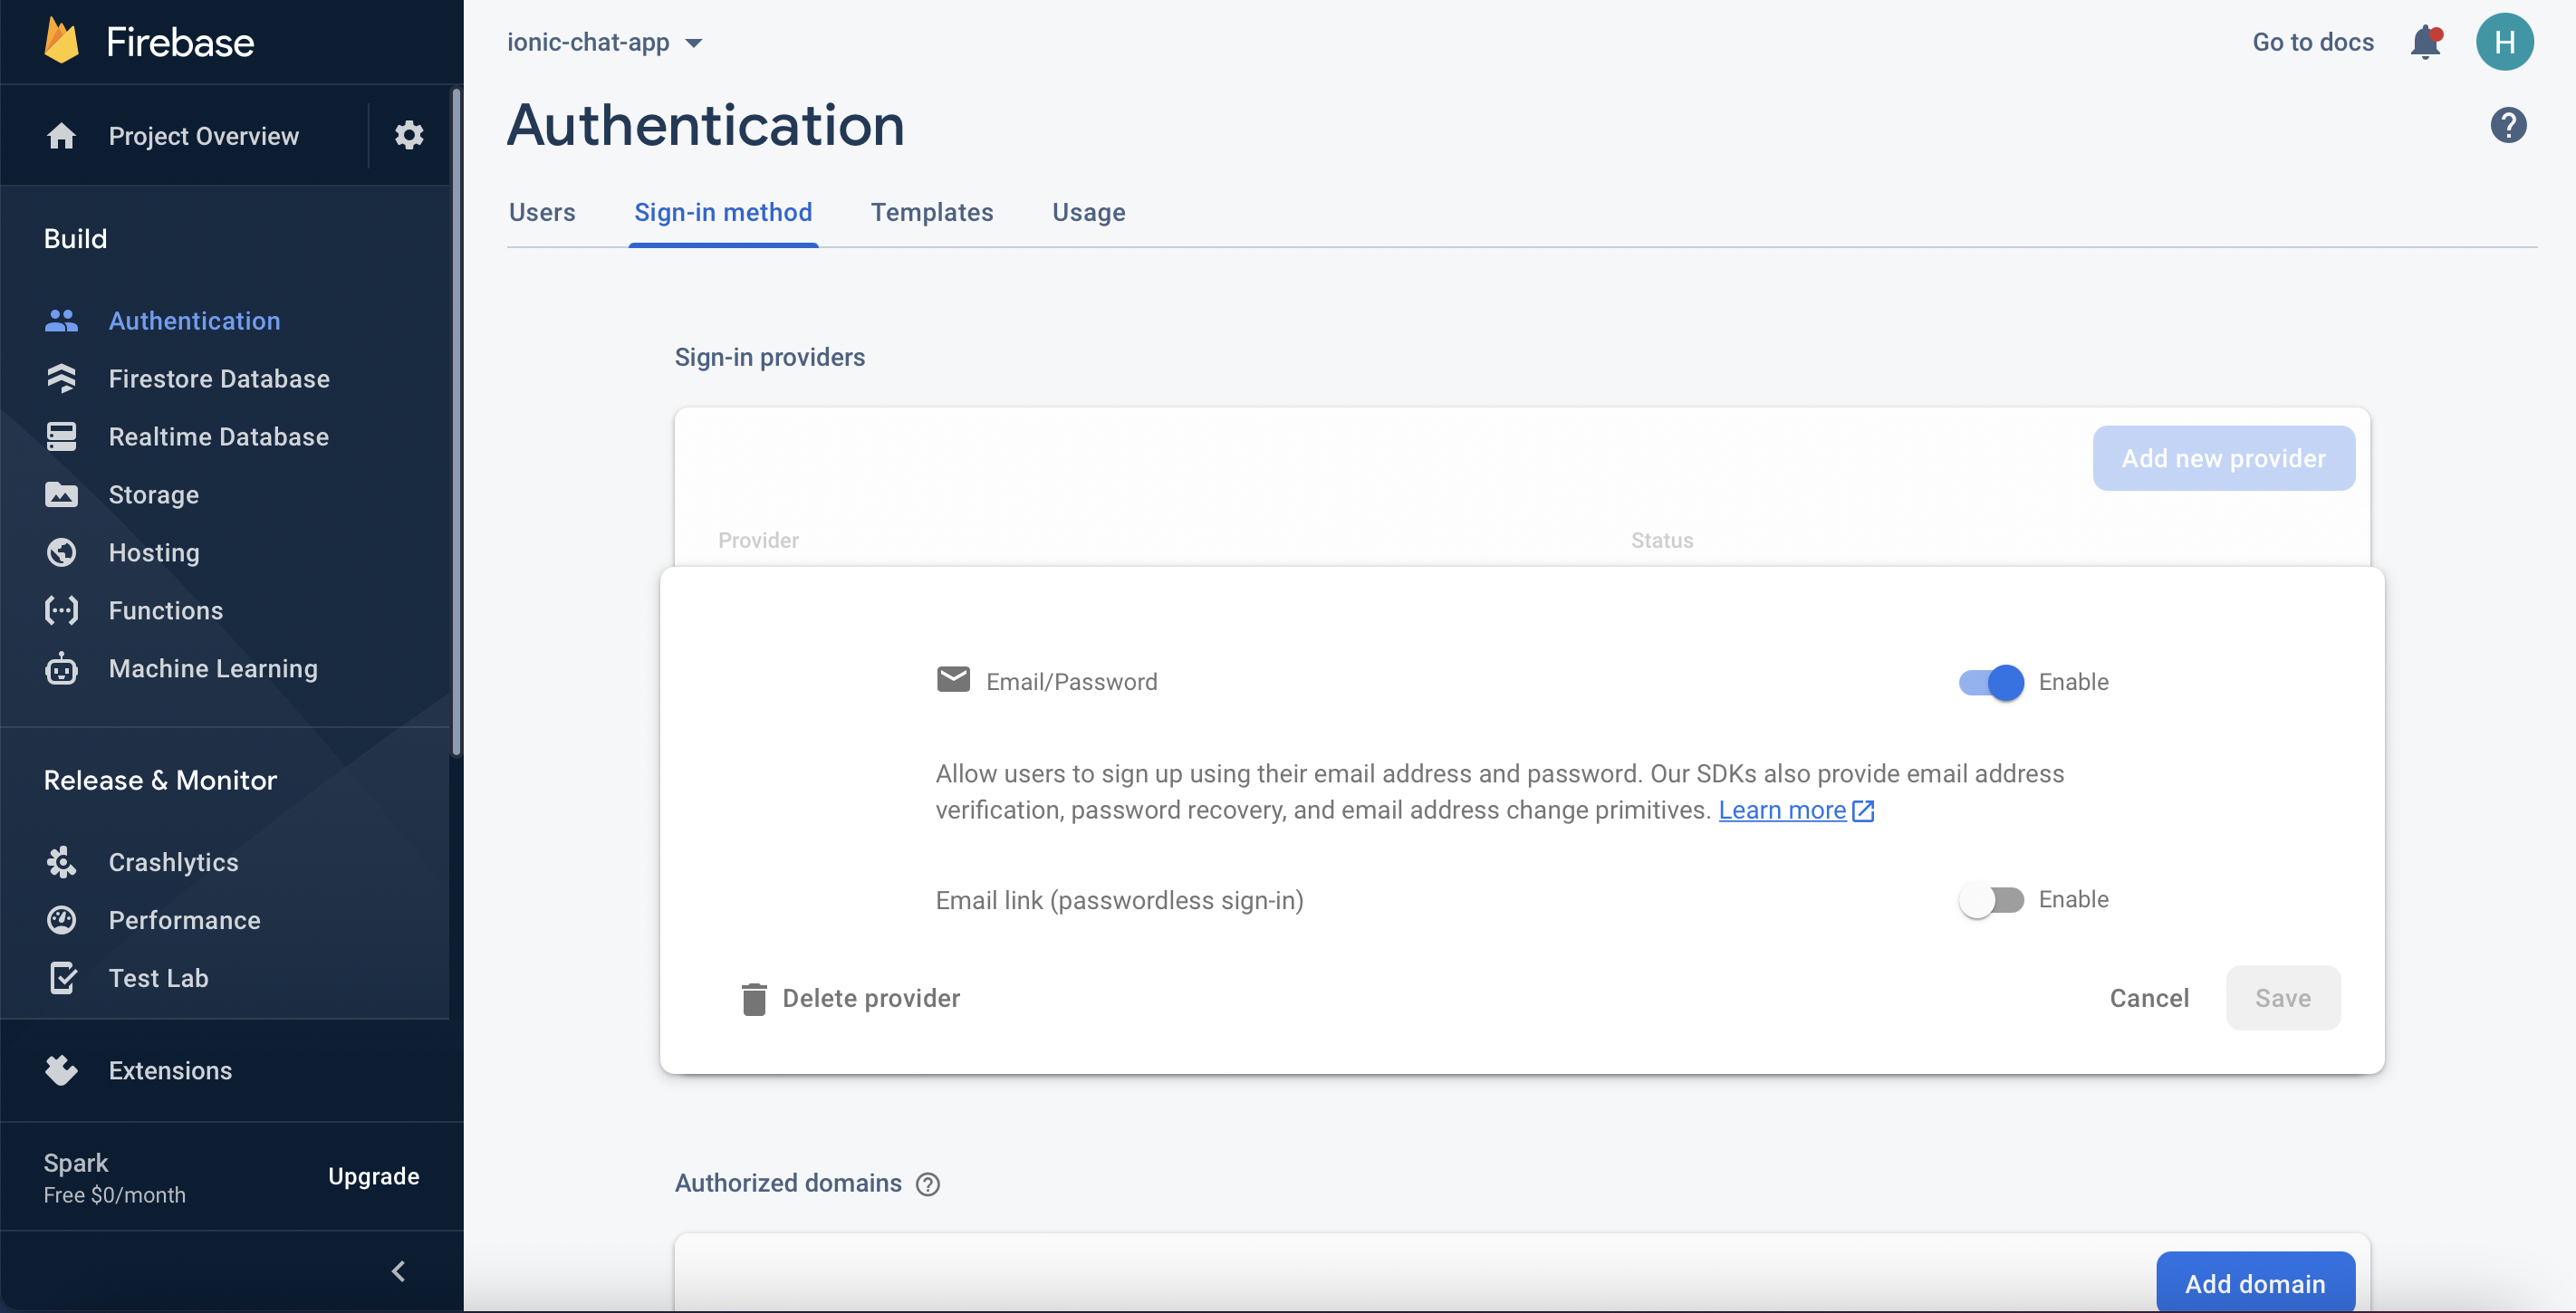
Enable Firebase Authentication with Email and Password
Now, you need to go and register your application under your Firebase project. On the project’s overview page, select the add app option and pick web as the platform.
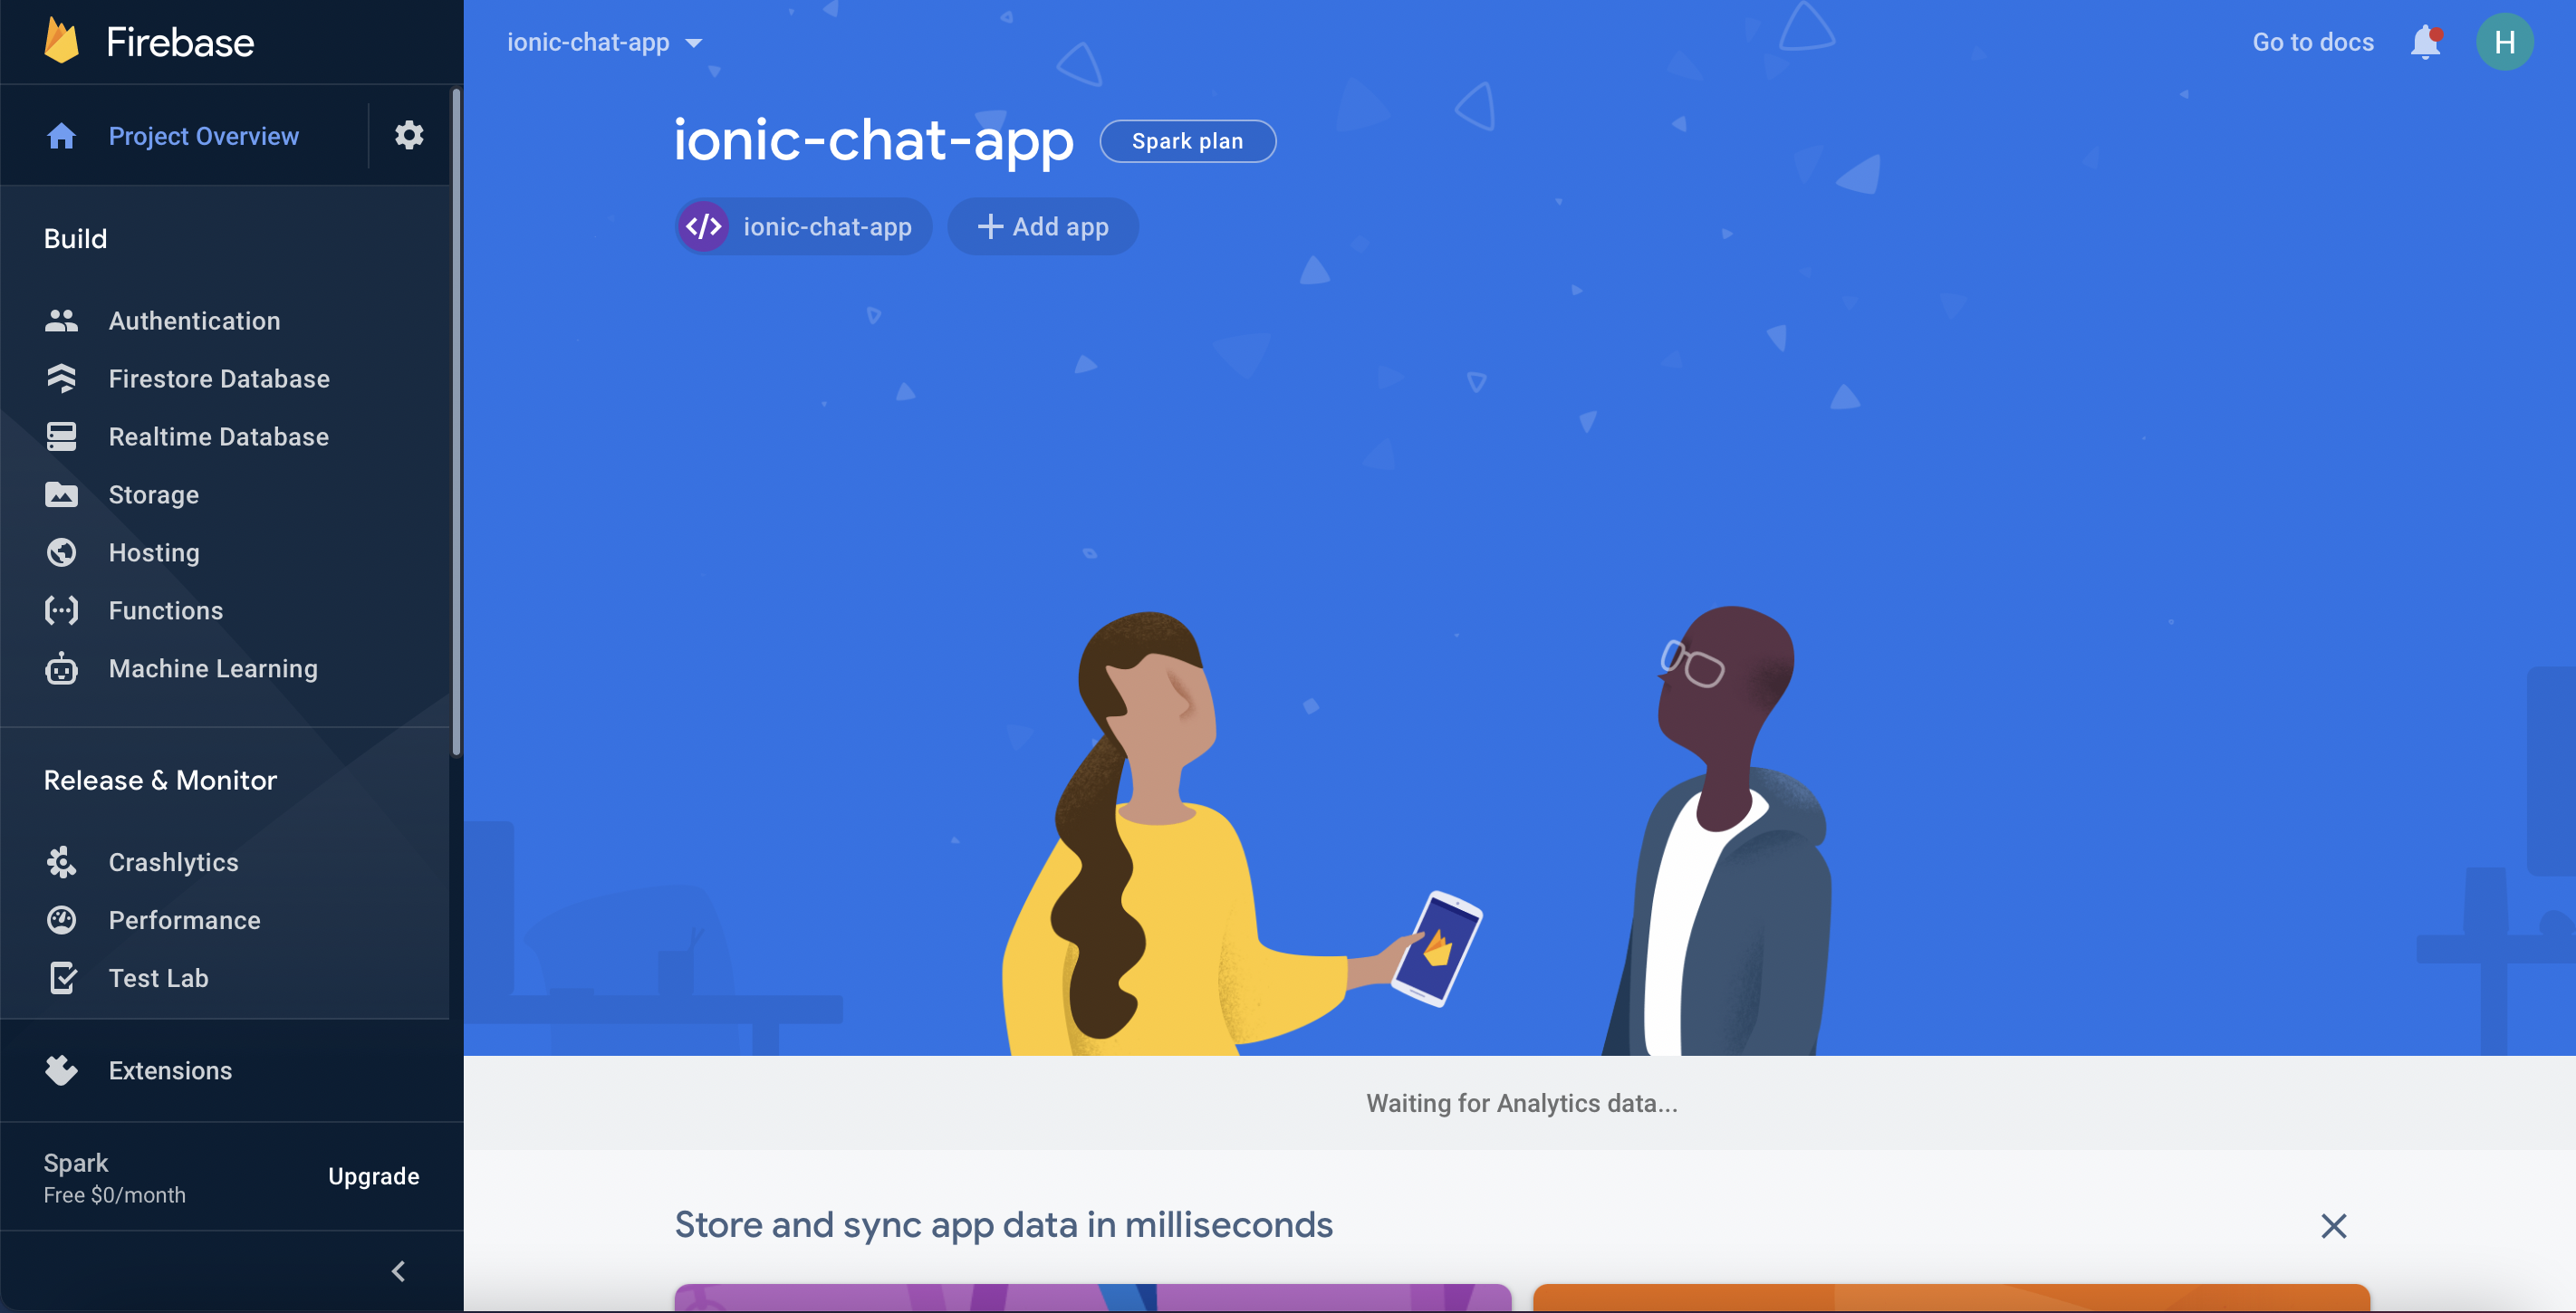
Firebase Dashboard
Once you’re done registering the application, you’ll be presented with a screen containing your application credentials.
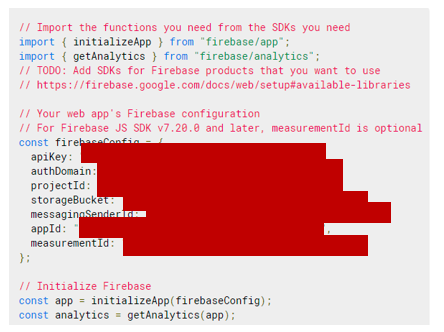
Firebase Credentials
Please update your created .env file with the above corresponding information. Congratulations, now that you're done with the installations, let's do some configurations.
Step 4: Initializing CometChat for the Application
The App.tsx File
The below codes initialize CometChat in your app before it spins up. The App.tsx file uses your CometChat API Credentials. We will get CometChat API Credentials from the .env file. Please do not share your secret keys on GitHub.
Actually, App.tsx does not contain only the above code. It also contains other business logic of the application. The full source code of App.tsx file can be found here.
Step 5: Create the Permissions for the Application
In this application, we need to provide the calling features. For this reason, the user needs to provide some permissions for the application such as accessing the camera, recording video, writing/reading to external storage, and so on. Because we are wanting the application to run on both Android. Therefore, this section will help you know how to make the application request permissions from the end-users.
For Android, you need to write the “getPermissions” function and then call it inside the “useEffect” of the App.js file. You can refer to the code snippet below for more information.
*Note: If you are using Capacitor - version 2.4.1. The NSPhotoLibraryUsageDescription permission will be added by default.
Step 6: Configuring the Firebase File
You need to create the “firebase.ts” file inside your src folder. This file is responsible for interfacing with Firebase authentication. Also, it makes ready our google authentication service provider enabling us to sign in with google. Secret keys will be retrieved from the env file. As mentioned above, please do not share your secret keys on GitHub.
Step 7: Setting Up Context.js File
In some cases, we need to share the state between components without passing data down at every level. For this reason, we can avoid props drilling. To achieve that, we can use React Context API. Please create a file which is called “context.ts” file inside your src folder. You can get the source code of the context.ts file here.
Step 8: Project Structure
The image below reveals the project structure. Make sure you see the folder arrangement before proceeding. Now, let's make the rest of the project components as seen in the image above.
In this project’s structure, we’ve created the following files/folders:
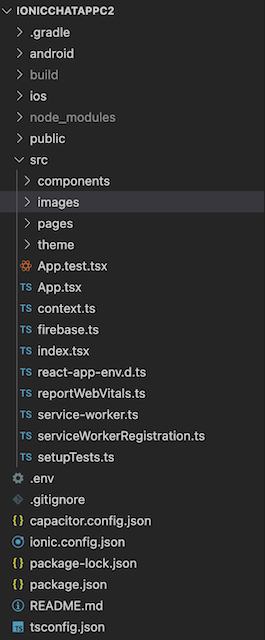
Project Structure
components: This folder stores components that will be used in the application.
pages: This folder contains pages of the application such as the login page, register page, chat page and so on.
images: This folder contains images that will be used in the application.
firebase.ts: This file helps us initialize Firebase and use it in different places of the application.
context.ts: This file helps us store the state that will be shared across all components without passing down at every level. For this reason, we can avoid props drilling.
Configuring Images for the Application
As mentioned above, we need to create a folder which is called “images”. This folder is used to store images in the application. To get images for the application, you can get from here.
Configuring Styling for the Application
Inside the project structure, you need to create an App.css file inside the “theme” folder and paste the codes here. the App.css file will contain all CSS of the application.
The Private Route Component
As mentioned above, to build the Ionic chat app, we are using the Ionic React. Therefore, React Router library is used to help us navigate between pages. However, we need to find a solution to prevent the end-user accesses some routes if he/she has not logged in yet. To achieve that, we need to create the Private Route component. The Private Route component will check the authenticated user existed in the local storage. if the data existed in the local storage, it means that the end-user can access restricted routes and vice versa. The full source code of the Private Route component can be found here.
The Login Page
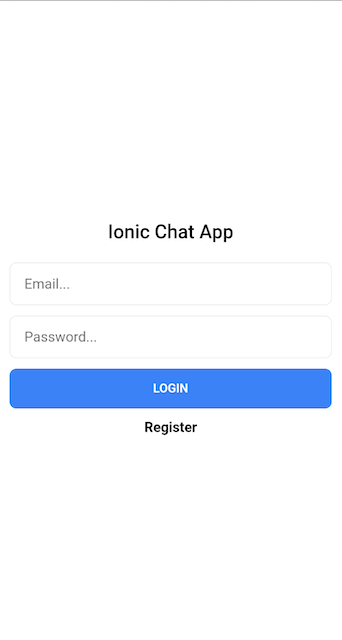
The Login Page
This page is responsible for authenticating our users using the Firebase google authentication service. It accepts the user credentials and either signs him up or in, depending on if he is new to our application. See the code below and observe how our app interacts with Firebase and the CometChat SDK. The full source code can be found here.
Before calling any functions from the CometChat service, please make sure that. CometChat was initialized successfully in your application. After the user has logged in successfully. He/She will be redirected to the home page. In this case, we need to store the authenticated user in the local storage for further usages. You can refer to the code snippet below to understand how to log in to the CometChat.
The Sign Up Page
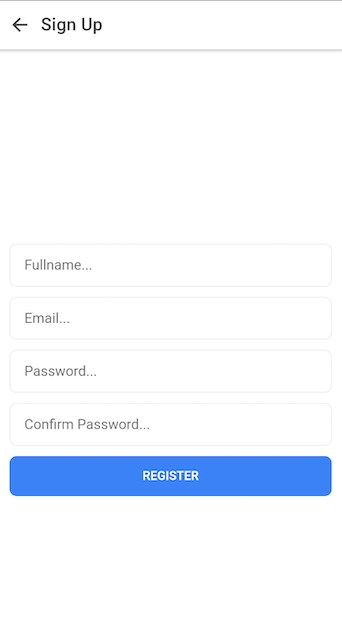
The SignUp Page
The sign-up page will help end-users to register new accounts. This component will do two things. The first thing is to register new accounts on Firebase by using the Firebase authentication service. Aside from that, it also registers new accounts on CometChat by using the CometChat SDK. The full source code can be found here.
To create a new account from CometChat, you need to create a new user object based on the User model from CometChat. Following that, the created user will be registered on CometChat by calling the “registerUser” function from the CometChat service. Please do not forget to pass your CometChat auth key as the second parameter You can refer to the below code snippet for more information.
The Home Page
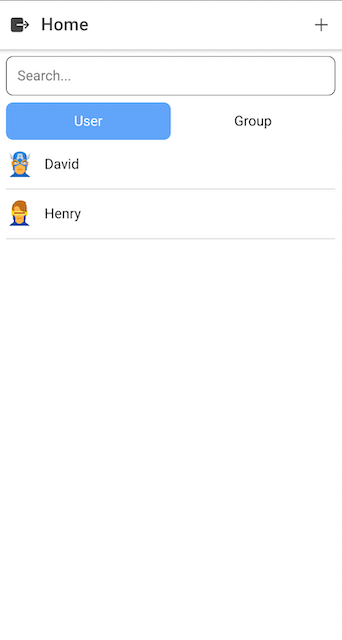
Home Page - Search Users
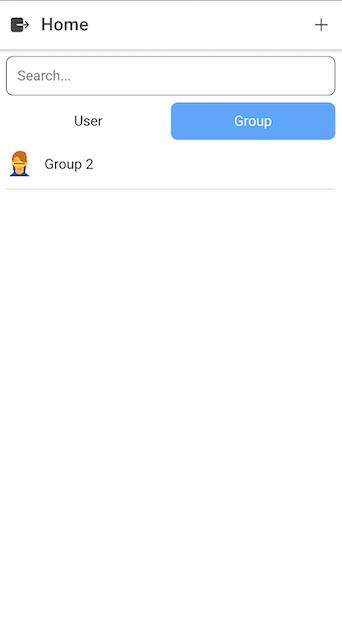
Home Page - Search Groups
As you can see in figure 9 and figure 10, the home page will show the list of users and groups. We have a search box in which the user can type some keywords that will be used to search the users/groups. On the other hand, the UI is providing two buttons - Users & Groups. It means that, if the user chooses the “Users” option, they want to view the list of users and vice versa. The full source code of the Home component can be found here.
To search the list of users/groups, we need to call the CometChat service. In this case, we define two functions. The first one is the “searchUsers” function and the second one is the “searchGroups”. Both of them build the request payload by using the builder design pattern and call the “fetchNext” function from the CometChat service to fetch the corresponding results, then display the results on the UI by updating the state. Aside from that, we also need to show unread count message for each user/group. We can use cometChat.getUnreadMessageCountForAllUsers to get unread messages counts for just the users and cometChat.getUnreadMessageCountForAllGroups to get unread messages counts for just the groups. Therefore, we can increase the UX. On the other hand, we will add a message listener to listen for real time message if the end-users are on the home page and then update the unread messages counts respectively. You can refer to the below code snippet for more information.
On the right side of the home page header, you can see the plus icon. If the user clicks on that icon, the application redirects the user to the create a group page, and on that page, the user will be able to create a new public group for the application. The public groups will be displayed on the group's section of the home page in which other users can view and join any groups they want. Creating a new group will be discussed in the following section.
On the other hand, if the user selects an item from the list, we will update the “selectedConversation” state using React Context API so we can access that state from different places without passing it down manually at every level. If the user selects a group, and he/she has not joined that group before, the “joinGroup” function will be executed to let the user join the selected group. After selecting an item from the list, the application will redirect the user to the chat page. The chat page, and create a new public group page will be discussed in the following section. You can refer to the below code snippet for more information.
The Create Group Page
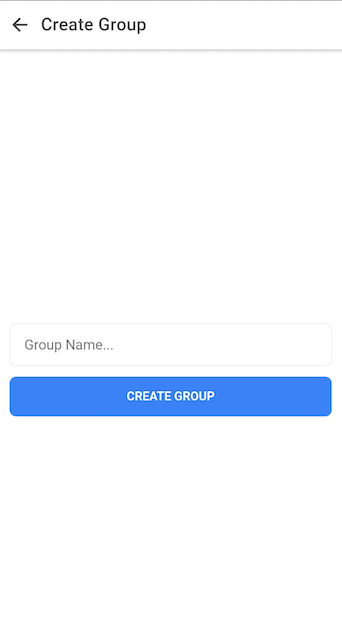
The Create Group Page
To create a new group, the user needs to input the group’s name and then clicks on the “Create Group” button. After that, the application calls the CometChat service to create a new public group. The full source code of creating a new group can be found here.
As mentioned above, we need to call the CometChat service to create a new group. For this reason, the “createGroup” function is created to achieve that. Inside that function, we define some information for the group such as the group’s name, group’s icon, group's type, group’s uid - using the uuid library. You can refer to the below code snippet for more information.
The Chat Page
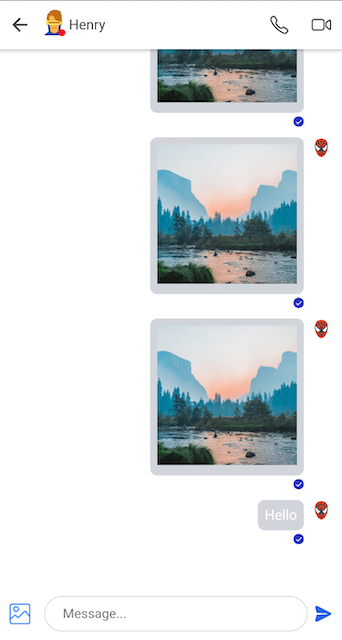
The Chat Page
According to the requirements, the users can chat with each other or chat in groups. We are using Ionic to build our mobile application. It means that we are working with components. For this reason, we will create a single component, which is called, “Chat” to reuse for both private chat and group chat. The full source code can be found here.
We need to display the list of messages whenever the user chooses a conversation (private chat or group chat) and navigate to the chat page. The below steps need to be implemented:
Step 1: Define a state to store the list of messages.
Step 2: Define a function to load the list of messages from CometChat.
Step 3: Call that function by using useEffect hook.
Step 4: Transform the response before update the state.
Step 5: After updating the state, the component will be re-rendered, and the list of messages will be display on the UI.
...
const Chat: React.FC = () => {
  const history = useHistory();

  const { cometChat, user, selectedConversation, setCallType } = useContext(Context);

  const [messages, setMessages] = useState<any>([]);
  ...
  const messageRef = useRef<any>(null);
  const messageBottomRef = useRef<any>(null);
  ...
  useEffect(() => {
    if (selectedConversation) {
      // get list of messages.
      getMessages();
      ...
    }
    ...
  }, [selectedConversation]);

  useEffect(() => {
    if (messages && messages.length !== 0) {
      // scroll to bottom.
      scrollToBottom();
    }
  }, [messages]);
  ...

  const scrollToBottom = () => {
    if (messageBottomRef && messageBottomRef.current) {
      messageBottomRef.current.parentNode.scrollTop = messageBottomRef.current.offsetTop;
    }
  }
  ...

  const getContentMessage = (message: any) => {
    if (message) {
      return message.text ? message.text : message.data && message.data.url ? message.data.url : null;
    }
    return null;
  };

  const transformMessages = (messages: any) => {
    if (messages && messages.length !== 0) {
      const transformedMessages = [];
      for (const message of messages) {
        const messageContent = getContentMessage(message);
        if (messageContent) {
          transformedMessages.push({
            id: message.id,
            text: messageContent,
            receiverId: message.receiverId,
            sender: {
              uid: message.sender.uid,
              avatar: message.sender.avatar ? message.sender.avatar : user.avatar
            },
            type: message.type,
            deliveredAt: message.deliveredAt,
            readAt: message.readAt
          });
        }
      }
      return transformedMessages;
    }
    return messages;
  };

  const getReceiverIdForMarkingAsRead = (message: any) => {
    if (message.receiverType === cometChat.RECEIVER_TYPE.USER) {
      return message.sender.uid;
    }
    return message.receiverId;
  };

  const sendReadBulkReceipts = (messages: any) => {
    if (messages && messages.length !== 0) {
      // get the last message.
      const lastMessage = messages[messages.length - 1];
      const receiverId = getReceiverIdForMarkingAsRead(lastMessage);
      cometChat.markAsRead(lastMessage.id, receiverId, lastMessage.receiverType, lastMessage.sender.uid).then();
    }
  };

  const getMessages = () => {
    const limit = 50;
    const messageRequestBuilder = new cometChat.MessagesRequestBuilder()
      .setCategories(["message"])
      .setLimit(limit)
    if (selectedConversation.contactType === 1) {
      messageRequestBuilder.setGUID(selectedConversation.guid);
    } else if (selectedConversation.contactType === 0) {
      messageRequestBuilder.setUID(selectedConversation.uid);
    }

    const messagesRequest = messageRequestBuilder.build();

    messagesRequest
      .fetchPrevious()
      .then((messages: any) => {
        setMessages(() => transformMessages(messages));
        sendReadBulkReceipts(messages);
        scrollToBottom();
      })
      .catch((error: any) => { });
  }

  const getReceiverId = () => {
    if (selectedConversation && selectedConversation.guid) {
      return selectedConversation.guid;
    }
    if (selectedConversation && selectedConversation.uid) {
      return selectedConversation.uid;
    }
    return null;
  };

  const getReceiverType = () => {
    if (selectedConversation && selectedConversation.guid) {
      return cometChat.RECEIVER_TYPE.GROUP;
    }
    return cometChat.RECEIVER_TYPE.USER;
  };
  ...

  const sendMessage = (e: any) => {
    if (e.key === 'Enter') {
      // get the value from input.
      const message = messageRef.current.value;
      if (message) {
        // call cometchat api to send the message.
        const textMessage = new cometChat.TextMessage(
          selectedConversation.contactType === 0 ? selectedConversation.uid : selectedConversation.guid,
          message,
          selectedConversation.contactType === 0 ? cometChat.RECEIVER_TYPE.USER : cometChat.RECEIVER_TYPE.GROUP
        );

        cometChat.sendMessage(textMessage).then(
          (msg: any) => {
            // reset input box.
            messageRef.current.value = '';
            // append the new message to "messages" state.
            setMessages((prevMessages: any) => [...prevMessages, {
              id: uuidv4(),
              text: message,
              receiverId: getReceiverId(),
              sender: {
                uid: user.uid,
                avatar: user.avatar
              },
              isRight: true
            }]);
            // scroll to bottom.
            scrollToBottom();
            // send end typing notification.
            sendEndTypingNotification();
          },
          (error: any) => {
            alert('Cannot send you message, please try later');
          }
        );
      }
    }
  }

  const isRight = (message: any) => {
    if (message.isRight !== null && message.isRight !== undefined) {
      return message.isRight;
    }
    return message.sender.uid === user.uid;
  }
  ...

  if (!selectedConversation) {
    history.push('/');
  }
  ...

  return (
    <>
      <IonHeader>
        <IonToolbar>
          <IonButtons slot="start">
            <IonBackButton defaultHref="/" />
          </IonButtons>
          <IonButtons slot="end">
            <IonButton onClick={startAudioCall}>
              <IonIcon slot="icon-only" icon={callOutline} />
            </IonButton>
          </IonButtons>
          <IonButtons slot="end">
            <IonButton onClick={startVideoCall}>
              <IonIcon slot="icon-only" icon={videocamOutline} />
            </IonButton>
          </IonButtons>
          {selectedConversation && selectedConversation.contactType === 1 && <IonButtons slot="end">
            <IonButton onClick={goToManageGroup} >
              <IonIcon slot="icon-only" icon={settings} />
            </IonButton>
          </IonButtons>}
          <div className='chatbox__title'>
            <div className='chatbox__title-avatar-container'>
              <img src={selectedConversation?.avatar ? selectedConversation?.avatar : selectedConversation?.icon ? selectedConversation?.icon : ''} alt={selectedConversation?.name} />
              {selectedConversation && selectedConversation.contactType === 0 && <span className={`chatbox__title-status ${isUserOnline ? 'chatbox__title-status--online' : 'chatbox__title-status--offline'}`}></span>}
            </div>
            <span>{selectedConversation?.name}</span>
          </div>
        </IonToolbar>
      </IonHeader>
      <div className="chatbox">
        <div className="message__container">
          {messages && messages.length !== 0 && messages.map((message: any) => (
            <Message key={message.id} message={message.text} messageType={message.type} deliveredAt={message.deliveredAt} readAt={message.readAt} senderId={message.sender.uid} avatar={message.sender.avatar} isRight={isRight(message)} />
          ))}
          <div ref={messageBottomRef} id="message-bottom"></div>
        </div>
        <div className="chatbox__input">
          <span ref={typingRef} className='hide'>Someone is typing...</span>
          <div>
            <img src={imageIcon} alt='file-chooser' className='chatbox__file-chooser' onClick={toggleActionsSheet(true)} />
            <input type="url" placeholder="Message..." onKeyDown={sendMessage} ref={messageRef} onChange={onInputChanged} onBlur={onInputBlured} />
            <svg fill="#2563EB" className="crt8y2ji" width="20px" height="20px" viewBox="0 0 24 24"><path d="M16.6915026,12.4744748 L3.50612381,13.2599618 C3.19218622,13.2599618 3.03521743,13.4170592 3.03521743,13.5741566 L1.15159189,20.0151496 C0.8376543,20.8006365 0.99,21.89 1.77946707,22.52 C2.41,22.99 3.50612381,23.1 4.13399899,22.8429026 L21.714504,14.0454487 C22.6563168,13.5741566 23.1272231,12.6315722 22.9702544,11.6889879 C22.8132856,11.0605983 22.3423792,10.4322088 21.714504,10.118014 L4.13399899,1.16346272 C3.34915502,0.9 2.40734225,1.00636533 1.77946707,1.4776575 C0.994623095,2.10604706 0.8376543,3.0486314 1.15159189,3.99121575 L3.03521743,10.4322088 C3.03521743,10.5893061 3.34915502,10.7464035 3.50612381,10.7464035 L16.6915026,11.5318905 C16.6915026,11.5318905 17.1624089,11.5318905 17.1624089,12.0031827 C17.1624089,12.4744748 16.6915026,12.4744748 16.6915026,12.4744748 Z" fillRule="evenodd" stroke="none"></path></svg>
          </div>
        </div>
      </div>
      ...
    </>
  );
};
...
According to the requirement, the application allows the user to attach files (images, videos). We need to provide a way for rendering image/video messages. As you can see in the above code snippet, we render messages by using the Message component. We have not talked about it yet. Please do not worry. We will discuss about it in the following section. The full source code of the Message component can be found here.
The next part is to figure out how to send a text message. After the user types something on the message composer and hits the send button. The process should look like this.
Step 1: Define a callback function when the user hits the send button on the UI.
Step 2: Inside that function, call the CometChat service to store the sent message.
Step 3: If the step 2 is a success, the state will be updated, the sent message will be append to the gifted chat UI.
...
const Chat: React.FC = () => {
  ...
  const { cometChat, user, selectedConversation, setCallType } = useContext(Context);

  const [messages, setMessages] = useState<any>([]);
  ...
  const messageRef = useRef<any>(null);
  const messageBottomRef = useRef<any>(null);
  ...
  const scrollToBottom = () => {
    if (messageBottomRef && messageBottomRef.current) {
      messageBottomRef.current.parentNode.scrollTop = messageBottomRef.current.offsetTop;
    }
  }
  ...

  const getReceiverId = () => {
    if (selectedConversation && selectedConversation.guid) {
      return selectedConversation.guid;
    }
    if (selectedConversation && selectedConversation.uid) {
      return selectedConversation.uid;
    }
    return null;
  };

  const getReceiverType = () => {
    if (selectedConversation && selectedConversation.guid) {
      return cometChat.RECEIVER_TYPE.GROUP;
    }
    return cometChat.RECEIVER_TYPE.USER;
  };
  ...

  const sendMessage = (e: any) => {
    if (e.key === 'Enter') {
      // get the value from input.
      const message = messageRef.current.value;
      if (message) {
        // call cometchat api to send the message.
        const textMessage = new cometChat.TextMessage(
          selectedConversation.contactType === 0 ? selectedConversation.uid : selectedConversation.guid,
          message,
          selectedConversation.contactType === 0 ? cometChat.RECEIVER_TYPE.USER : cometChat.RECEIVER_TYPE.GROUP
        );

        cometChat.sendMessage(textMessage).then(
          (msg: any) => {
            // reset input box.
            messageRef.current.value = '';
            // append the new message to "messages" state.
            setMessages((prevMessages: any) => [...prevMessages, {
              id: uuidv4(),
              text: message,
              receiverId: getReceiverId(),
              sender: {
                uid: user.uid,
                avatar: user.avatar
              },
              isRight: true
            }]);
            // scroll to bottom.
            scrollToBottom();
            ...
          },
          (error: any) => {
            alert('Cannot send you message, please try later');
          }
        );
      }
    }
  }
  ...
  const isRight = (message: any) => {
    if (message.isRight !== null && message.isRight !== undefined) {
      return message.isRight;
    }
    return message.sender.uid === user.uid;
  }

  return (
    <>
      <IonHeader>
        <IonToolbar>
          <IonButtons slot="start">
            <IonBackButton defaultHref="/" />
          </IonButtons>
          <IonButtons slot="end">
            <IonButton onClick={startAudioCall}>
              <IonIcon slot="icon-only" icon={callOutline} />
            </IonButton>
          </IonButtons>
          <IonButtons slot="end">
            <IonButton onClick={startVideoCall}>
              <IonIcon slot="icon-only" icon={videocamOutline} />
            </IonButton>
          </IonButtons>
          {selectedConversation && selectedConversation.contactType === 1 && <IonButtons slot="end">
            <IonButton onClick={goToManageGroup} >
              <IonIcon slot="icon-only" icon={settings} />
            </IonButton>
          </IonButtons>}
          <div className='chatbox__title'>
            <div className='chatbox__title-avatar-container'>
              <img src={selectedConversation?.avatar ? selectedConversation?.avatar : selectedConversation?.icon ? selectedConversation?.icon : ''} alt={selectedConversation?.name} />
              {selectedConversation && selectedConversation.contactType === 0 && <span className={`chatbox__title-status ${isUserOnline ? 'chatbox__title-status--online' : 'chatbox__title-status--offline'}`}></span>}
            </div>
            <span>{selectedConversation?.name}</span>
          </div>
        </IonToolbar>
      </IonHeader>
      <div className="chatbox">
        <div className="message__container">
          {messages && messages.length !== 0 && messages.map((message: any) => (
            <Message key={message.id} message={message.text} messageType={message.type} deliveredAt={message.deliveredAt} readAt={message.readAt} senderId={message.sender.uid} avatar={message.sender.avatar} isRight={isRight(message)} />
          ))}
          <div ref={messageBottomRef} id="message-bottom"></div>
        </div>
        <div className="chatbox__input">
          <span ref={typingRef} className='hide'>Someone is typing...</span>
          <div>
            <img src={imageIcon} alt='file-chooser' className='chatbox__file-chooser' onClick={toggleActionsSheet(true)} />
            <input type="url" placeholder="Message..." onKeyDown={sendMessage} ref={messageRef} onChange={onInputChanged} onBlur={onInputBlured} />
            <svg fill="#2563EB" className="crt8y2ji" width="20px" height="20px" viewBox="0 0 24 24"><path d="M16.6915026,12.4744748 L3.50612381,13.2599618 C3.19218622,13.2599618 3.03521743,13.4170592 3.03521743,13.5741566 L1.15159189,20.0151496 C0.8376543,20.8006365 0.99,21.89 1.77946707,22.52 C2.41,22.99 3.50612381,23.1 4.13399899,22.8429026 L21.714504,14.0454487 C22.6563168,13.5741566 23.1272231,12.6315722 22.9702544,11.6889879 C22.8132856,11.0605983 22.3423792,10.4322088 21.714504,10.118014 L4.13399899,1.16346272 C3.34915502,0.9 2.40734225,1.00636533 1.77946707,1.4776575 C0.994623095,2.10604706 0.8376543,3.0486314 1.15159189,3.99121575 L3.03521743,10.4322088 C3.03521743,10.5893061 3.34915502,10.7464035 3.50612381,10.7464035 L16.6915026,11.5318905 C16.6915026,11.5318905 17.1624089,11.5318905 17.1624089,12.0031827 C17.1624089,12.4744748 16.6915026,12.4744748 16.6915026,12.4744748 Z" fillRule="evenodd" stroke="none"></path></svg>
          </div>
        </div>
      </div>
      ...
    </>
  );
};
...
Besides sending a text message, the application allows the user to attach images, videos. To select a file from the devices, we need to use the Chooser and Image Picker library. This library helps us to choose different file types from our phones, tablets, and so on. You can refer to its documentation for more information. To upload files in the application, the below steps need to be followed:
Step 1: Make sure that the Chooser and Image Picker library have been installed.
Step 2: After the file is selected successfully, the application will call the CometChat service to send a media message.
Step 3: If step 3 is a success, we update the state and display the media on the UI.
...
import { Chooser } from '@ionic-native/chooser'
import { ImagePicker } from '@ionic-native/image-picker';
...
import imageIcon from '../images/image.png';

const Chat: React.FC = () => {
  const history = useHistory();

  const { cometChat, user, selectedConversation, setCallType } = useContext(Context);

  const [messages, setMessages] = useState<any>([]);
  ...
  const [selectedFile, setSelectedFile] = useState<any>(null);
  const [isActionSheetShown, setIsActionSheetShown] = useState<any>(false);

  const messageRef = useRef<any>(null);
  const messageBottomRef = useRef<any>(null);
  ...

  useEffect(() => {
    if (messages && messages.length !== 0) {
      // scroll to bottom.
      scrollToBottom();
    }
  }, [messages]);

  useEffect(() => {
    if (selectedFile) {
      sendMediaMessage();
    }
  }, [selectedFile]);

  const scrollToBottom = () => {
    if (messageBottomRef && messageBottomRef.current) {
      messageBottomRef.current.parentNode.scrollTop = messageBottomRef.current.offsetTop;
    }
  }
  ...

  const getReceiverId = () => {
    if (selectedConversation && selectedConversation.guid) {
      return selectedConversation.guid;
    }
    if (selectedConversation && selectedConversation.uid) {
      return selectedConversation.uid;
    }
    return null;
  };

  const getReceiverType = () => {
    if (selectedConversation && selectedConversation.guid) {
      return cometChat.RECEIVER_TYPE.GROUP;
    }
    return cometChat.RECEIVER_TYPE.USER;
  };

  const sendMediaMessage = () => {
    const receiverId = getReceiverId();
    const receiverType = getReceiverType();
    let messageType = cometChat.MESSAGE_TYPE.IMAGE;
    if (selectedFile.type.split('/')[0] === 'image') {
      messageType = cometChat.MESSAGE_TYPE.IMAGE;
    } else if (selectedFile.type.split('/')[0] === 'video') {
      messageType = cometChat.MESSAGE_TYPE.VIDEO;
    } else {
      messageType = cometChat.MESSAGE_TYPE.FILE;
    }
    const mediaMessage = new cometChat.MediaMessage(receiverId, selectedFile.file, messageType, receiverType);
    cometChat.sendMessage(mediaMessage).then((message: any) => {
      // append the new message to "messages" state.
      setMessages((prevMessages: any) => [...prevMessages, {
        id: uuidv4(),
        text: message.data.url,
        sender: {
          uid: user.uid,
          avatar: user.avatar
        },
        isRight: true,
        type: message.type
      }]);
      // scroll to bottom.
      scrollToBottom();
    }, (error: any) => {
    }
    );
  };
  ...

  const isRight = (message: any) => {
    if (message.isRight !== null && message.isRight !== undefined) {
      return message.isRight;
    }
    return message.sender.uid === user.uid;
  }
  ...

  if (!selectedConversation) {
    history.push('/');
  }

  const dataURItoBlob = (dataURI: any) => {
    const byteString = atob(dataURI.split(',')[1]);
    const mimeString = dataURI.split(',')[0].split(':')[1].split(';')[0];
    const ab = new ArrayBuffer(byteString.length);
    const ia = new Uint8Array(ab);
    for (let i = 0; i < byteString.length; i++) {
      ia[i] = byteString.charCodeAt(i);
    }
    const bb = new Blob([ab], { type: mimeString });
    return bb;
  }

  const selectDocument = () => {
    Chooser.getFile('all')
      .then((response: any) => {
        const blob_nw = dataURItoBlob(response.dataURI);

        const file = {
          file: blob_nw,
          type: response.mediaType,
          name: response.name
        };
        setSelectedFile(() => file);
      })
      .catch((error: any) => console.error(error));
  };

  const selectImage = () => {
    const options = {
      outputType: 1
    };
    ImagePicker.getPictures(options)
      .then((results: any) => {
        results[0] = 'data:image/jpeg;base64,' + results[0];
        const blob_nw = dataURItoBlob(results[0]);
        const date = new Date();
        const file = {
          file: blob_nw,
          type: 'image/jpeg',
          name: 'temp_img' + date.getTime()
        };
        setSelectedFile(() => file);
      }, (err) => {
      });
  };

  const toggleActionsSheet = (isActionsSheetShown: any) => () => {
    setIsActionSheetShown(() => isActionsSheetShown);
  }
  ...

  return (
    <>
      <IonHeader>
        <IonToolbar>
          <IonButtons slot="start">
            <IonBackButton defaultHref="/" />
          </IonButtons>
          <IonButtons slot="end">
            <IonButton onClick={startAudioCall}>
              <IonIcon slot="icon-only" icon={callOutline} />
            </IonButton>
          </IonButtons>
          <IonButtons slot="end">
            <IonButton onClick={startVideoCall}>
              <IonIcon slot="icon-only" icon={videocamOutline} />
            </IonButton>
          </IonButtons>
          {selectedConversation && selectedConversation.contactType === 1 && <IonButtons slot="end">
            <IonButton onClick={goToManageGroup} >
              <IonIcon slot="icon-only" icon={settings} />
            </IonButton>
          </IonButtons>}
          <div className='chatbox__title'>
            <div className='chatbox__title-avatar-container'>
              <img src={selectedConversation?.avatar ? selectedConversation?.avatar : selectedConversation?.icon ? selectedConversation?.icon : ''} alt={selectedConversation?.name} />
              {selectedConversation && selectedConversation.contactType === 0 && <span className={`chatbox__title-status ${isUserOnline ? 'chatbox__title-status--online' : 'chatbox__title-status--offline'}`}></span>}
            </div>
            <span>{selectedConversation?.name}</span>
          </div>
        </IonToolbar>
      </IonHeader>
      <div className="chatbox">
        <div className="message__container">
          {messages && messages.length !== 0 && messages.map((message: any) => (
            <Message key={message.id} message={message.text} messageType={message.type} deliveredAt={message.deliveredAt} readAt={message.readAt} senderId={message.sender.uid} avatar={message.sender.avatar} isRight={isRight(message)} />
          ))}
          <div ref={messageBottomRef} id="message-bottom"></div>
        </div>
        <div className="chatbox__input">
          <span ref={typingRef} className='hide'>Someone is typing...</span>
          <div>
            <img src={imageIcon} alt='file-chooser' className='chatbox__file-chooser' onClick={toggleActionsSheet(true)} />
            <input type="url" placeholder="Message..." onKeyDown={sendMessage} ref={messageRef} onChange={onInputChanged} onBlur={onInputBlured} />
            <svg fill="#2563EB" className="crt8y2ji" width="20px" height="20px" viewBox="0 0 24 24"><path d="M16.6915026,12.4744748 L3.50612381,13.2599618 C3.19218622,13.2599618 3.03521743,13.4170592 3.03521743,13.5741566 L1.15159189,20.0151496 C0.8376543,20.8006365 0.99,21.89 1.77946707,22.52 C2.41,22.99 3.50612381,23.1 4.13399899,22.8429026 L21.714504,14.0454487 C22.6563168,13.5741566 23.1272231,12.6315722 22.9702544,11.6889879 C22.8132856,11.0605983 22.3423792,10.4322088 21.714504,10.118014 L4.13399899,1.16346272 C3.34915502,0.9 2.40734225,1.00636533 1.77946707,1.4776575 C0.994623095,2.10604706 0.8376543,3.0486314 1.15159189,3.99121575 L3.03521743,10.4322088 C3.03521743,10.5893061 3.34915502,10.7464035 3.50612381,10.7464035 L16.6915026,11.5318905 C16.6915026,11.5318905 17.1624089,11.5318905 17.1624089,12.0031827 C17.1624089,12.4744748 16.6915026,12.4744748 16.6915026,12.4744748 Z" fillRule="evenodd" stroke="none"></path></svg>
          </div>
        </div>
      </div>
      <IonActionSheet
        isOpen={isActionSheetShown}
        onDidDismiss={toggleActionsSheet(false)}
        buttons={[{
          text: 'Select Image',
          handler: () => {
            selectImage();
          }
        }, {
          text: 'Select Document',
          handler: () => {
            selectDocument();
          }
        }]}
      >
      </IonActionSheet>
    </>
  );
};
...
One of the most important things about live chat is listening to the incoming messages in real-time. On the other hand, we need to show typing indicators, unread message count, and read receipts. To achieve that in our application, we will need support from the CometChat service. The CometChat service is providing a way to help us achieve those features. You can refer to the below images and code snippet for more information.
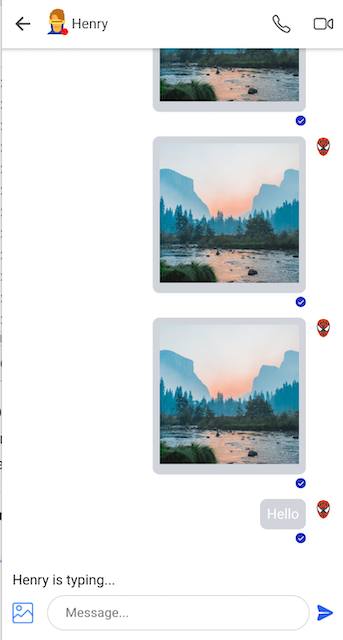
Typing Indicators
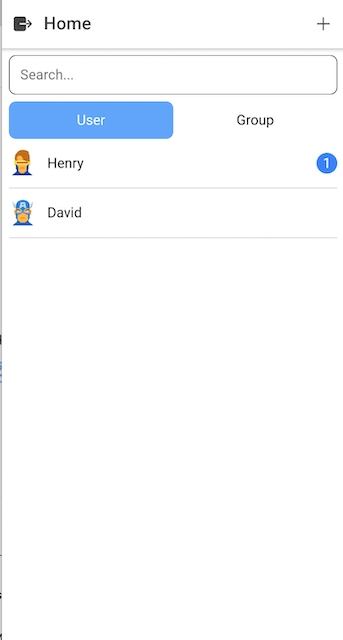
Unread Message Count

Read Receipts
*Note: The best practice is to remove the message listener when your component has been unmounted.
__Following that, we have a case. If David have opened a chat screen of Henry and then Henry has logged in to the application. The status on the header of the chat page should be changed from Offline to Online on David’s side. We can use the UserListener to get real-time events of user online/offline. You can refer to the below code snippet for more information.
The Calling Feature
In this section, we will need to provide a way to let the user make an audio/video call. It could be a private call between two users or a group call. The full source code can be found here. For more information about the calling features, you can refer to the CometChat documentation. A user can make a call to another user even that user is opening the chatbox, or not. For example, Henry is opening the hatbox and he would like to make a call with Anna. However, Anna is on another screen, she is not opening the chatbox. To increase the UX, we still want Anna can receive the call from Henry. For this reason, we will update the code in our main file, and it is App.js. Please refer to the below section for more information.
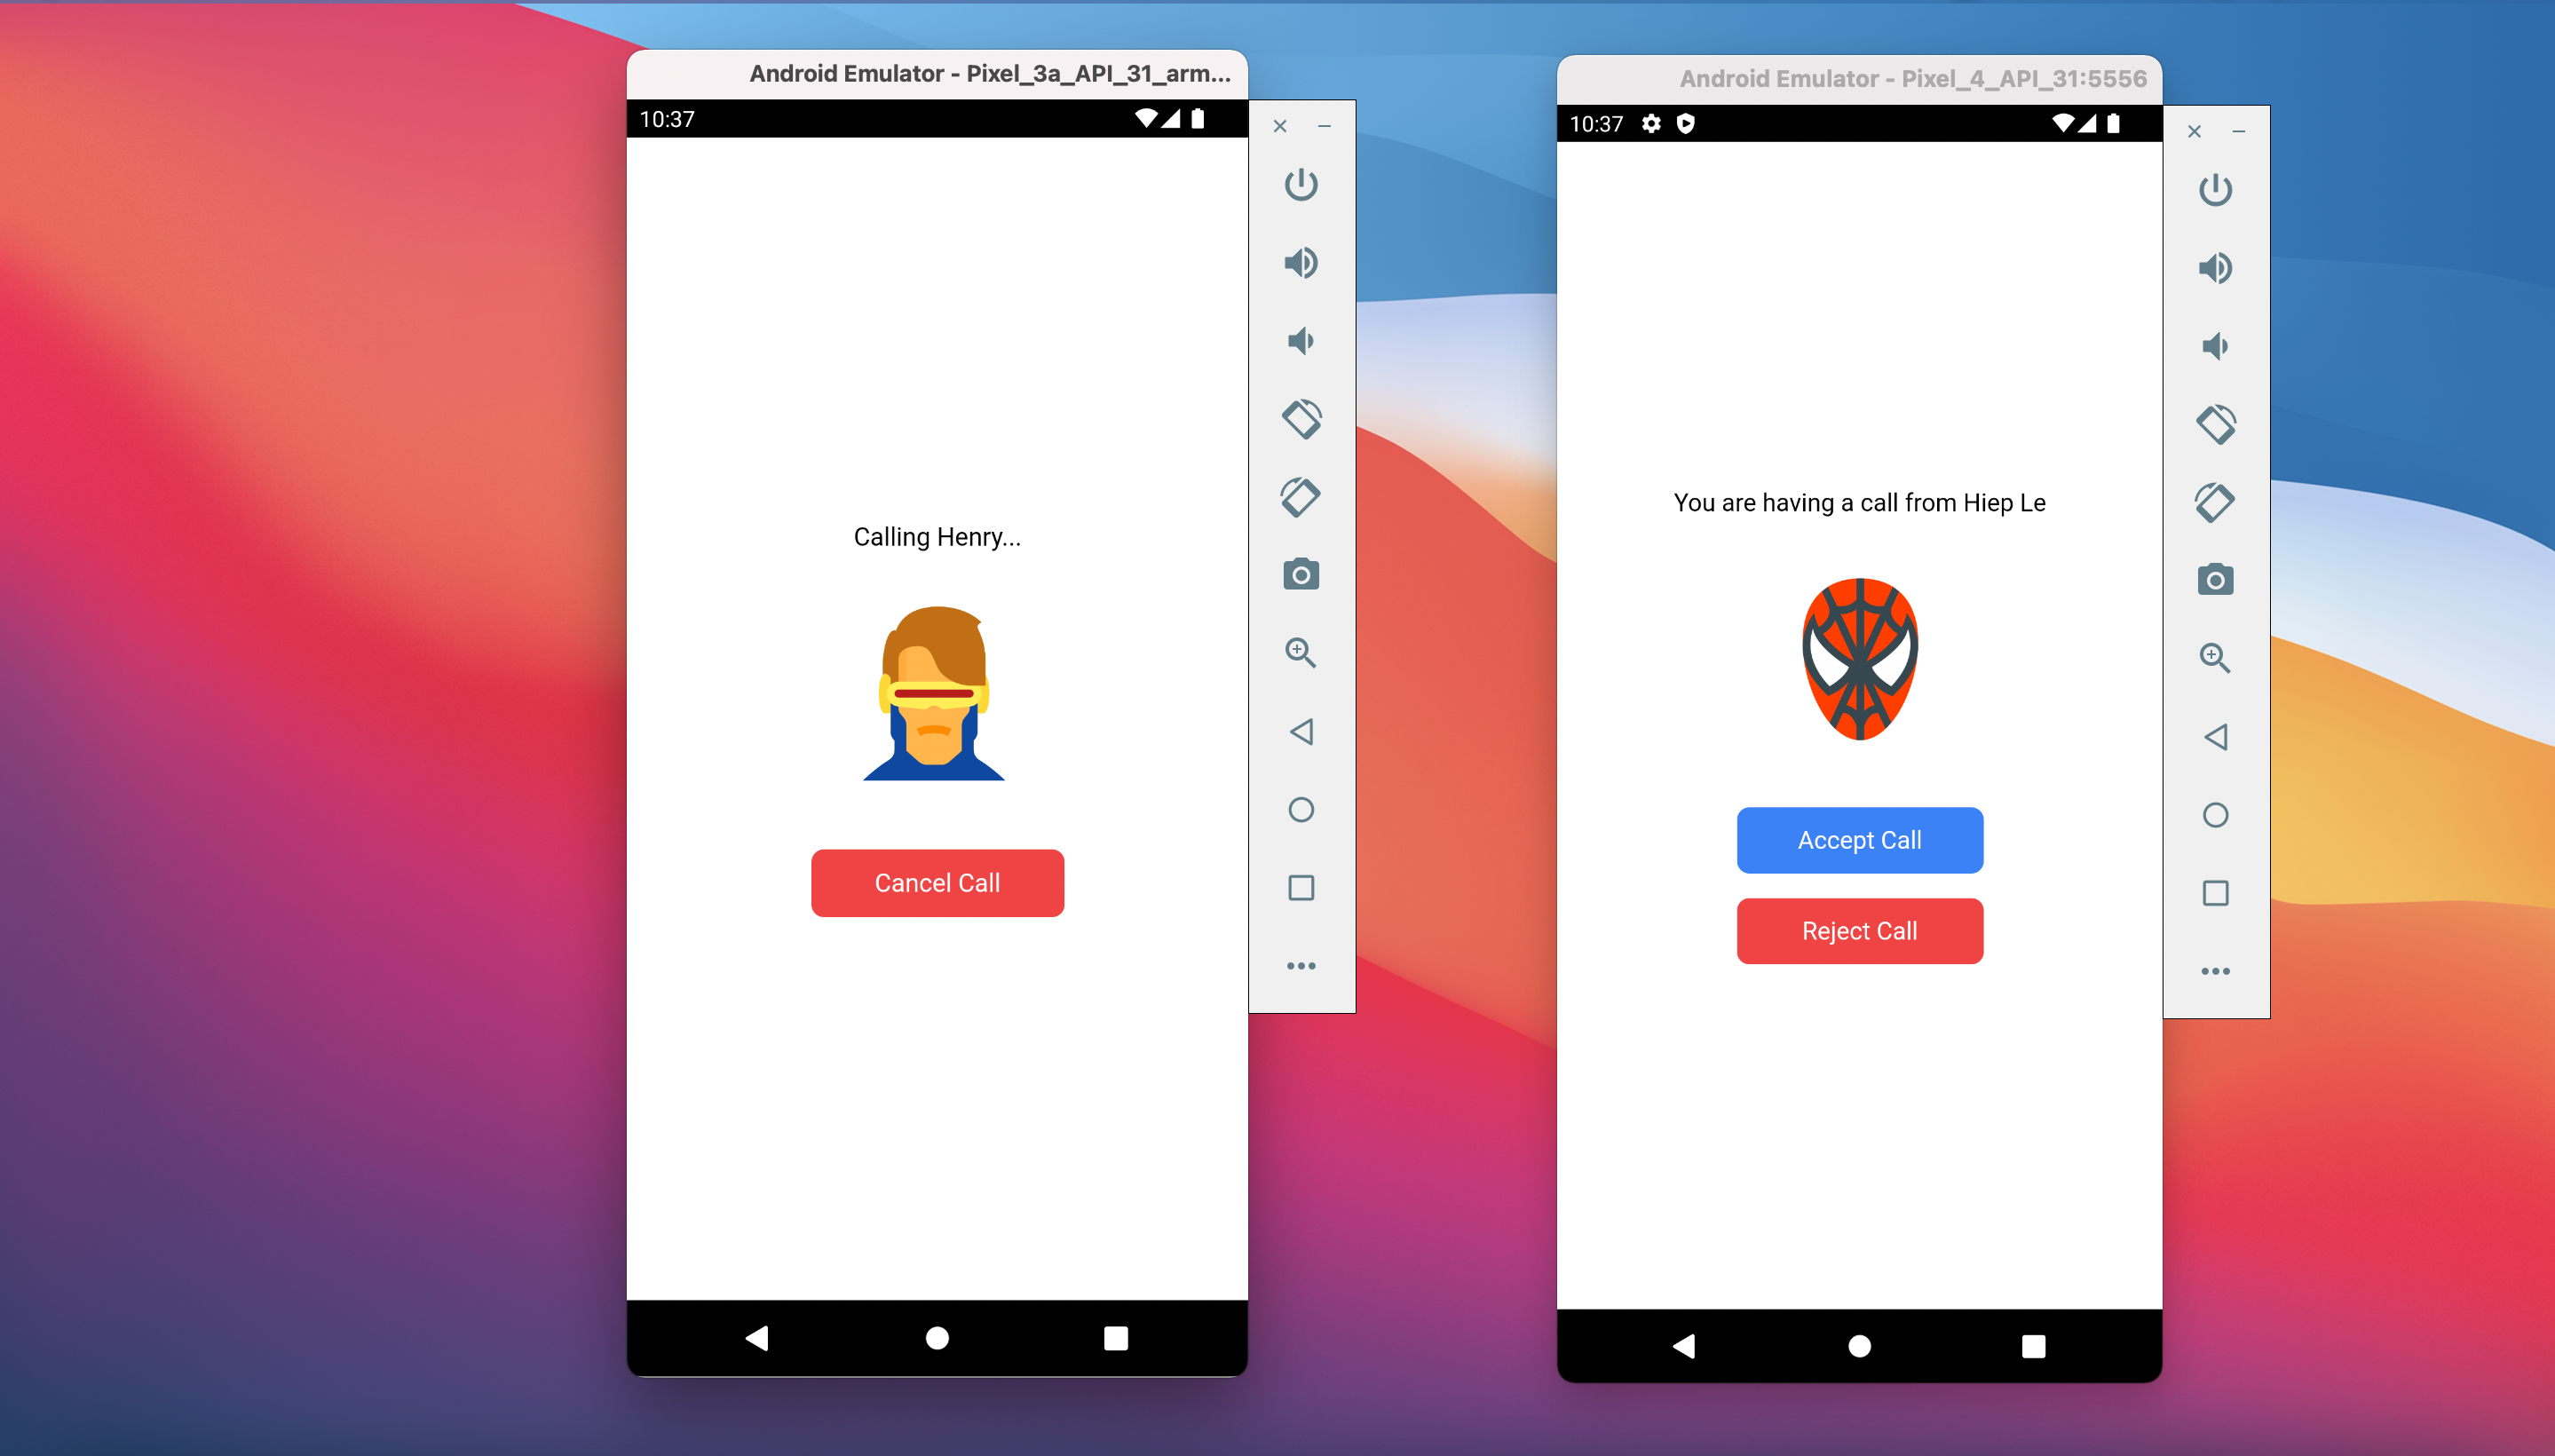
Calling screen between 2 users before the call has actually started
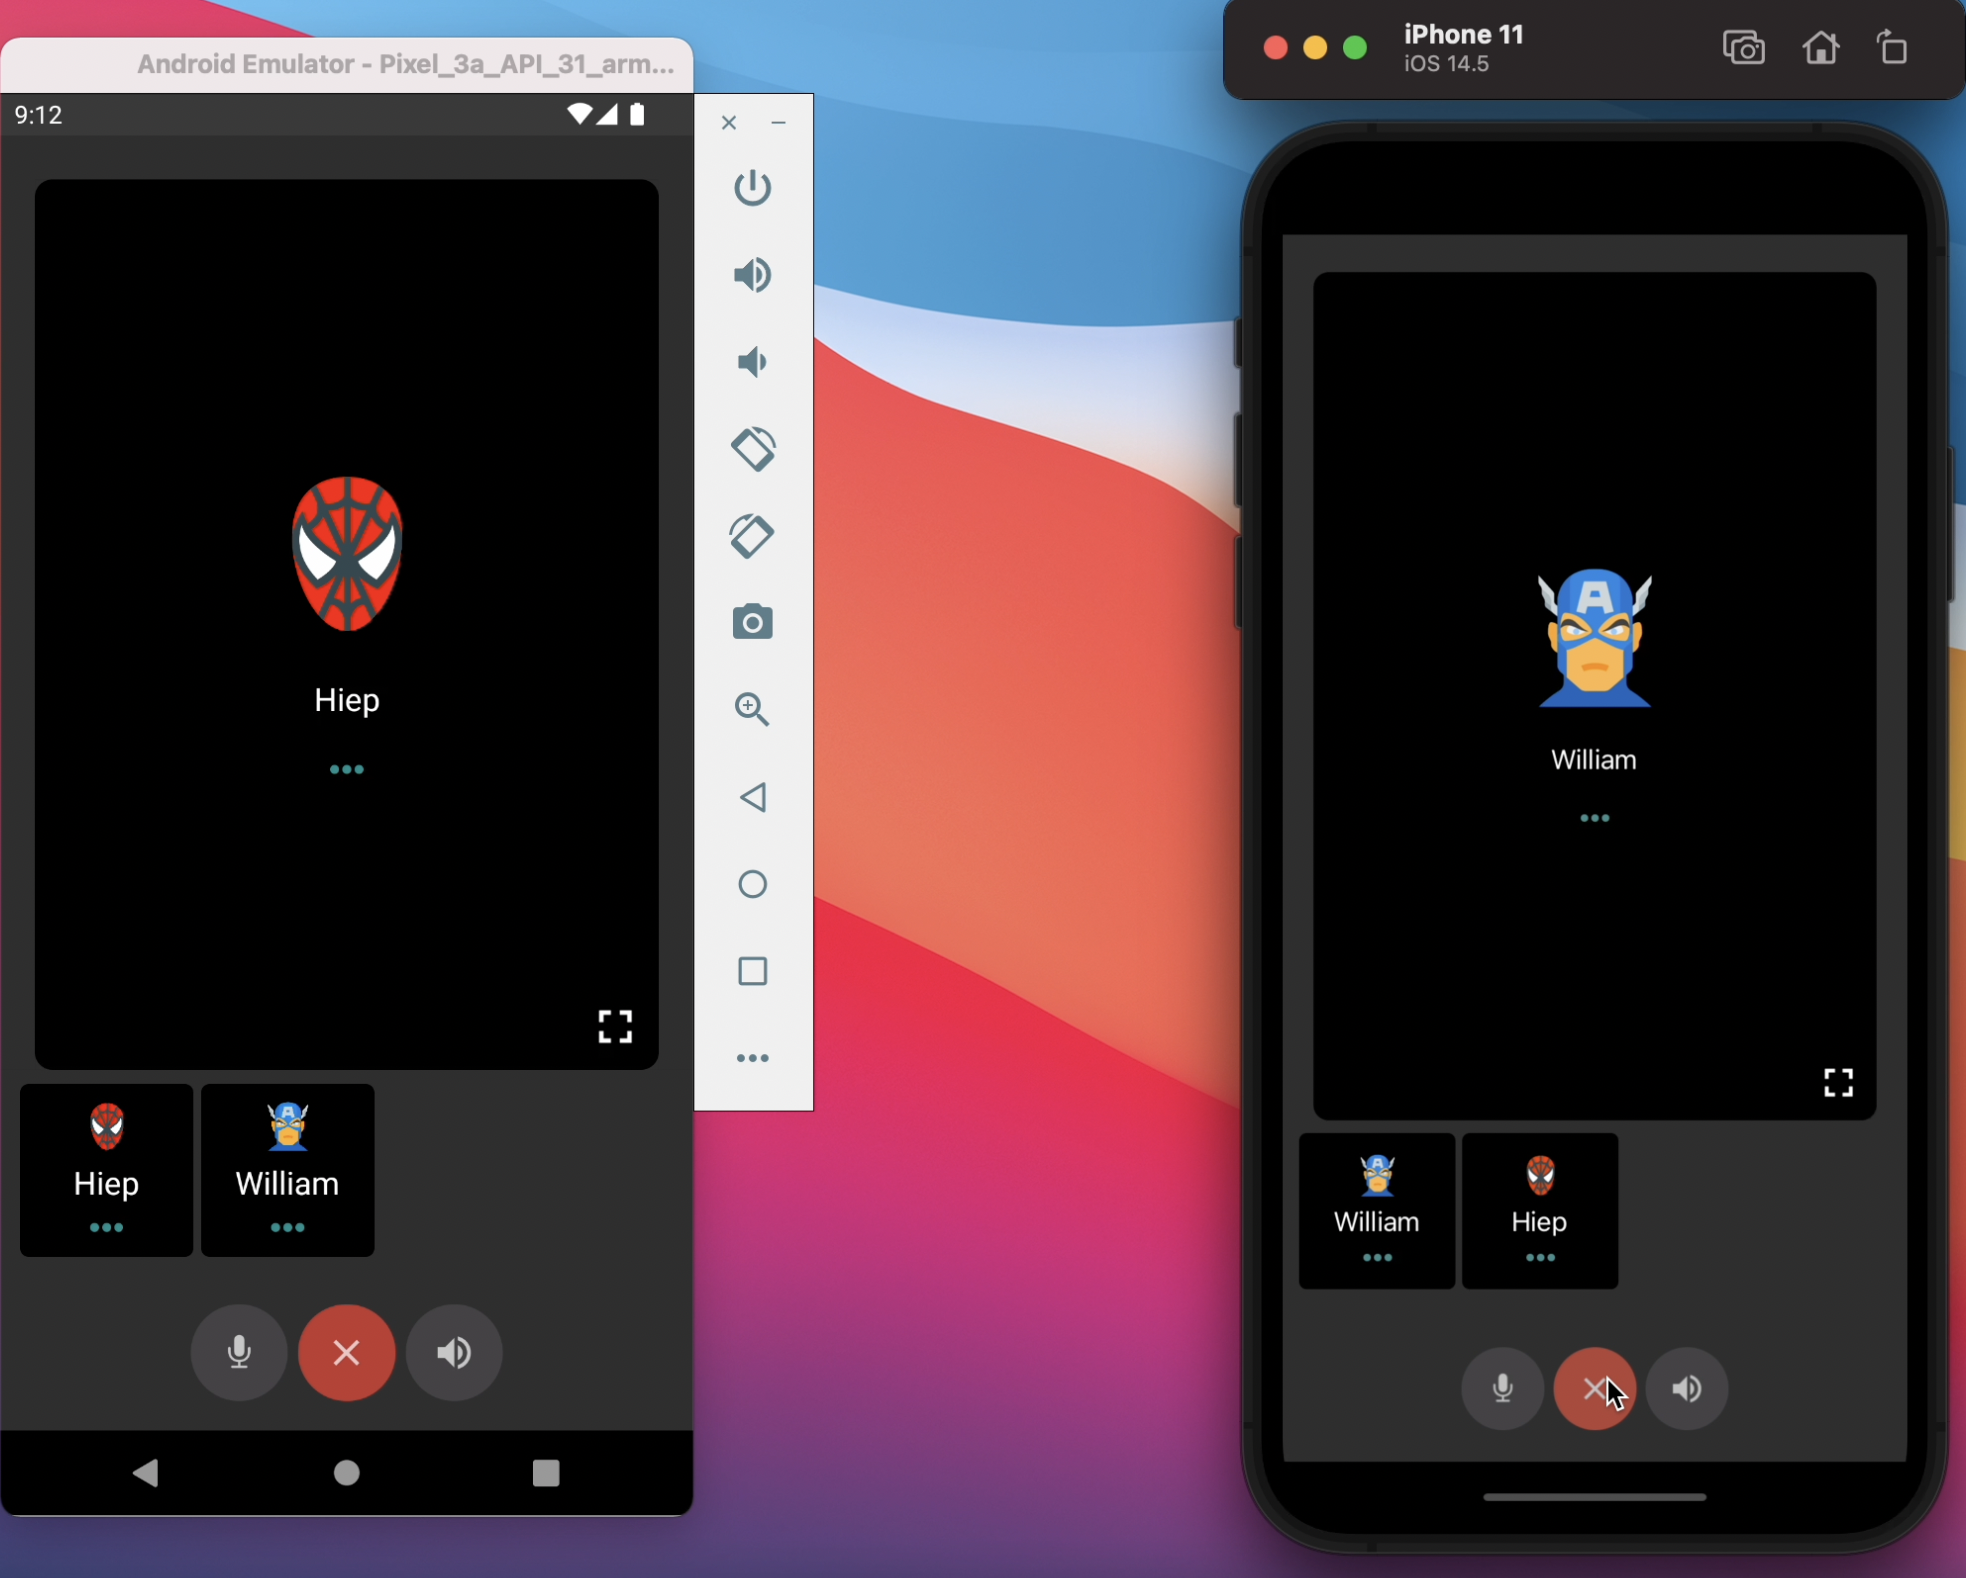
Audio Call
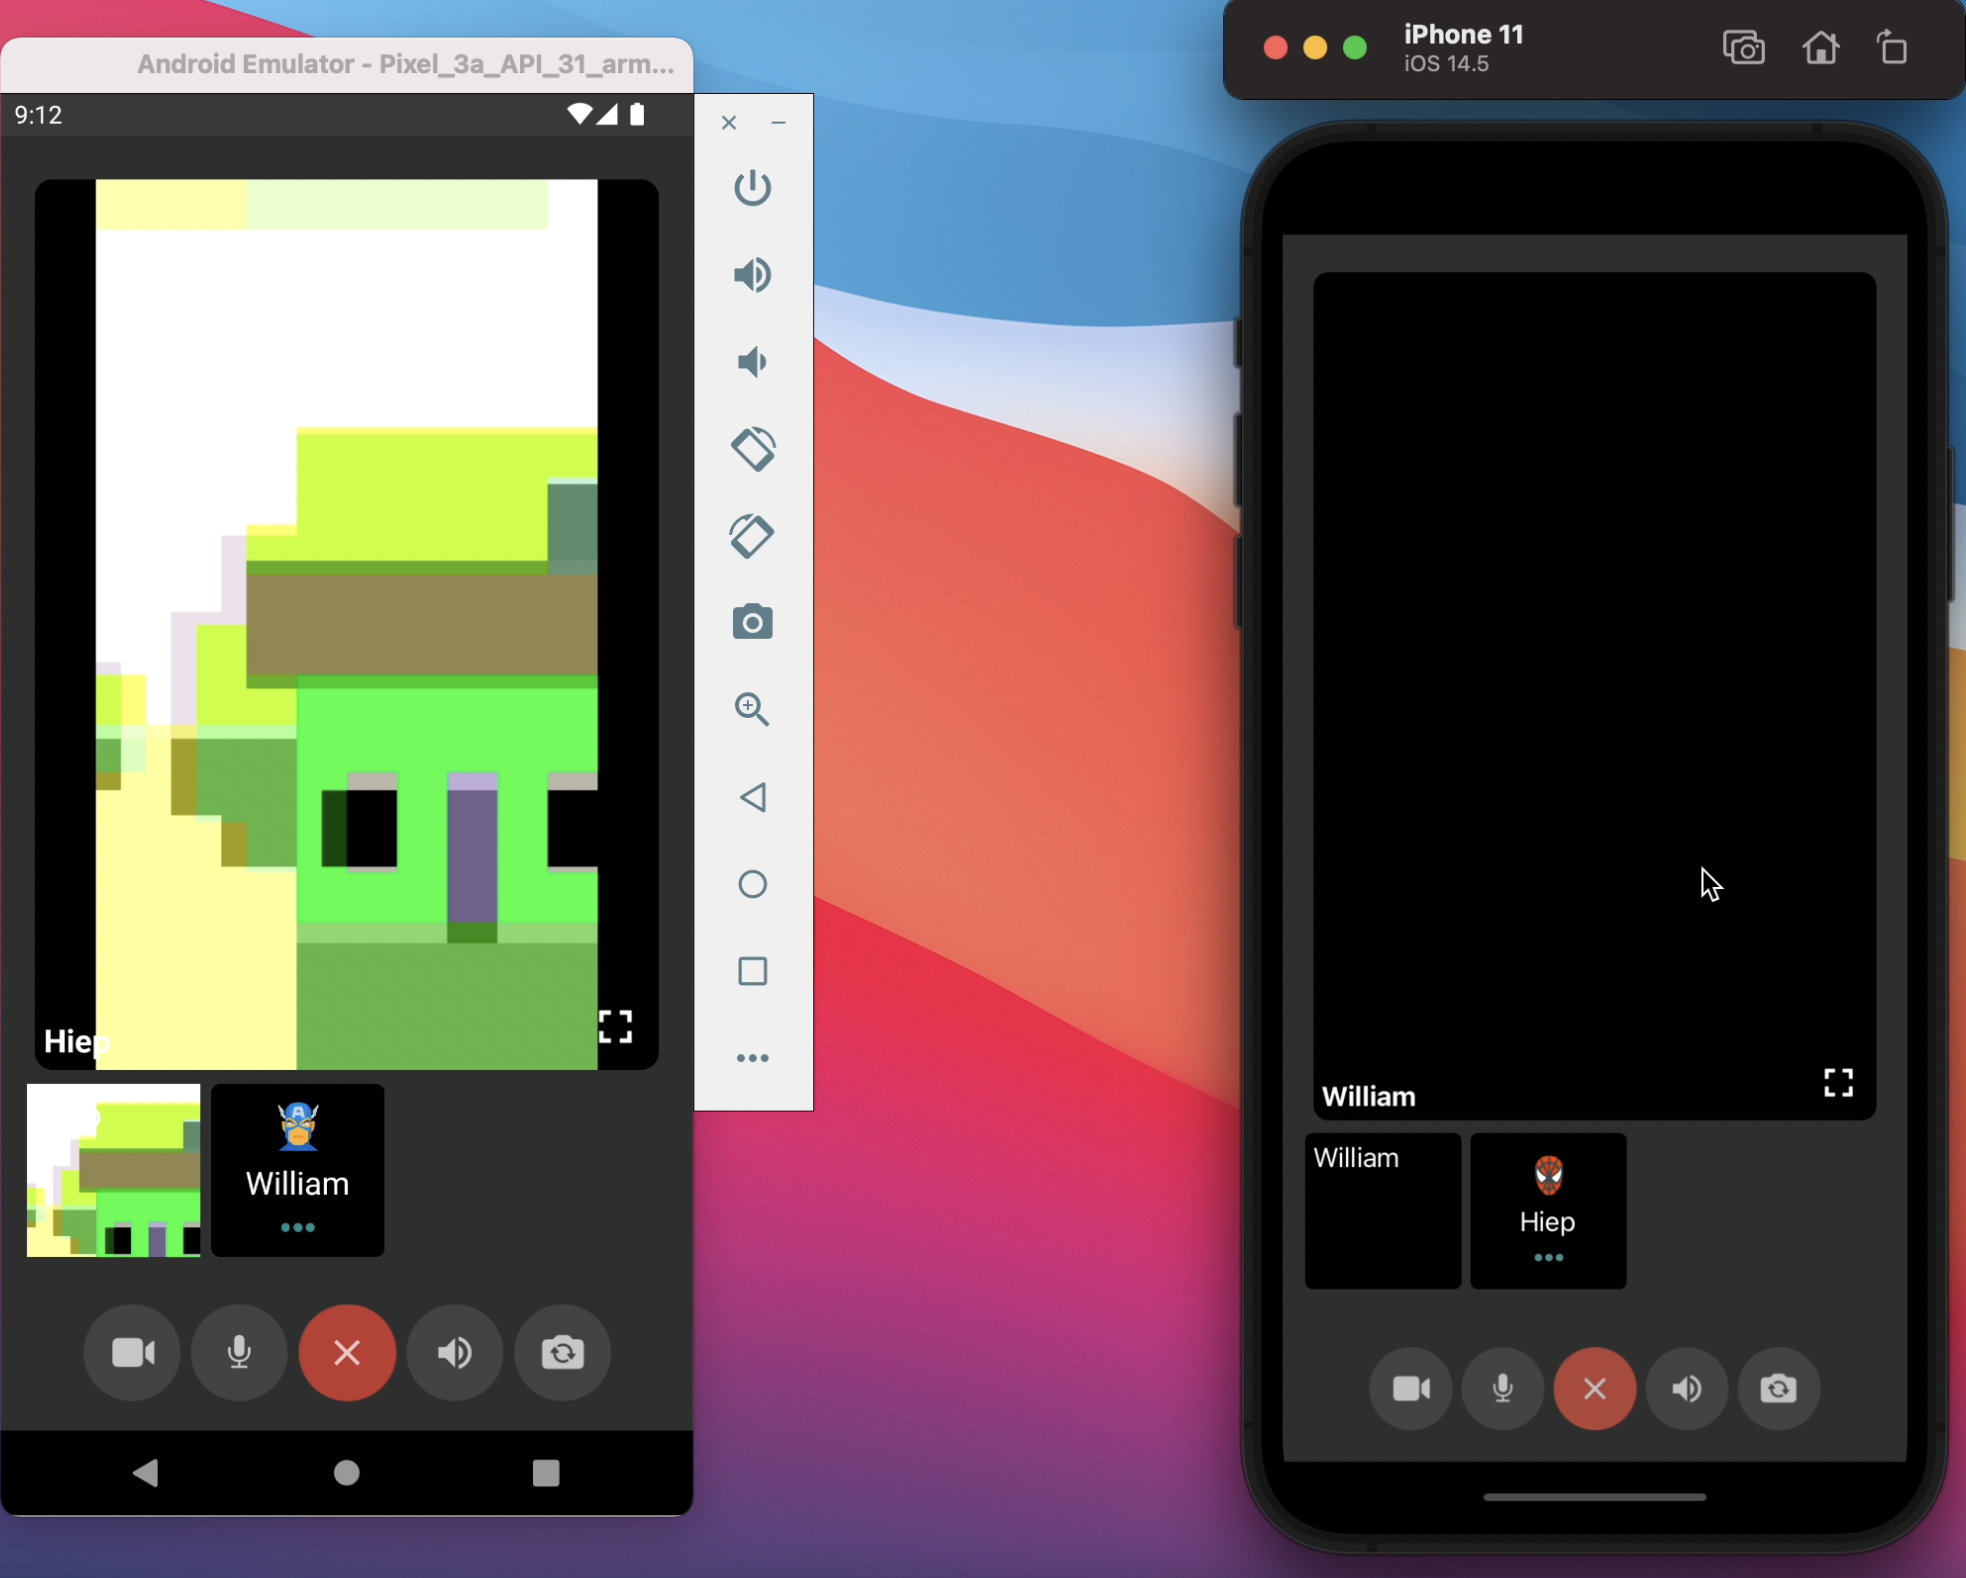
Video Call
To achieve this feature, we need to follow the documentation from CometChat. You can refer to the below code snippet.
To start audio/video call, we need to handle click events for the “call” icon and “video” icon. You can refer to the below code snippet.
The Manage Group Page
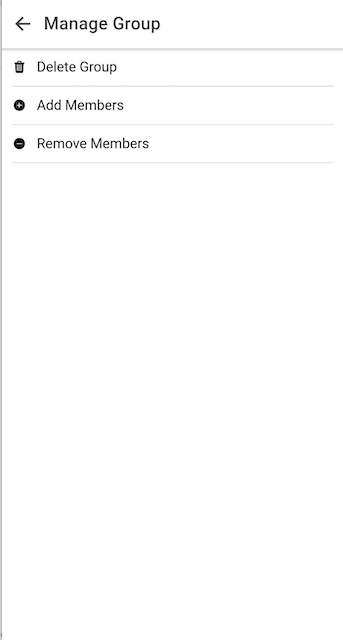
The Manage Group Page
According to the requirements, we need to provide a way to let the user manage a group if the user is the owner of that group. The user can add members to the group or remove members from that group. We can achieve that feature so easily by using the CometChat services. The manage group page is taking responsibility for rendering the group management options. Whenever the user selects an option. He/She will be redirected to the corresponding screen. The full source code can be found here. You can refer to the code snippet below and the documentation from CometChat for more information.
The Add Group Members Page

The Add Group Member Page
The add group members page will let the user to add users to a group. The feature can be done with supporting from the CometChat service. The full source code of this page can be found here.
On the other hand, after a user was added to the group, removed from the group, left the group, and joined the group. We need to inform other members in the same group about that. To do that we need to use addGroupListener. Please follow to the below code snippet for more information.
As we can see the above code snippet, we also listen to when a member is removed from the group. Aside from that, we also event listeners to detect whenever a member has left the group. onGroupMemberKicked. Removing members from a group will be discussed in the following section.
The Remove Group Members Page
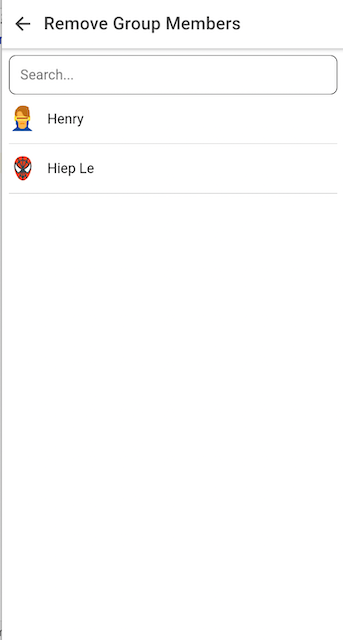
The Remove Group Members Page
The remove group members page allows the user to remove users from a group. Like adding members to a group, the CometChat service is providing a way to help us achieve that feature with minimal effort. The full source code of this page can be found here.
The Delete Group & Leave Group Feature
In this section, we will discuss how to implement the delete group and leave group features. Fortunately, the CometChat supported us to achieve those features with minimal efforts.
To delete a group, you need to call CometChat.deleteGroup(GUID)
To leave a group, you need to call CometChat.leaveGroup(GUID)
You can refer to the below code snippet for more information.
The Logout Feature
On the home page, if the user clicks on the exit icon. A popup will be shown to make sure that the user wants to log out from the application. Following that, we need to do some clean-up actions such as calling logout function from the CometChat service and then removing the authenticated information from the local storage and navigating the user back to the login page. You can refer to the below code snippet for more information.
Wrapping Up
In conclusion, we have done an amazing job in developing an Ionic chat app by leveraging React, Firebase, and CometChat. You’ve been introduced to the chemistry behind the Ionic chat app and how the CometChat SDK makes chat applications buildable.
You have seen how to integrate most of the CometChat functionalities such as texting and real-time messaging, voice/video call, managing users/groups. I hope you enjoyed this tutorial and that you were able to successfully build the Ionic chat app. It's time to get busy and build other related applications with the skills you have gotten from this tutorial. You can start building your chat app for free by signing up to the cometchat dashboard here.
About the Author
Hiep Le is a software engineer. He takes a huge interest in building software products and is a full-time software engineer. Most of his work is focused on one thing - to help people learn.

Hiep Le
CometChat
