This tutorial is outdated. We're currently working on an updated version. In the meantime, for instructions on building a chat app using CometChat, please visit our documentation.
App and web development have come a long way in the last few years. We use a lot of chat applications every day, including Facebook Messenger, WhatsApp, and Snapchat. Using the CometChat Widget and Firebase backend services you will learn how to make a chat app with JavaScript with minimal effort.
What You Will Build
In this tutorial your learn how to build an application which:
allow end-users to signup, creating new accounts in CometChat
enables users to login in and have a short profile (Name, UID, Photo, About)
authenticate users with CometChat and Firebase
You will also use the CometChat Chat Widget and configure it such that:
a list of Users/Contacts is visible to all users with the search bar
all users can text chat and share images, audio, video, document,
all users can initiate voice & video call each other and groups
users can create/exit groups and add/remove other users
group chat via text, voice, and video chat is enabled for all users
What You Will Need
To follow this tutorial, you need to have a basic understanding of HTML, CSS, and JavaScript. You will also need:
A Google account to use with Firebase
Node.js installed on your machine
Add real-time chat with minimal effort using CometChat
Project Setup
To setup your project Create a folder named javascript-chat-app and ddd the following files and folders
css: will contain all styling for your JavaScript chat application
img: stores images used by the application such as the logo and background
js: contains the applications JavaScript code and business logic
screenshots: this folder contains images used in the README.md file
favicon.ico: the favicon.ico for the application.
index.html: will be displayed when users visit the application
login.html: will be displayed when users login to the application
.gitignore: contains files to be excluded from git. You need to include the config.js file because it will contain the secret keys for your application
README.md: describes the application and provides instructions for how to run the application.
You will create the contents of the required files and folders as you follow the tutorial.
You need to create a styles.css file inside the css folder in your project to store the applications stylesheet. The styles.css file on GitHub contains all the styles for the application.
The img folder on GitHub contains all the image assets required by the application. You should download them and add them to the img folder inside your project.
Installing JavaScript Dependencies
In order to use the application in a web browser you need to setup a simple HTTP server to serve the HTML, CSS and JavaScript files. For this you will use http-server.
Run the command npm install -g http-server install http-server from npm.
Once the module is installed you can start the server by navigating to your projects root folder and running http-server
Setting up CometChat
You will need to create a new App:
Login to your CometChat dashboard
Click on ‘Add New App’
Provide a name for your app and select the region you want to use.
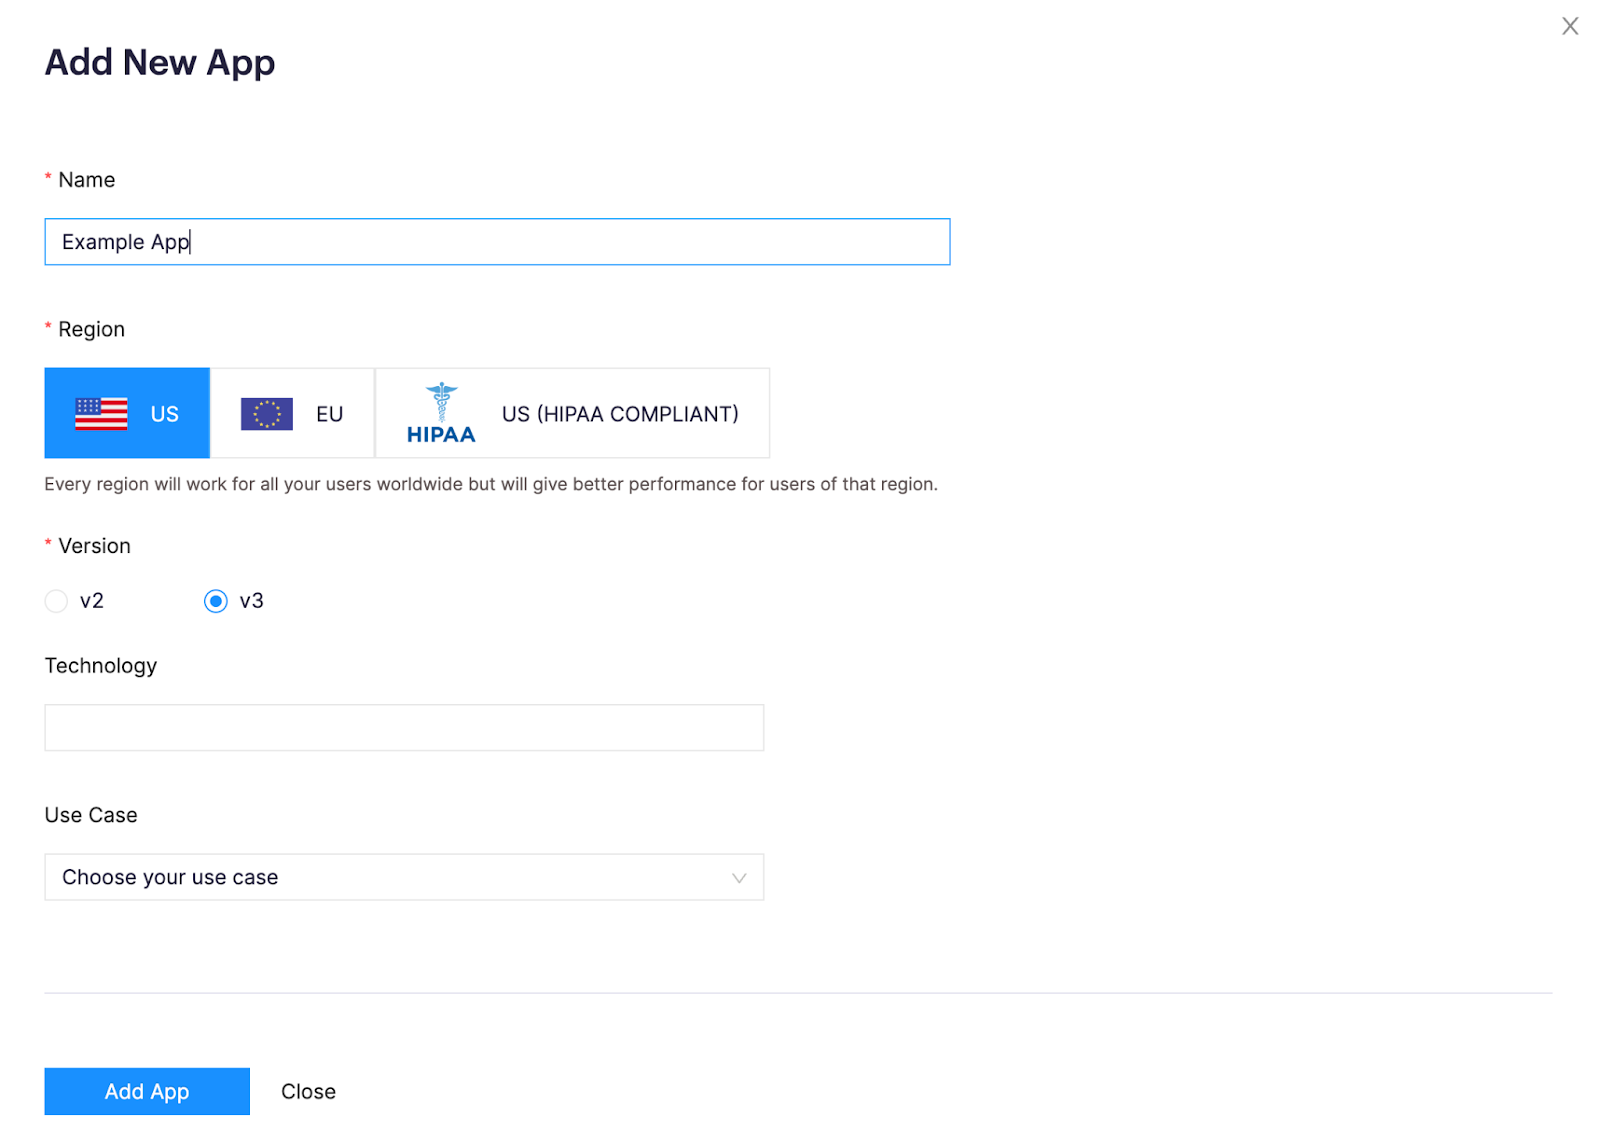
Creating a new App in the CometChat dashboard
Remove Existing Users and Groups
CometChat will automatically create some Users and Groups to use with your application. You can safely remove these as you will be creating new users that will be shared between your application and CometChat.
Creating a CometChat Chat Widget
CometChat provides tools to help you create and design your chat app window which can then easily be embedded into your application as a widget.
To create a new Chat Widget with CometChat follow the steps below:
Select ‘Chat Widget’s from the menu on the left
Click on ‘New Chat Widget’
This will create a new widget for you which you can customize in order to change the design or add and remove different features
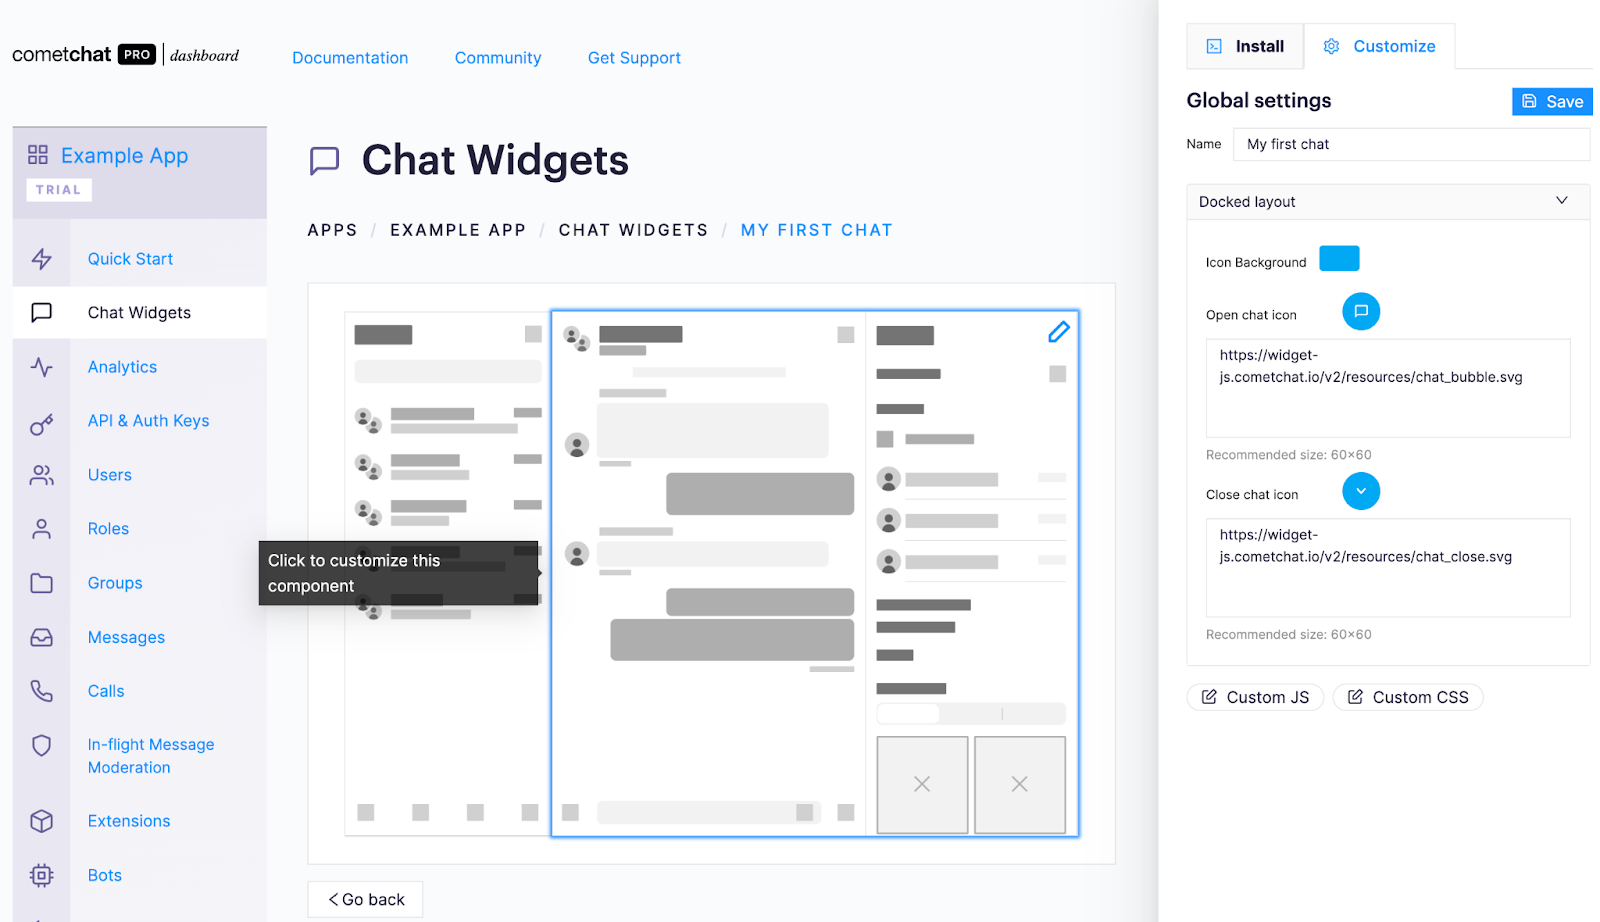
Modifying a Chat Widget in the CometChat dashboard
You can find more information about the Chat Widgets and different options in the docs. However we’ve done our best to make the features easily discoverable and as you will see the powerful widget means there's no need to build everything from scratch.
Find Your App’s Credentials
Once your App has been created you can find your APP ID and Auth Key on the ‘Quick Start’ page.

While the WIDGET ID and REST API KEY can be found on your widgets page
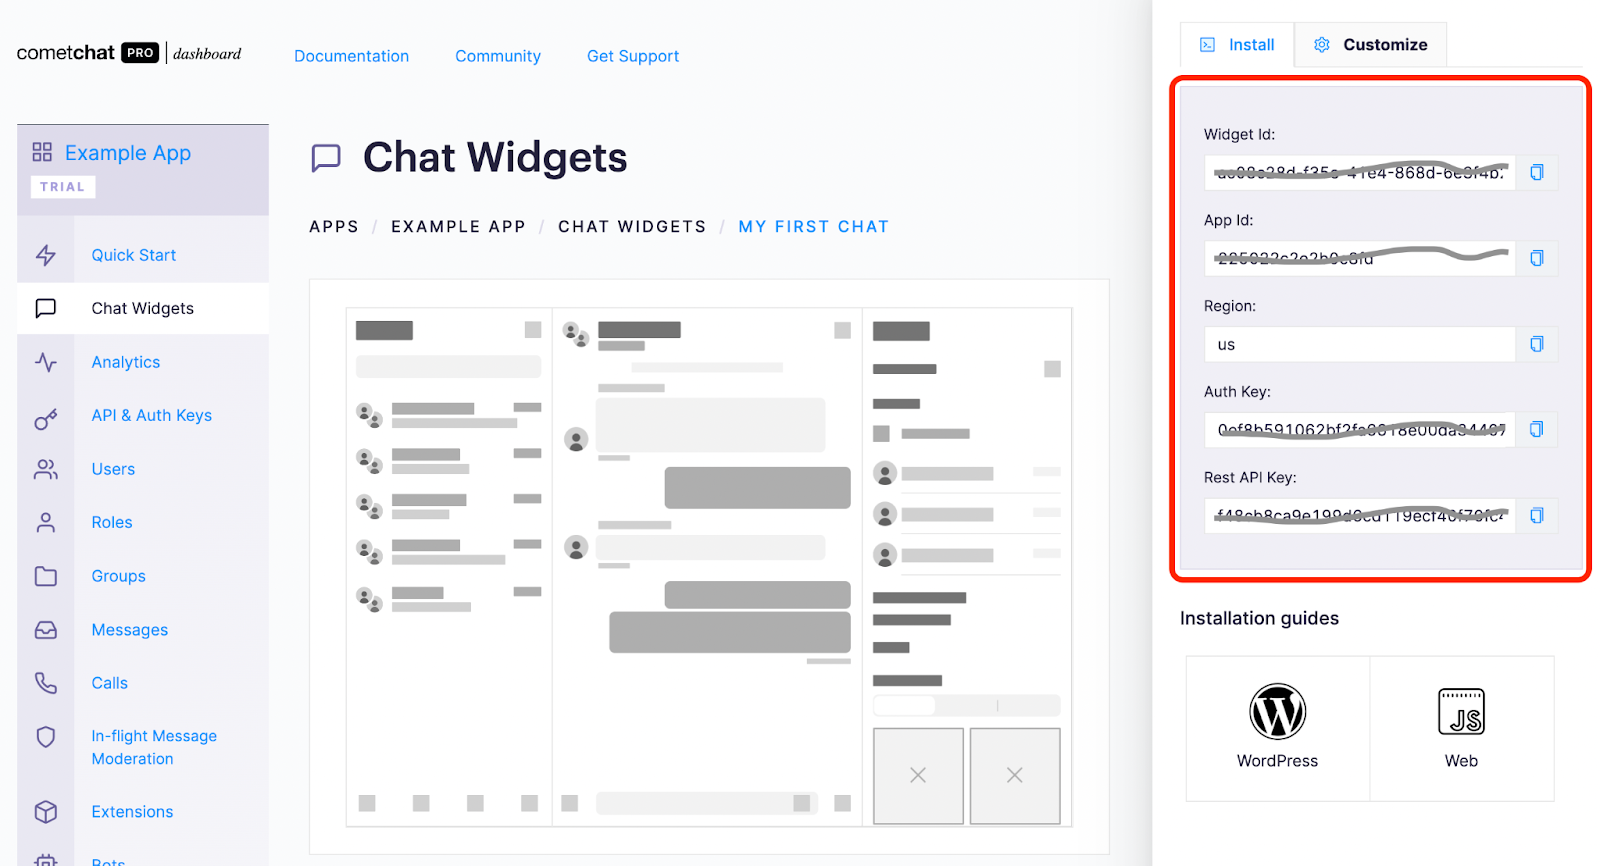
Configuring CometChat in Your Application
In this tutorial, we will be using the CometChat Widget. When users log in to our application, they do not just log in to our application, they also log in to the CometChat platform.
In order to use the CometChat widget or SDK in your application you need to provide the credentials needed to communicate with the CometChat platform.
In the js folder your created earlier add a new file config.js to store your account credentials with the content below:
Be sure to replace the example values with the values from your CometChat account.
Setting Up Firebase
Firebase is a back-end platform provided by Google for building full-stack applications. It provides programmers with authentication options, storage, databases, hosting, A/B testing and other services.
Firebase helps you to focus on developing the front-end of your applications while it does the hidden jobs for you.
You will need to create a new Firebase project:
Go to the Firebase Console
Create a new project
Create a Realtime Database
Firebase offers two types of databases (Cloud Firestore and Realtime Database). For the his tutorial, you will be using a Realtime Database.
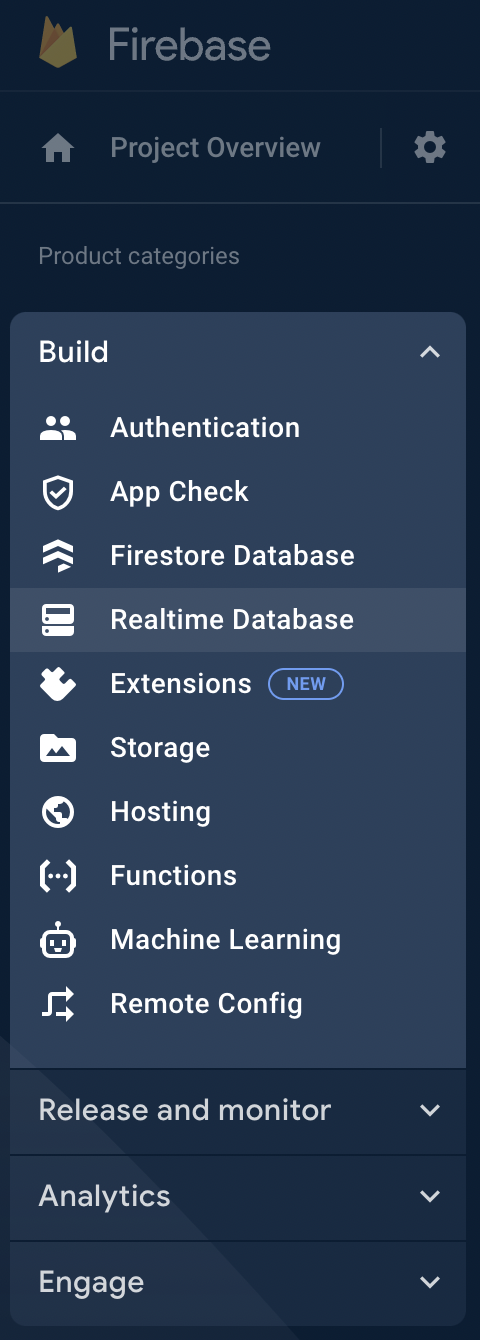
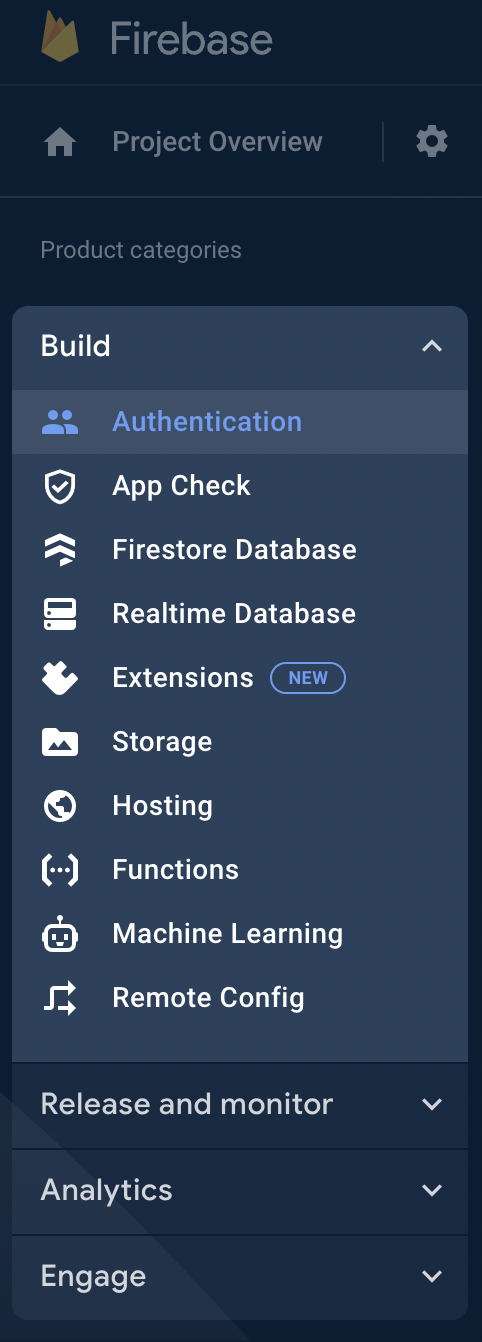
In the sidebar on the left
Open the ‘Build’ menu
Click on 'Realtime Database' and then ‘Create Database’
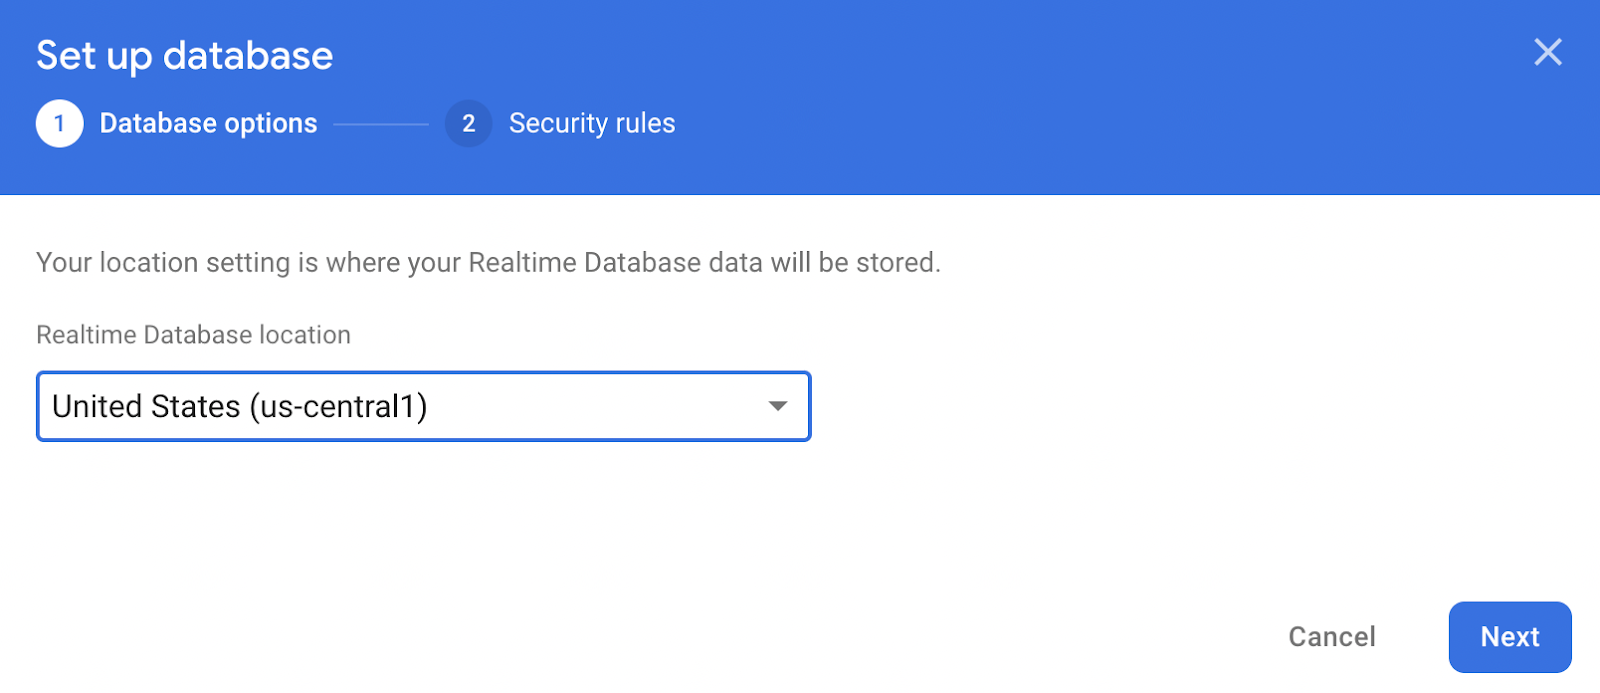
After that, select the region you want to use
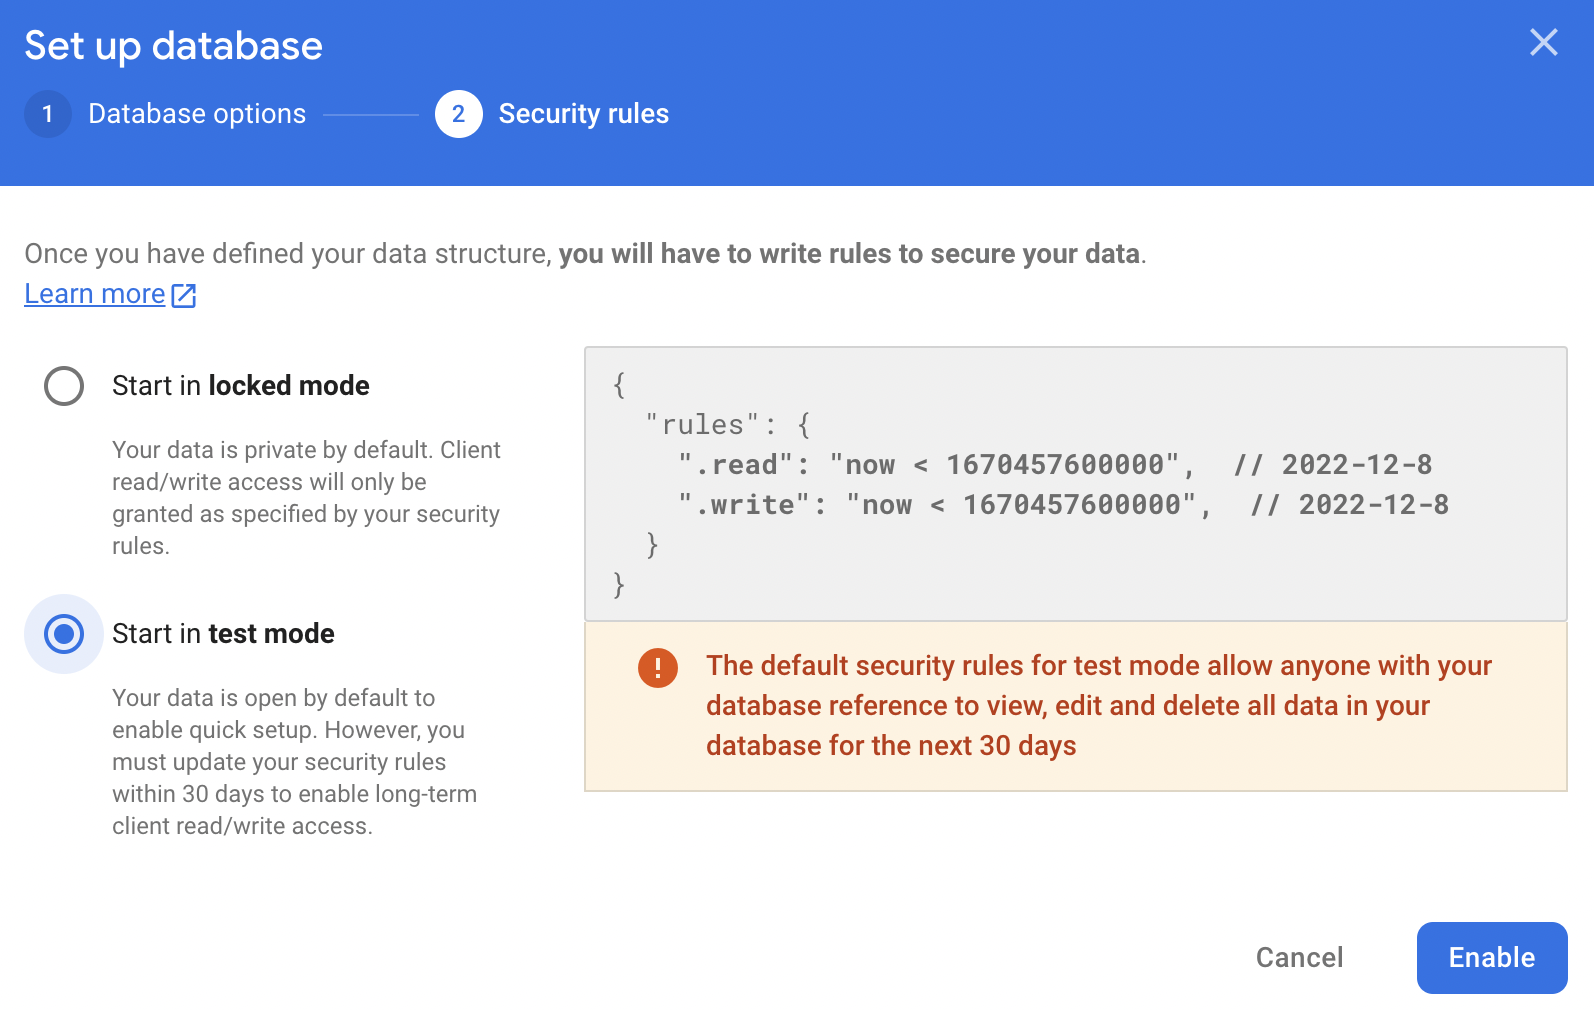
Finally, start the database in Test mode
Add an Authentication Service
We will be using Firebase’s Authentication Service to manage users accounts. The service will be configured so that users need to provide a username (email address) and password in order to use the application.
In the sidebar on the left
Open the ‘Build’ menu
Click on 'Authentication' and then ‘Get Started’
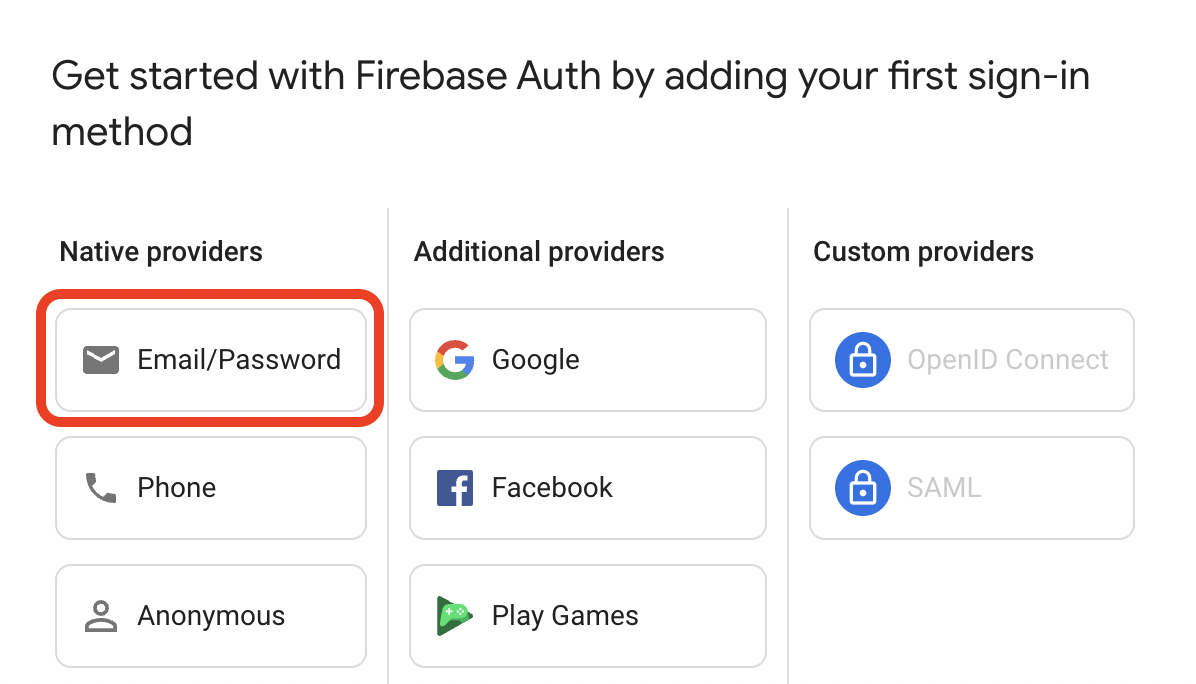
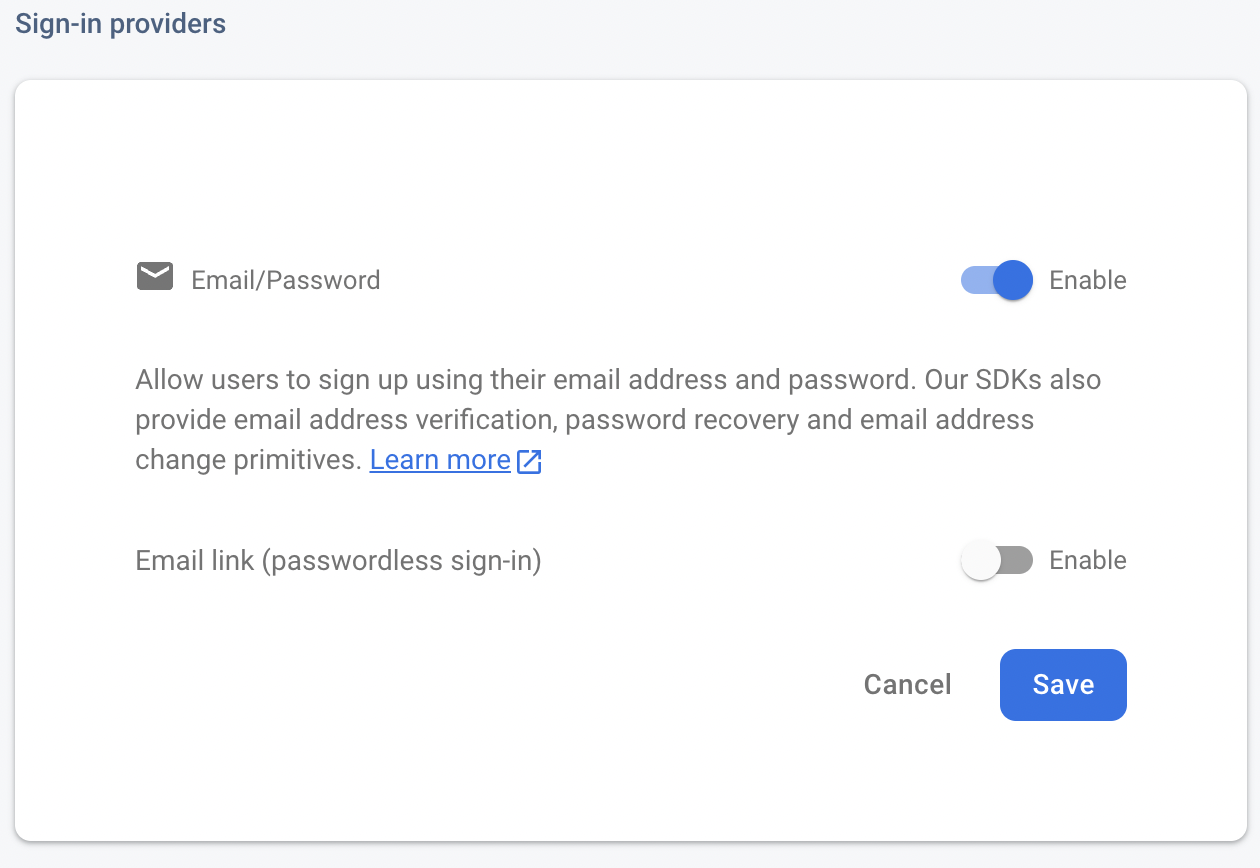
Then select ‘Email/Password’ from the ‘Native providers’ list as your authentication method.
Finally, enable the ‘Email/Password’ option and click ‘Save’.
Get Your Configuration Details
Once your database is set up, the only thing left to do is to get your configuration details. You will use these in order to authenticate your application with the Firebase service.
You can find your configuration details in the Firebase console:
Click the Gear icon next to Project Overview
Choose Project Settings

Under ‘Your apps’, select a ‘Web app’:

Next you need to register your application
Enter a name for your application e.g. javascript-chat-app
Click on ‘Register App’
You can ignore the next screen and click on ‘Continue to Console’
Your application’s config values will then be visible in the ‘Your apps’ section
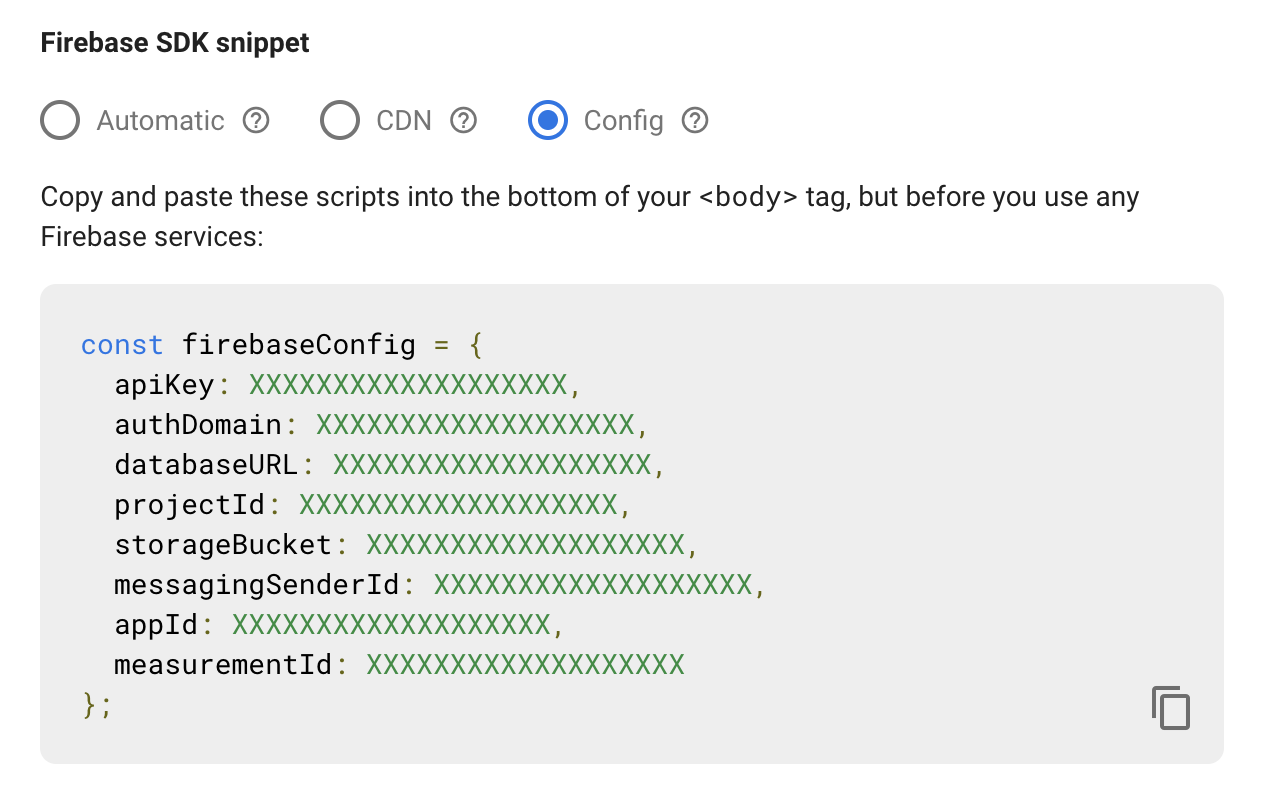
You will need to add these values to the config.js file you created earlier.
Initializing Firebase in Your Application
The firebase.js file will be responsible for interfacing with Firebase's Realtime Database service and initialize the email/password authentication service provider enabling users to sign in with their email/password. The projects secret keys will be retrieved from the config.js file.
Inside your js folder create a new firebase.js file with the following content:
The Login Page
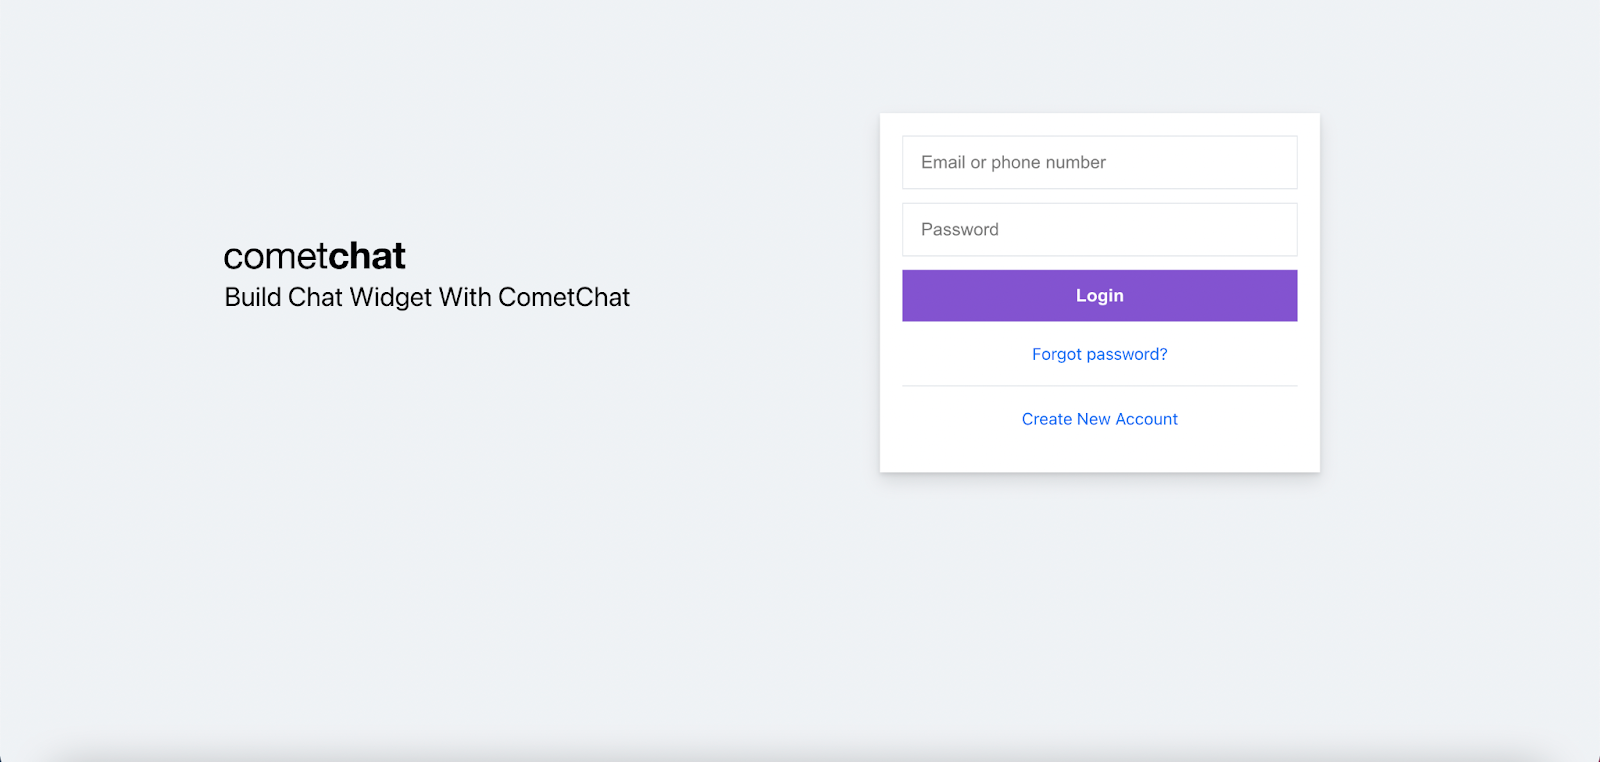
The login page is responsible for authenticating users using the Firebase authentication service. It accepts the user credentials and either creates and account for them or logs them in, depending on if they are a new user or not.
Add the following HTML to the login.html file in your project:
In the HTML above you have included some third-party libraries:
CometChat Widget: helps integrate the CometChat Widget
UUID: The UUID library is used to generate a unique ID for each account
Validator: used to validate the login form
Firebase: helps us to interact with Firebase and use Firebase services including Firebase Authentication, and Firebase Realtime Database
As well as using third-party libraries, you need to create some files to handle the logic for your application: auth.js, config.js, firebase.js, util.js, login.js. You have already created config.js and firebase.js, however you will now need to add the other files.
The auth.js File
The application needs to provide a way for users to login in and have a short profile. Once the user has logged in to the application, the user cannot go back to the login page but if the user has not signed in to the application, the user cannot go to the home page. auth.js will be used to handle this functionality
auth.js will be used on both the login and the home page and will be executed first before any other actions. This file will be responsible for checking if the current user has logged in, or not using the getLoggedinUser() function provided by the CometChat Widget SDK. If the user has not logged in to the application, the user will be redirected to the login page.
In the js folder create a new auth.js file with the following content:
The util.js File
Some functions can be used across multiple pages in the application, such as showing or hiding the loading indicator or getting information for the authenticated user. To avoid duplicating code, you should store all common functions in a single file.
In the js folder create a new util.js file with the following content:
The login.js File
The login.js file is responsible for handling the business logic for the login page. This file contains functions which let the user register a new account or log in to the application. The full source code can be found on GitHub.
In the js folder create a new login.js file and copy the contents of the login.js on GitHub
Reading through the file, after clicking the sign-up button, the registerNewAccount() function will be called. It accepts a JSON object as a parameter containing the user’s information including email address, password, and password confirmation. Before proceeding, the user’s information is validated using the validateNewAccount() function. If the information is valid, the user’s avatar and unique id will be generated. The application then registers a new user account with the Firebase Authentication service as well as CometChat using the CometChatWidget SDK.
In order to log in to the chat application, the user needs to click on the ‘Login’ button. The code snippet below describes how to handle the business logic for the sign-in feature. The user’s credentials will be taken from the input elements first and the application validates that information. If the input information is valid, the application will let the user log in using the Firebase Authentication Service and the CometChatWidget. The authenticated user will then be redirected to the home page.
The Home Page
After the user has logged in to the application, the user will be redirected to the home page which will display the CometChat Widget.
Add the following HTML to the index.html file in your project:
The index.js File
This file is responsible for showing a greeting to the user, handling the logic when clicking on the “Logout” button, and launching the CometChat Widget.
The most important part of the above code snippet is how to launch the CometChat Widget. According to the CometChat Widget documentation, you need to initialize the CometChat Widget first, if initialization is completed successfully, the code for launching the CometChat Widget will be executed. Aside from that, all configurations will be taken from the ‘config.js’ file.
Clicking the “Logout” button, will call the “logout” function provided by the CometChat SDK. If the function is executed successfully, you need to redirect the user to the login page.
Conclusion
You have now built your fist chat application using a CometChat Widget and Firebase. You have seen how to integrate most of the CometChat functionalities such as texting and real-time messaging.
I hope you enjoyed this tutorial and that you were able to successfully build the JavaScript chat app. It's time to get busy and build other related applications with the skills you have gotten from this tutorial. You can start building your chat app for free by signing up to the CometChat dashboard.
About the Author
Hiep Le is a software engineer. He takes a huge interest in building software products and is a full-time software engineer. Most of his work is focused on one thing - to help people learn

Hiep Le
CometChat
