Overview
The CometChat Android Kotlin UI Kit is developed to keep developers in mind and aims to reduce development efforts significantly.

The UI Kit’s customizable UI components simplify the process of integrating text chat and voice/video calling features to your website or mobile application in a few minutes.
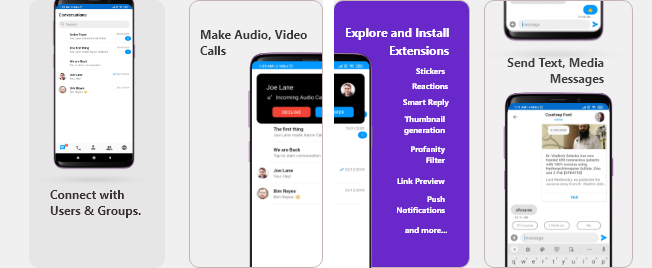
I want to checkout Kotlin Chat UI Kit
Follow the steps mentioned in the README.md
file.
Kindly, click on below button to download our Kotlin Chat UI Kit.
Kotlin Chat UI KitView on GithubI want to explore the sample app
Import the app into Android Studio and follow the steps mentioned in the README.md
file.
Kindly, click on below button to download our Kotlin Sample App.
Kotlin Sample AppView on GithubPrerequisites ⭐
Before you begin, ensure you have met the following requirements:
✅ You have Android Studio installed on your machine.
✅ You have an Android Device or Emulator with Android Version 6.0 or above.
✅ You have read Key Concepts.
Installing Android Kotlin Chat UI Kit
Setup 🔧
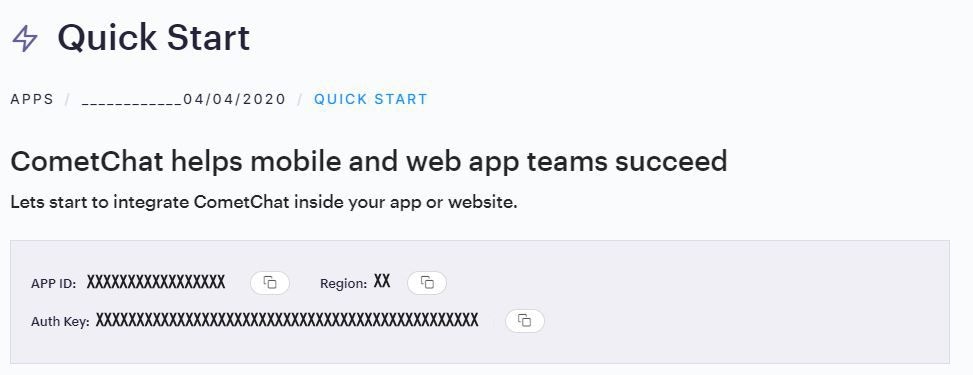
To install Android Kotlin UI Kit, you need to first register on CometChat Dashboard. Click here to sign up.
Get your Application Keys 🔑
- Create a new app
- Head over to the Quick Start or API & Auth Keys section and note the App ID, Auth Key, and Region.

Add the CometChat Dependency
First, add the repository URL to the project levelbuild.gradle
file in the repositories block under the allprojects
section.
allprojects {
repositories {
maven {
url "https:__dl.cloudsmith.io_public_cometchat_cometchat-pro-android_maven_"
}
}
}
Open the app level build.gradle
file and
- Add the below two line in the
dependencies
section.
dependencies {
implementation 'com.cometchat:pro-android-chat-sdk:2.4.1'
implementation 'com.cometchat:pro-android-calls-sdk:2.1.0'
}
- Add the below lines
android
section
android {
compileOptions {
sourceCompatibility JavaVersion.VERSION_1_8
targetCompatibility JavaVersion.VERSION_1_8
}
}
Configure CometChat inside your app
Initialize CometChat 🌟
The init()
method initializes the settings required for CometChat. We suggest calling the init() method on app startup, preferably in the onCreate() method of the Application class.
- Kotlin
private val appID = "APP_ID"
private val region = "REGION"
val appSettings = AppSettingsBuilder().subscribePresenceForAllUsers().setRegion(region).build()
CometChat.init(this, appID, appSettings, object : CallbackListener<String>() {
override fun onSuccess(successMessage: String) {
Log.d(TAG, "Initialization completed successfully")
}
override fun onError(e: CometChatException) {
Log.d(TAG, "Initialization failed with exception: "+e.message)
}
})
Make sure you replace the APP_ID with your CometChat APP ID
and REGION with your app's REGION
in the above code.
Login User 👤
The login()
method returns the User object containing all the information of the logged-in user.
- Kotlin
private val UID = "cometchat-uid-1" // Replace with the UID of the user to login
private val AUTH_KEY = "Enter AUTH_KEY" // Replace with your App Auth Key
CometChat.login(UID, AUTH_KEY, object : CallbackListener<User?>() {
override fun onSuccess(user: User?) {
Log.d(TAG, "Login Successful : "+user.toString())
}
override fun onError(e: CometChatException) {
Log.d(TAG, "Login failed with exception: " + e.message);
}
})
-
Make sure you replace the
AUTH_KEY
with your CometChat AUTH Key in the above code. -
We have setup 5 users for testing having UIDs:
cometchat-uid-1
,cometchat-uid-2
,cometchat-uid-3
,cometchat-uid-4
andcometchat-uid-5
.
Add the UI Kit Library
To integrate the UI Kit, please follow the steps below:
- Clone the UI Kit-Kotlin Library from the android-kotlin-chat-ui-kit repository
Download Kotlin UI Kit Library
- Import
uikit-kotlin
Module from Module Settings. - If the Library is added successfully, it will look like mentioned in the below image.

Configure UI Kit Library
As the UI Kit uses dataBinding you must enable dataBinding
To configure your app to use data binding, add the dataBinding element to your build.gradle file in the app module, as shown in the following example:
android {
...
dataBinding {
enabled = true
}
}
We are using File Provider for storage & file access. So you need to add your application package name in manifestPlaceholders
android {
defaultConfig {
manifestPlaceholders = [file_provider: "YOUR_PACKAGE_NAME"]
__add your application package.
}
}
As UI Kit is using material components your app's theme should extend Theme.MaterialComponents. Follow the guide at Getting started with Material Components.
Make sure you add the below dependency to your app-level build.gradle file
dependencies {
implementation 'com.google.android.material:material:1.2.0-alpha04'
}
The following is the list of Material Components themes you can use to get the latest component styles and theme-level attributes.
'Theme.MaterialComponents.NoActionBar'
'Theme.MaterialComponents.Light.NoActionBar'
Theme.MaterialComponents.DayNight.NoActionBar
Update your app theme to inherit from one of these themes, e.g.:
- XML
<style name="AppTheme" parent="Theme.MaterialComponents.Light.NoActionBar.Bridge">
<!-- Customize your theme here. -->
</style>
Launch CometChatUI 🚀

CometChatUI is an option to launch a fully functional chat application using the UI Kit. In UI Kit all the UI Components are interlinked and work together to launch a fully functional chat on your mobile/application.
To use CometChatUI user has to launch CometChatUI Activity. Add the following code snippet to launch CometChatUI
.
- Kotlin
startActivity(Intent(this@YourActivity, CometChatUI::class.java))
Checkout our sample app
Visit our Kotlin sample app repository to run the Kotlin sample app