> ## Documentation Index
> Fetch the complete documentation index at: https://www.cometchat.com/docs/llms.txt
> Use this file to discover all available pages before exploring further.
# One-to-One / Group Chat
> Build a single chat window for one-to-one or group messaging in React Router with CometChat UI Kit.
| Field | Value |
| ------------ | --------------------------------------------------------------------------------- |
| Package | `@cometchat/chat-uikit-react` |
| Framework | React Router |
| Components | `CometChatMessageHeader`, `CometChatMessageList`, `CometChatMessageComposer` |
| Layout | Single chat window — no sidebar, no conversation list |
| Prerequisite | Complete [React Router Integration](/ui-kit/react/integration-react-router) first |
| SSR | N/A — client-side SPA by default |
| Pattern | Support chat, embedded widgets, focused messaging |
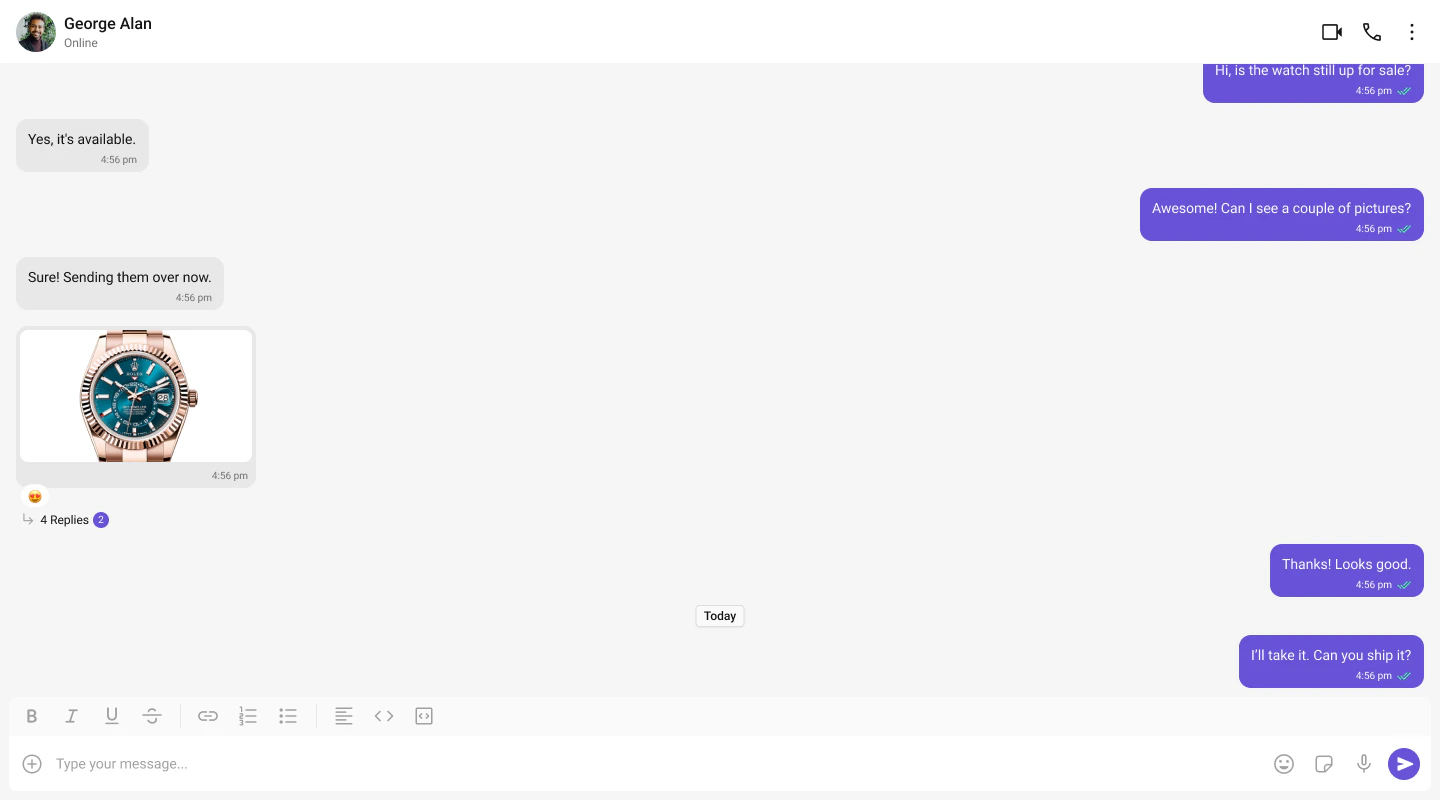
This guide builds a single chat window — no sidebar, no conversation list. Users go directly into a one-to-one or group chat. Good for support chat, embedded widgets, or any focused messaging experience.
This assumes you've already completed [React Router Integration](/ui-kit/react/integration-react-router) (project created, UI Kit installed, init + login working).
 ***
## What You're Building
Three components stacked vertically:
1. **Chat header** — displays recipient name, avatar, online status, and optional call buttons
2. **Message list** — real-time chat history with scrolling
3. **Message composer** — text input with media, emojis, and reactions
***
## Full Code
Create a route component for the chat page. Init and login are completed in `src/main.tsx` (see [React Router Integration](/ui-kit/react/integration-react-router)).
```tsx title="src/pages/DirectChatPage.tsx" theme={null}
import { useEffect, useState } from "react";
import { CometChat } from "@cometchat/chat-sdk-javascript";
import {
CometChatProvider,
CometChatMessageHeader,
CometChatMessageList,
CometChatMessageComposer,
} from "@cometchat/chat-uikit-react";
import "./DirectChatPage.css";
const RECIPIENT_UID = "cometchat-uid-2"; // Replace with the UID you want to chat with
export default function DirectChatPage() {
const [chatUser, setChatUser] = useState(undefined);
useEffect(() => {
CometChat.getUser(RECIPIENT_UID).then(
(user) => setChatUser(user),
(error) => console.error("User fetch failed:", error)
);
}, []);
if (!chatUser) return
***
## What You're Building
Three components stacked vertically:
1. **Chat header** — displays recipient name, avatar, online status, and optional call buttons
2. **Message list** — real-time chat history with scrolling
3. **Message composer** — text input with media, emojis, and reactions
***
## Full Code
Create a route component for the chat page. Init and login are completed in `src/main.tsx` (see [React Router Integration](/ui-kit/react/integration-react-router)).
```tsx title="src/pages/DirectChatPage.tsx" theme={null}
import { useEffect, useState } from "react";
import { CometChat } from "@cometchat/chat-sdk-javascript";
import {
CometChatProvider,
CometChatMessageHeader,
CometChatMessageList,
CometChatMessageComposer,
} from "@cometchat/chat-uikit-react";
import "./DirectChatPage.css";
const RECIPIENT_UID = "cometchat-uid-2"; // Replace with the UID you want to chat with
export default function DirectChatPage() {
const [chatUser, setChatUser] = useState(undefined);
useEffect(() => {
CometChat.getUser(RECIPIENT_UID).then(
(user) => setChatUser(user),
(error) => console.error("User fetch failed:", error)
);
}, []);
if (!chatUser) return Loading chat...
;
return (
);
}
```
```css title="src/pages/DirectChatPage.css" theme={null}
.chat-window {
display: flex;
flex-direction: column;
height: 100vh;
width: 100%;
}
```
Register the route in your `App.tsx`:
```tsx title="src/App.tsx" theme={null}
import { Routes, Route, Navigate } from "react-router-dom";
import DirectChatPage from "./pages/DirectChatPage";
function App() {
// ... login logic from integration guide ...
return (
} />
} />
);
}
export default App;
```
Key points:
* `CometChat.getUser(UID)` fetches the full user object from the SDK — you need a real user object, not a manually constructed one.
* Pass either `user` or `group` to the message components, never both.
* The `RECIPIENT_UID` should be a user that exists in your CometChat app. Use one of the pre-created test UIDs: `cometchat-uid-1` through `cometchat-uid-5`.
* The chat page is a route component — React Router handles navigation.
***
## Switching to Group Chat
To load a group chat instead of one-to-one, fetch a `Group` object and pass it to the message components:
```tsx title="src/pages/DirectChatPage.tsx" theme={null}
import { useEffect, useState } from "react";
import { CometChat } from "@cometchat/chat-sdk-javascript";
import {
CometChatProvider,
CometChatMessageHeader,
CometChatMessageList,
CometChatMessageComposer,
} from "@cometchat/chat-uikit-react";
import "./DirectChatPage.css";
const GROUP_ID = "cometchat-guid-1"; // Replace with your Group ID
export default function DirectChatPage() {
const [chatGroup, setChatGroup] = useState(undefined);
useEffect(() => {
CometChat.getGroup(GROUP_ID).then(
(group) => setChatGroup(group),
(error) => console.error("Group fetch failed:", error)
);
}, []);
if (!chatGroup) return Loading chat...
;
return (
);
}
```
The only difference: use `CometChat.getGroup(GUID)` instead of `CometChat.getUser(UID)`, and pass `group` instead of `user`.
***
## Run
```bash theme={null}
npm run dev
```
Open `http://localhost:5173/chat`. You should see the chat window load with the conversation for the UID or GUID you set.
***
## Next Steps
Two-panel layout with a sidebar
Tabbed navigation with Chats, Calls, Users
Browse all prebuilt UI components