> ## Documentation Index
> Fetch the complete documentation index at: https://www.cometchat.com/docs/llms.txt
> Use this file to discover all available pages before exploring further.

# Conversation List + Message View

> Build a two-panel conversation list + message view layout in Astro with CometChat React UI Kit.

<Accordion title="AI Integration Quick Reference">
  | Field        | Value                                                                                                  |
  | ------------ | ------------------------------------------------------------------------------------------------------ |
  | Package      | `@cometchat/chat-uikit-react`                                                                          |
  | Framework    | Astro (with `@astrojs/react` islands)                                                                  |
  | Components   | `CometChatConversations`, `CometChatMessageHeader`, `CometChatMessageList`, `CometChatMessageComposer` |
  | Layout       | Two-panel — conversation list (left) + message view (right)                                            |
  | Prerequisite | Complete [Astro Integration](/ui-kit/react/astro-integration) Steps 1–5 first                          |
  | SSR          | `client:only="react"` directive — CometChat requires browser APIs                                      |
  | Pattern      | WhatsApp Web, Slack, Microsoft Teams                                                                   |
</Accordion>

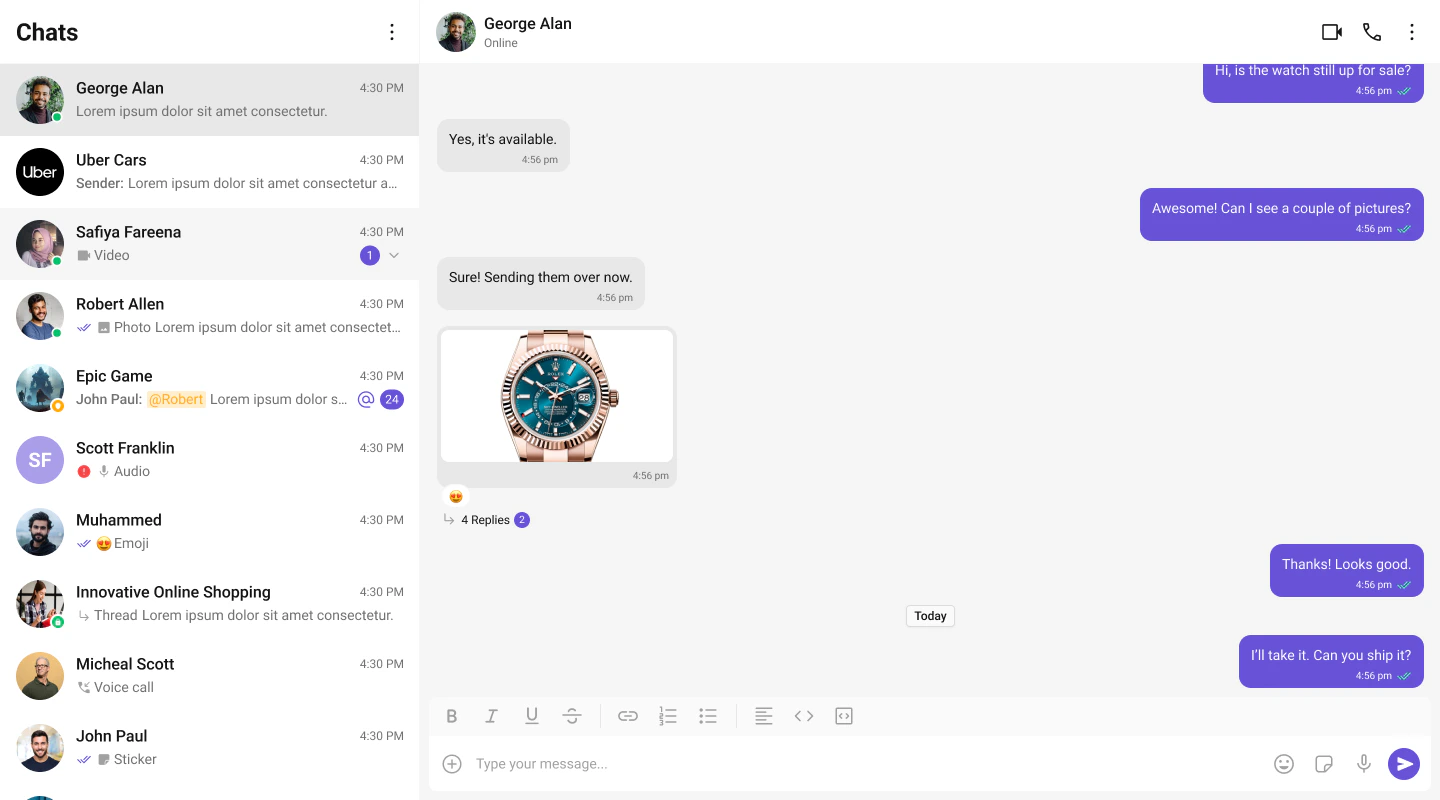
This guide builds a two-panel chat layout — conversation list on the left, messages on the right. Users tap a conversation to open it.

This assumes you've already completed [Astro Integration](/ui-kit/react/astro-integration) (project created, React added, UI Kit installed).

<Frame>
  <img src="https://mintcdn.com/cometchat-22654f5b/-YC7tOebleeoFejE/images/e6411d13-chat_experience_sidebar_message-35c431d8bf694e5690e4e0f3a74165af.png?fit=max&auto=format&n=-YC7tOebleeoFejE&q=85&s=03a9df5c80f787357ebc4508839a88cb" width="1282" height="802" data-path="images/e6411d13-chat_experience_sidebar_message-35c431d8bf694e5690e4e0f3a74165af.png" />
</Frame>

***

## What You're Building

Three sections working together:

1. **Sidebar (conversation list)** — shows all active conversations (users and groups)
2. **Message view** — displays chat messages for the selected conversation in real time
3. **Message composer** — text input with support for media, emojis, and reactions

***

## Step 1 — Create the React Island

Create a `ChatApp` component inside `src/components/`. This is a React island that handles init, login, and renders the full chat experience.

<Tree>
  <Tree.Folder name="src" defaultOpen>
    <Tree.Folder name="components" defaultOpen>
      <Tree.File name="ChatApp.tsx" />

      <Tree.File name="ChatApp.css" />
    </Tree.Folder>
  </Tree.Folder>
</Tree>

<Tabs>
  <Tab title="TypeScript">
    ```tsx title="ChatApp.tsx" lines highlight={15-17, 20} theme={null}
    import { useEffect, useState } from "react";
    import {
      CometChatConversations,
      CometChatMessageComposer,
      CometChatMessageHeader,
      CometChatMessageList,
      CometChatUIKit,
      UIKitSettingsBuilder,
    } from "@cometchat/chat-uikit-react";
    import { CometChat } from "@cometchat/chat-sdk-javascript";
    import "@cometchat/chat-uikit-react/css-variables.css";
    import "./ChatApp.css";

    const COMETCHAT_CONSTANTS = {
      APP_ID: "",    // Replace with your App ID
      REGION: "",    // Replace with your Region
      AUTH_KEY: "",  // Replace with your Auth Key (dev only)
    };

    const UID = "cometchat-uid-1"; // Replace with your actual UID

    export default function ChatApp() {
      const [user, setUser] = useState<CometChat.User | undefined>(undefined);
      const [selectedUser, setSelectedUser] = useState<CometChat.User | undefined>(undefined);
      const [selectedGroup, setSelectedGroup] = useState<CometChat.Group | undefined>(undefined);

      useEffect(() => {
        const UIKitSettings = new UIKitSettingsBuilder()
          .setAppId(COMETCHAT_CONSTANTS.APP_ID)
          .setRegion(COMETCHAT_CONSTANTS.REGION)
          .setAuthKey(COMETCHAT_CONSTANTS.AUTH_KEY)
          .subscribePresenceForAllUsers()
          .build();

        CometChatUIKit.init(UIKitSettings)
          .then(() => {
            console.log("Initialization completed successfully");
            CometChatUIKit.getLoggedinUser().then((loggedInUser) => {
              if (!loggedInUser) {
                CometChatUIKit.login(UID)
                  .then((u) => {
                    console.log("Login Successful", { u });
                    setUser(u);
                  })
                  .catch((error) => console.error("Login failed", error));
              } else {
                console.log("Already logged-in", { loggedInUser });
                setUser(loggedInUser);
              }
            });
          })
          .catch((error) => console.error("Initialization failed", error));
      }, []);

      if (!user) return <div>Initializing Chat...</div>;

      return (
        <div className="conversations-with-messages">
          <div className="conversations-wrapper">
            <CometChatConversations
              onItemClick={(activeItem) => {
                let item: any = activeItem;
                if (activeItem instanceof CometChat.Conversation) {
                  item = activeItem.getConversationWith();
                }
                if (item instanceof CometChat.User) {
                  setSelectedUser(item);
                  setSelectedGroup(undefined);
                } else if (item instanceof CometChat.Group) {
                  setSelectedUser(undefined);
                  setSelectedGroup(item);
                } else {
                  setSelectedUser(undefined);
                  setSelectedGroup(undefined);
                }
              }}
            />
          </div>

          {selectedUser || selectedGroup ? (
            <div className="messages-wrapper">
              <CometChatMessageHeader user={selectedUser} group={selectedGroup} />
              <CometChatMessageList user={selectedUser} group={selectedGroup} />
              <CometChatMessageComposer user={selectedUser} group={selectedGroup} />
            </div>
          ) : (
            <div className="empty-conversation">Select a conversation to start chatting</div>
          )}
        </div>
      );
    }
    ```
  </Tab>

  <Tab title="CSS">
    ```css title="ChatApp.css" lines theme={null}
    .conversations-with-messages {
      display: flex;
      height: 100%;
      width: 100%;
    }

    .conversations-wrapper {
      height: 100%;
      width: 480px;
      overflow: hidden;
      display: flex;
      flex-direction: column;
    }

    .conversations-wrapper > .cometchat {
      overflow: hidden;
    }

    .messages-wrapper {
      width: calc(100% - 480px);
      height: 100%;
      display: flex;
      flex-direction: column;
    }

    .empty-conversation {
      height: 100%;
      width: 100%;
      display: flex;
      justify-content: center;
      align-items: center;
      background: var(--cometchat-background-color-03, #F5F5F5);
      color: var(--cometchat-text-color-secondary, #727272);
      font: var(--cometchat-font-body-regular, 400 14px Roboto);
    }

    .cometchat .cometchat-message-composer {
      border-radius: 0px;
    }
    ```
  </Tab>
</Tabs>

**How it works**:

* Init and login happen inside `useEffect` — the component only renders chat UI after login resolves.
* When a conversation is tapped, the `User` or `Group` is extracted from the `Conversation` object.
* `selectedUser` / `selectedGroup` state drives which chat is displayed — pass either `user` or `group` to the message components, never both.

***

## Step 2 — Render the Astro Page

Import the island and hydrate it client-side using `client:only="react"`.

```astro title="src/pages/index.astro" lines theme={null}
---
import ChatApp from "../components/ChatApp.tsx";
import "../styles/globals.css";
---

<html lang="en">
  <head>
    <meta charset="utf-8" />
    <title>CometChat + Astro</title>
  </head>
  <body>
    <ChatApp client:only="react" />
  </body>
</html>
```

The `client:only="react"` directive ensures the component skips SSR entirely and only renders in the browser — required because CometChat needs `window` and `WebSocket`.

***

## Step 3 — Run the Project

<Tabs>
  <Tab title="npm">
    ```bash lines theme={null}
    npm run dev
    ```
  </Tab>

  <Tab title="pnpm">
    ```bash lines theme={null}
    pnpm dev
    ```
  </Tab>

  <Tab title="yarn">
    ```bash lines theme={null}
    yarn dev
    ```
  </Tab>
</Tabs>

You should see the conversation list on the left. Tap any conversation to load messages on the right.

***

## Next Steps

<CardGroup cols={2}>
  <Card title="Theming" icon="paintbrush" href="/ui-kit/react/theme">
    Customize colors, fonts, and styles to match your brand
  </Card>

  <Card title="Components Overview" icon="grid-2" href="/ui-kit/react/components-overview">
    Browse all prebuilt UI components
  </Card>

  <Card title="Astro Integration" icon={<img src="/images/icons/astro.svg" alt="Astro" />} href="/ui-kit/react/astro-integration">
    Back to the main setup guide
  </Card>

  <Card title="Core Features" icon="comments" href="/ui-kit/react/core-features">
    Chat features included out of the box
  </Card>
</CardGroup>
