> ## Documentation Index
> Fetch the complete documentation index at: https://www.cometchat.com/docs/llms.txt
> Use this file to discover all available pages before exploring further.
# Overview
> Overview of Overview in CometChat.
🚀 **CometChat Android UI Kit v6 is now available!** It features a completely revamped component architecture and improved theming. [Try the v6 →](/ui-kit/android/v6/overview)
Reference for Kotlin UI Kit.
Check out our Kotlin UI Kit [here](/ui-kit/kotlin/customize-ui-kit).
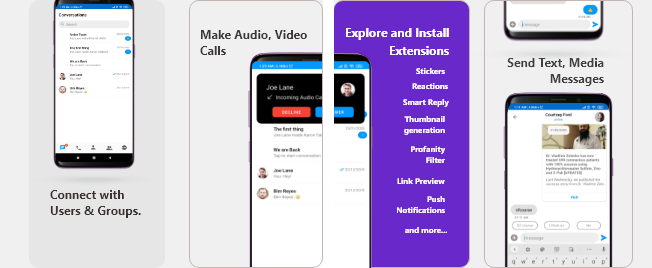
The CometChat Android Java UI Kit lets developers integrate text chat & voice/video calling features into Android apps seamlessly.
 👍 Improvements in v3.0
* Faster connection & response times
* Higher rate limits
* Supports up to 100K users in a group
* Unlimited groups
* Support for Transient Messages
* Real-time user & group members count
The Android Java UI Kit’s fully customizable UI components simplify the process of integrating text chat and voice/video calling features to your website or mobile application in a few minutes.
Follow the steps mentioned in the `README.md` file.
Kindly, click on below button to download our Android Java Chat UI Kit.
[Java Chat UI Kit](https://github.com/cometchat-pro/android-java-chat-ui-kit/archive/v3.zip)
[View on Github](https://github.com/cometchat/cometchat-chat-uikit-android-java/tree/v3)
**I want to integrate UI Kit with my App**
* [UI Components](/ui-kit/android/v3/android-java-ui-components)
* [Customize UI Kit](/ui-kit/android/v3/android-customize-ui-kit)
Import the app into Android Studio and follow the steps mentioned in the `README.md` file.
Kindly, click on below button to download our Java Sample App.
[Java Sample App](https://github.com/cometchat-pro-samples/android-java-chat-app/archive/v3.zip)
[View on Github](https://github.com/cometchat/cometchat-chat-sample-app-android-java/tree/v3)
### Prerequisites ⭐
Before you begin, ensure you have met the following requirements:
✅ You have `Android Studio` installed in your machine.
✅ You have a `Android Device or Emulator` with Android Version 6.0 or above.
✅ You have read [CometChat Key Concepts](/ui-kit/android/v3/key-concepts).
## Installing Android Java Chat UI Kit
### Setup 🔧
To setup Android Java Chat UI Kit, you need to first register on CometChat Dashboard. [Click here to sign up](https://app.cometchat.com/login).
#### Get your Application Keys 🔑
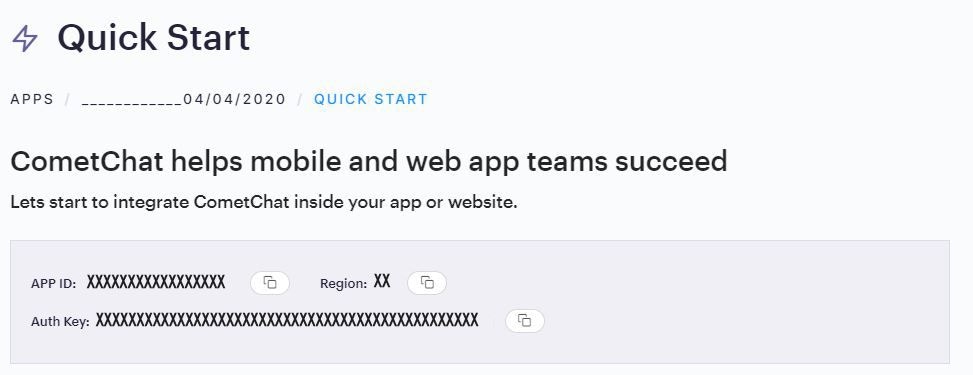
1. Create a new app: Click **Add App** option available → Enter App Name & other information → Create App
2. You will find `APP_ID`, `AUTH_KEY` and `REGION` key at the top in **QuickStart** section or else go to "API & Auth Keys" section and copy the `APP_ID`, `API_KEY` and `REGION` key from the "Auth Only API Key" tab.
👍 Improvements in v3.0
* Faster connection & response times
* Higher rate limits
* Supports up to 100K users in a group
* Unlimited groups
* Support for Transient Messages
* Real-time user & group members count
The Android Java UI Kit’s fully customizable UI components simplify the process of integrating text chat and voice/video calling features to your website or mobile application in a few minutes.
Follow the steps mentioned in the `README.md` file.
Kindly, click on below button to download our Android Java Chat UI Kit.
[Java Chat UI Kit](https://github.com/cometchat-pro/android-java-chat-ui-kit/archive/v3.zip)
[View on Github](https://github.com/cometchat/cometchat-chat-uikit-android-java/tree/v3)
**I want to integrate UI Kit with my App**
* [UI Components](/ui-kit/android/v3/android-java-ui-components)
* [Customize UI Kit](/ui-kit/android/v3/android-customize-ui-kit)
Import the app into Android Studio and follow the steps mentioned in the `README.md` file.
Kindly, click on below button to download our Java Sample App.
[Java Sample App](https://github.com/cometchat-pro-samples/android-java-chat-app/archive/v3.zip)
[View on Github](https://github.com/cometchat/cometchat-chat-sample-app-android-java/tree/v3)
### Prerequisites ⭐
Before you begin, ensure you have met the following requirements:
✅ You have `Android Studio` installed in your machine.
✅ You have a `Android Device or Emulator` with Android Version 6.0 or above.
✅ You have read [CometChat Key Concepts](/ui-kit/android/v3/key-concepts).
## Installing Android Java Chat UI Kit
### Setup 🔧
To setup Android Java Chat UI Kit, you need to first register on CometChat Dashboard. [Click here to sign up](https://app.cometchat.com/login).
#### Get your Application Keys 🔑
1. Create a new app: Click **Add App** option available → Enter App Name & other information → Create App
2. You will find `APP_ID`, `AUTH_KEY` and `REGION` key at the top in **QuickStart** section or else go to "API & Auth Keys" section and copy the `APP_ID`, `API_KEY` and `REGION` key from the "Auth Only API Key" tab.
 #### Add the CometChat Dependency
**Step 1 -** Add the repository URL to the **project level**`build.gradle` file in the repositories block under the `allprojects` section.
```gradle theme={null}
allprojects {
repositories {
maven {
url "https://dl.cloudsmith.io/public/cometchat/cometchat-pro-android/maven/"
}
}
}
```
**Step 2-** Open the **app level**`build.gradle` file and follow below
1. Add the below line in the dependencies section.
```gradle theme={null}
dependencies {
implementation 'com.cometchat:pro-android-chat-sdk:3.0.1'
/*v2.4+ onwards, Voice & Video Calling functionality has been
moved to a separate library. In case you plan to use the calling feature,
please add the Calling dependency*/
implementation 'com.cometchat:pro-android-calls-sdk:2.1.1'
}
```
2. Add the below lines android section
```gradle theme={null}
android {
compileOptions {
sourceCompatibility JavaVersion.VERSION_1_8
targetCompatibility JavaVersion.VERSION_1_8
}
}
```
You can refer to the below link for instructions on how to do so:
**[📝 Add CometChat Dependency](/sdk/android/setup)** `Documentation`
***
### Configure CometChat SDK
#### Initialize CometChat 🌟
The `init()` method initializes the settings required for CometChat. Please make sure to call this method before calling any other methods from CometChat SDK.
```java theme={null}
String appID = "APP_ID"; // Replace with your App ID
String region = "REGION"; // Replace with your App Region ("eu" or "us")
String authKey = "AUTH_KEY"; //Replace with your Auth Key.
AppSettings appSettings=new AppSettings.AppSettingsBuilder().subscribePresenceForAllUsers().setRegion(region).build();
CometChat.init(this, appID,appSettings, new CometChat.CallbackListener() {
@Override
public void onSuccess(String successMessage) {
UIKitSettings.setAuthKey(authKey);
CometChat.setSource("ui-kit","android","java");
Log.d(TAG, "Initialization completed successfully");
}
@Override
public void onError(CometChatException e) {
Log.d(TAG, "Initialization failed with exception: " + e.getMessage());
}
});
```
`Tip` UIKitSettings.setAuthKey(String authKey) is used to pass the Auth Key to uiKit library.
Make sure to replace `region` and `appID` with your credentials in the above code snippet.
#### Login User 👤
Once you have created the user successfully, you will need to log the user into CometChat using the login() method.
```java theme={null}
String UID = "user1"; // Replace with the UID of the user to login
String authKey = "AUTH_KEY"; // Replace with your App Auth Key
if (CometChat.getLoggedInUser() == null) {
CometChat.login(UID, authKey, new CometChat.CallbackListener() {
@Override
public void onSuccess(User user) {
Log.d(TAG, "Login Successful : " + user.toString());
}
@Override
public void onError(CometChatException e) {
Log.d(TAG, "Login failed with exception: " + e.getMessage());
}
});
} else {
// User already logged in
}
```
* The `login()` method needs to be called only once.
* Replace `AUTH_KEY` with your App Auth Key in the above code snippet.
***
📝 Please refer to our **[SDK Documentation](/sdk/android/overview)** for more information on how to configure the CometChat Pro SDK and implement various features using the same.
### Add Android Java UI Kit Library
To integrate the Android Java UI Kit, please follow the steps below:
* Clone the UI Kit Library from the [android-chat-ui-kit repository](https://github.com/cometchat-pro/android-java-chat-ui-kit) or
[Java Download UI Kit Library](https://github.com/cometchat-pro/android-java-chat-ui-kit/archive/v3.zip)
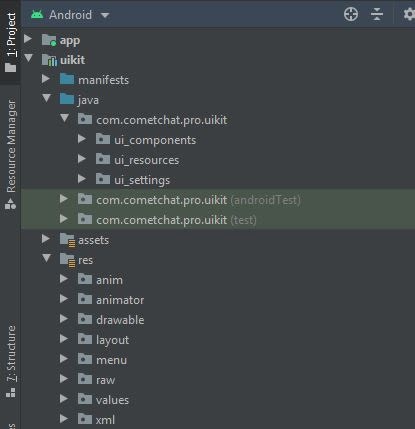
* Import `uikit` Module from Module Settings.(Click **[here](/ui-kit/android/v3/how-to-add-uikit-module)** to know how to import `uikit` as Module)
* If the Library is added sucessfully, it will look like mentioned in the below image.
#### Add the CometChat Dependency
**Step 1 -** Add the repository URL to the **project level**`build.gradle` file in the repositories block under the `allprojects` section.
```gradle theme={null}
allprojects {
repositories {
maven {
url "https://dl.cloudsmith.io/public/cometchat/cometchat-pro-android/maven/"
}
}
}
```
**Step 2-** Open the **app level**`build.gradle` file and follow below
1. Add the below line in the dependencies section.
```gradle theme={null}
dependencies {
implementation 'com.cometchat:pro-android-chat-sdk:3.0.1'
/*v2.4+ onwards, Voice & Video Calling functionality has been
moved to a separate library. In case you plan to use the calling feature,
please add the Calling dependency*/
implementation 'com.cometchat:pro-android-calls-sdk:2.1.1'
}
```
2. Add the below lines android section
```gradle theme={null}
android {
compileOptions {
sourceCompatibility JavaVersion.VERSION_1_8
targetCompatibility JavaVersion.VERSION_1_8
}
}
```
You can refer to the below link for instructions on how to do so:
**[📝 Add CometChat Dependency](/sdk/android/setup)** `Documentation`
***
### Configure CometChat SDK
#### Initialize CometChat 🌟
The `init()` method initializes the settings required for CometChat. Please make sure to call this method before calling any other methods from CometChat SDK.
```java theme={null}
String appID = "APP_ID"; // Replace with your App ID
String region = "REGION"; // Replace with your App Region ("eu" or "us")
String authKey = "AUTH_KEY"; //Replace with your Auth Key.
AppSettings appSettings=new AppSettings.AppSettingsBuilder().subscribePresenceForAllUsers().setRegion(region).build();
CometChat.init(this, appID,appSettings, new CometChat.CallbackListener() {
@Override
public void onSuccess(String successMessage) {
UIKitSettings.setAuthKey(authKey);
CometChat.setSource("ui-kit","android","java");
Log.d(TAG, "Initialization completed successfully");
}
@Override
public void onError(CometChatException e) {
Log.d(TAG, "Initialization failed with exception: " + e.getMessage());
}
});
```
`Tip` UIKitSettings.setAuthKey(String authKey) is used to pass the Auth Key to uiKit library.
Make sure to replace `region` and `appID` with your credentials in the above code snippet.
#### Login User 👤
Once you have created the user successfully, you will need to log the user into CometChat using the login() method.
```java theme={null}
String UID = "user1"; // Replace with the UID of the user to login
String authKey = "AUTH_KEY"; // Replace with your App Auth Key
if (CometChat.getLoggedInUser() == null) {
CometChat.login(UID, authKey, new CometChat.CallbackListener() {
@Override
public void onSuccess(User user) {
Log.d(TAG, "Login Successful : " + user.toString());
}
@Override
public void onError(CometChatException e) {
Log.d(TAG, "Login failed with exception: " + e.getMessage());
}
});
} else {
// User already logged in
}
```
* The `login()` method needs to be called only once.
* Replace `AUTH_KEY` with your App Auth Key in the above code snippet.
***
📝 Please refer to our **[SDK Documentation](/sdk/android/overview)** for more information on how to configure the CometChat Pro SDK and implement various features using the same.
### Add Android Java UI Kit Library
To integrate the Android Java UI Kit, please follow the steps below:
* Clone the UI Kit Library from the [android-chat-ui-kit repository](https://github.com/cometchat-pro/android-java-chat-ui-kit) or
[Java Download UI Kit Library](https://github.com/cometchat-pro/android-java-chat-ui-kit/archive/v3.zip)
* Import `uikit` Module from Module Settings.(Click **[here](/ui-kit/android/v3/how-to-add-uikit-module)** to know how to import `uikit` as Module)
* If the Library is added sucessfully, it will look like mentioned in the below image.
 ### Configure Android Java UI Kit Library
To use UI Kit you have to add Material Design support in your app as the UI Kit uses Material Design Components.
* Add Material Design Dependency in build.gradle
```gradle theme={null}
dependencies {
implementation 'com.google.android.material:material:'
}
```
* Make sure that your app's theme should extend `Theme.MaterialComponents`. Follow the guide on [Getting started Material Components](https://material.io/develop/android/docs/getting-started/)
The following is the list of Material Components themes you can use to get the latest component styles and theme-level attributes.
* `Theme.MaterialComponents.NoActionBar`
* Theme.MaterialComponents.Light.NoActionBar
* Theme.MaterialComponents.DayNight.NoActionBar
Update your app theme to inherit from one of these themes, e.g.:
```xml theme={null}
```
Enable DataBinding
As the UI Kit uses DataBinding you must enable DataBinding
To configure your app to use data binding, add the dataBinding element to your `build.gradle` file in the app module, as shown in the following example:
```gradle theme={null}
android {
dataBinding {
enabled = true
}
}
```
Open the `gradle.properties` and check if the below stated line is present or not, if not then simply add it.
```
android.enableJetifier=true
```
> We are using File Provider for storage & file access. So you need to add your application package name in manifestPlaceholders
```gradle theme={null}
android {
defaultConfig {
...
manifestPlaceholders = [file_provider: "YOUR_PACKAGE_NAME"]
//add your application package.
}
}
```
### Launch CometChat UI
### Configure Android Java UI Kit Library
To use UI Kit you have to add Material Design support in your app as the UI Kit uses Material Design Components.
* Add Material Design Dependency in build.gradle
```gradle theme={null}
dependencies {
implementation 'com.google.android.material:material:'
}
```
* Make sure that your app's theme should extend `Theme.MaterialComponents`. Follow the guide on [Getting started Material Components](https://material.io/develop/android/docs/getting-started/)
The following is the list of Material Components themes you can use to get the latest component styles and theme-level attributes.
* `Theme.MaterialComponents.NoActionBar`
* Theme.MaterialComponents.Light.NoActionBar
* Theme.MaterialComponents.DayNight.NoActionBar
Update your app theme to inherit from one of these themes, e.g.:
```xml theme={null}
```
Enable DataBinding
As the UI Kit uses DataBinding you must enable DataBinding
To configure your app to use data binding, add the dataBinding element to your `build.gradle` file in the app module, as shown in the following example:
```gradle theme={null}
android {
dataBinding {
enabled = true
}
}
```
Open the `gradle.properties` and check if the below stated line is present or not, if not then simply add it.
```
android.enableJetifier=true
```
> We are using File Provider for storage & file access. So you need to add your application package name in manifestPlaceholders
```gradle theme={null}
android {
defaultConfig {
...
manifestPlaceholders = [file_provider: "YOUR_PACKAGE_NAME"]
//add your application package.
}
}
```
### Launch CometChat UI
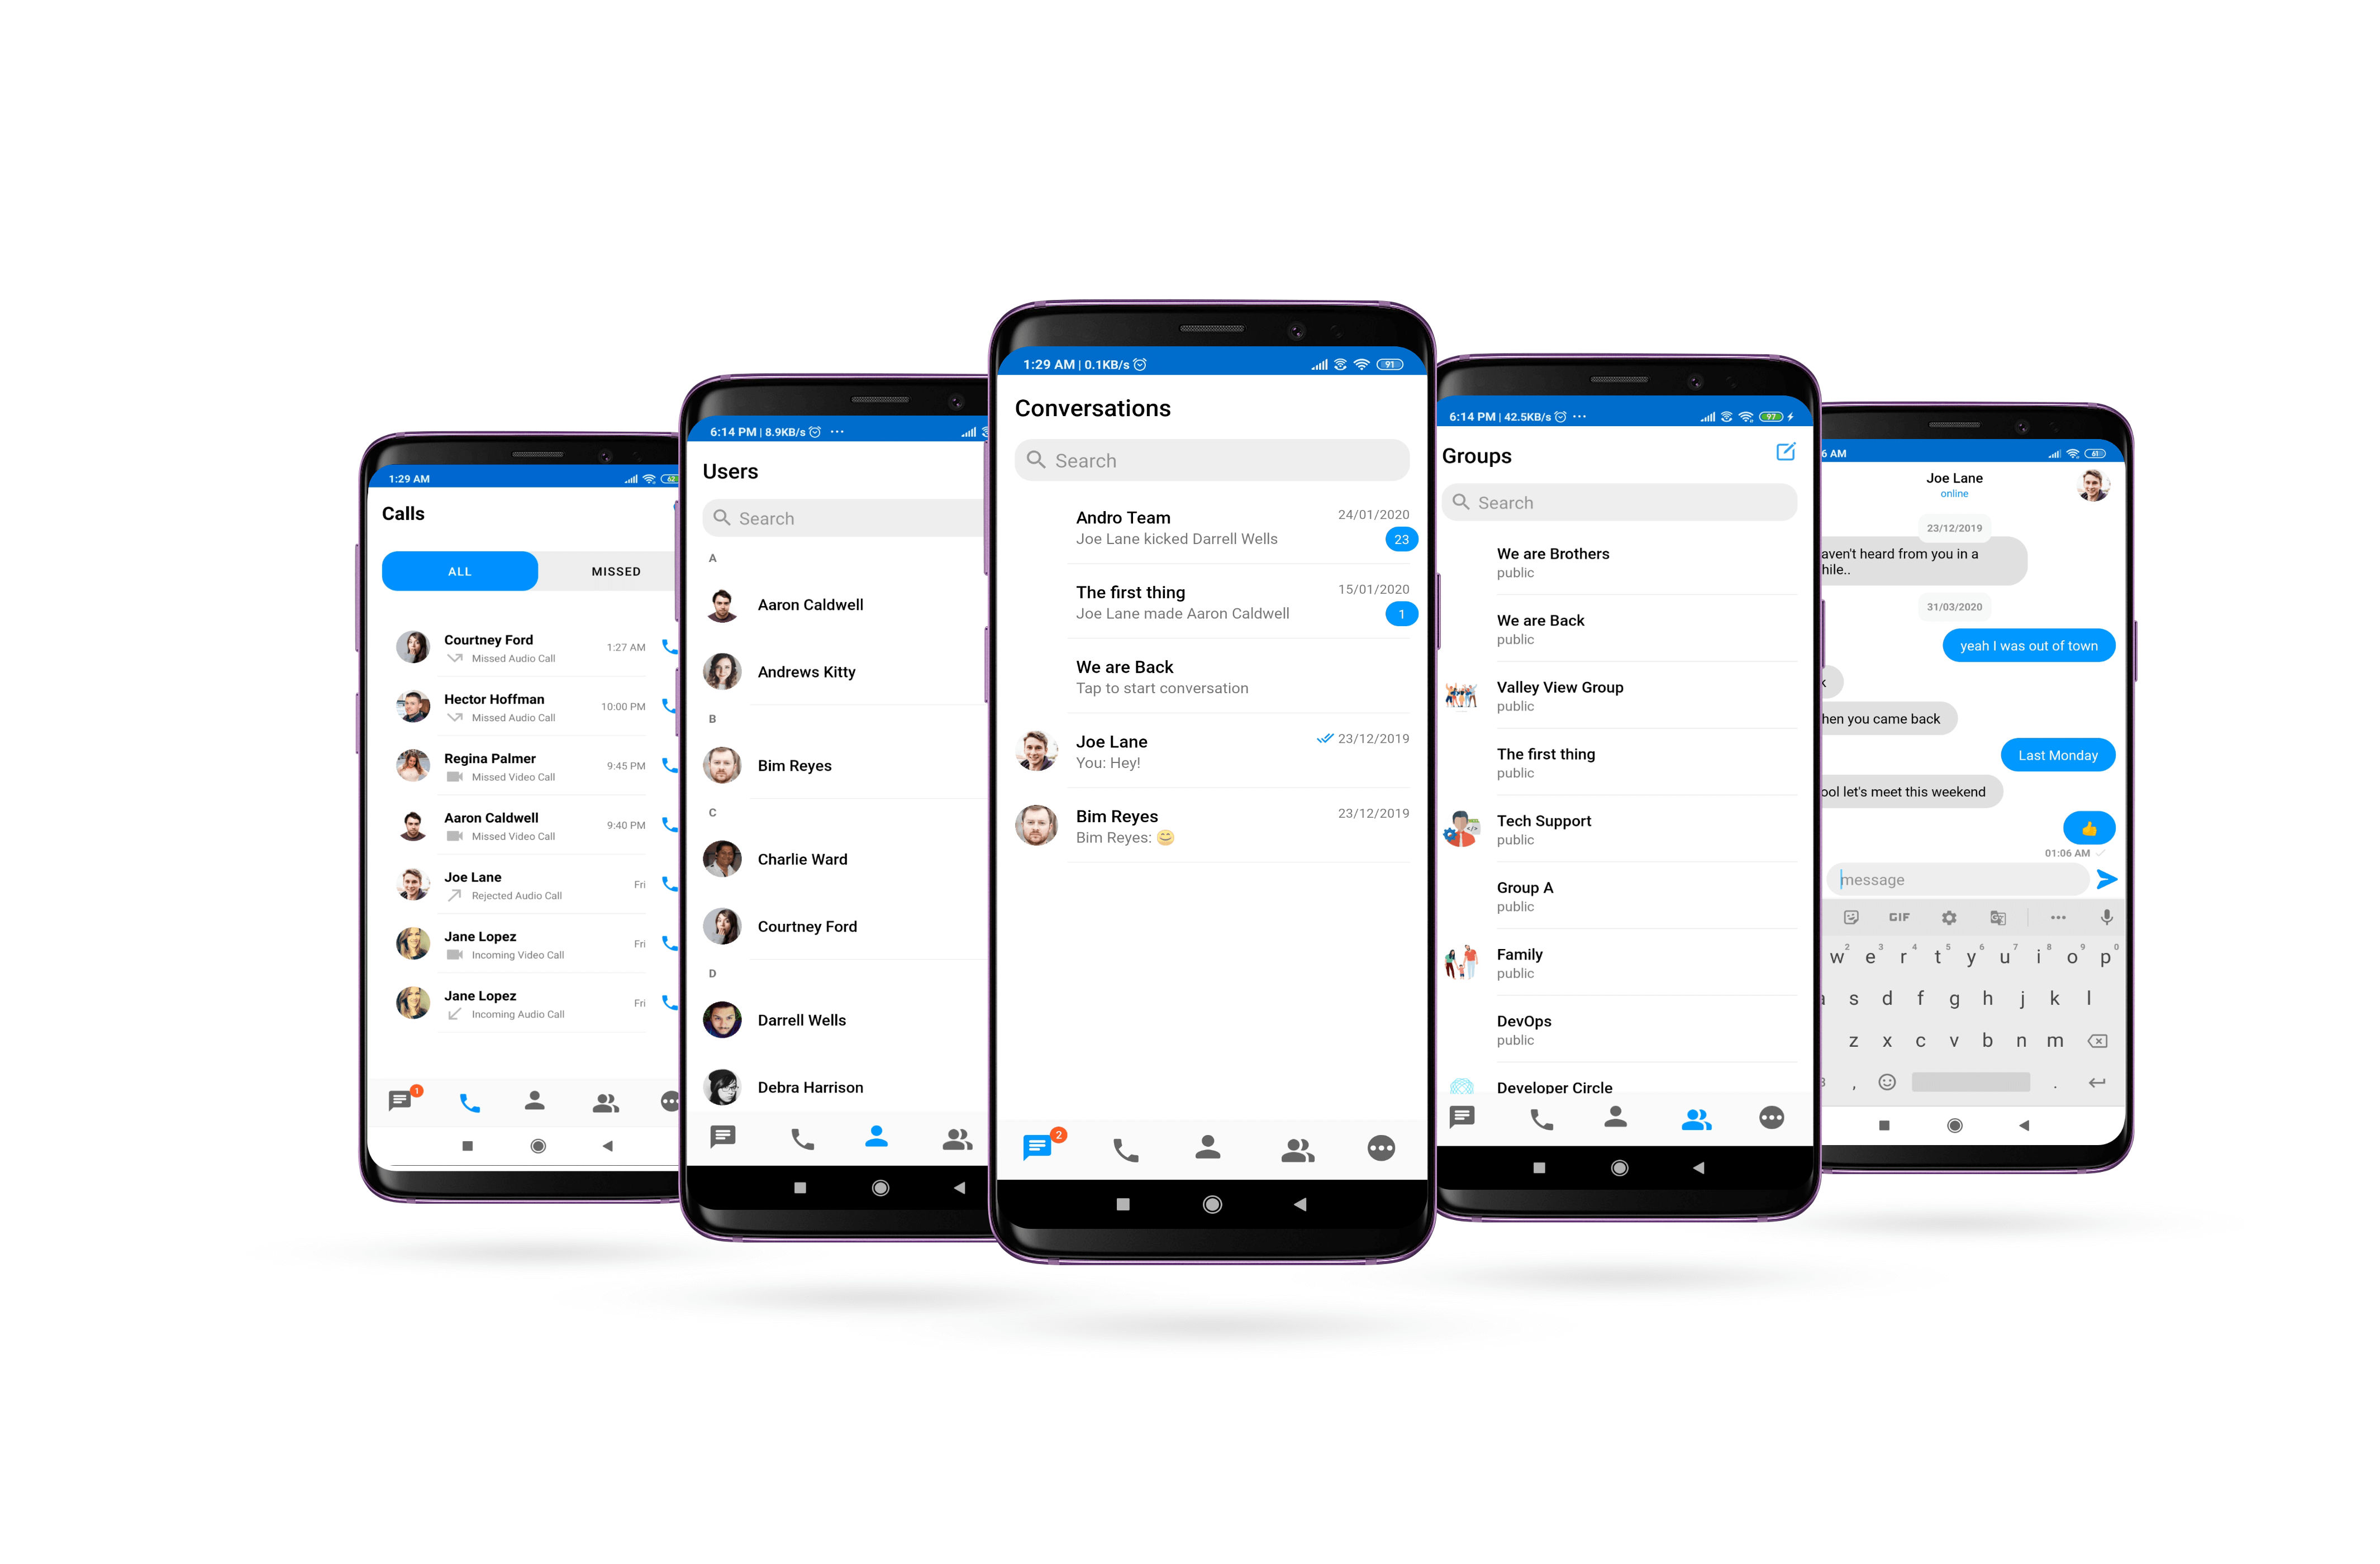 **CometChatUI** is a way to launch a fully working chat application using the UI Kit .In UI Unified all the UI Screens and UI Components working together to give the full experience of a chat application with minimal coding effort.\*
To use CometChatUI user has to launch `CometChatUI` class. Add the following code snippet to launch `CometChatUI`.
```java theme={null}
startActivity(new Intent(YourActivity.this,CometChatUI.class))
```
***
## Checkout our Android Java sample app
Visit our [Java sample app](https://github.com/cometchat-pro/android-java-chat-app/tree/v3)repository to run the Android Java sample app.
**CometChatUI** is a way to launch a fully working chat application using the UI Kit .In UI Unified all the UI Screens and UI Components working together to give the full experience of a chat application with minimal coding effort.\*
To use CometChatUI user has to launch `CometChatUI` class. Add the following code snippet to launch `CometChatUI`.
```java theme={null}
startActivity(new Intent(YourActivity.this,CometChatUI.class))
```
***
## Checkout our Android Java sample app
Visit our [Java sample app](https://github.com/cometchat-pro/android-java-chat-app/tree/v3)repository to run the Android Java sample app.