> ## Documentation Index
> Fetch the complete documentation index at: https://www.cometchat.com/docs/llms.txt
> Use this file to discover all available pages before exploring further.
# UI Kit Builder Integration
> Add CometChat UI Kit Builder to React Router apps with configurable chat features, themes, layouts, login, and SSR support.
The **UI Kit Builder** simplifies integrating CometChat's UI Kit into your React Router application — quickly set up chat, customize UI elements, and add features without extensive coding.
## **Complete Integration Workflow**
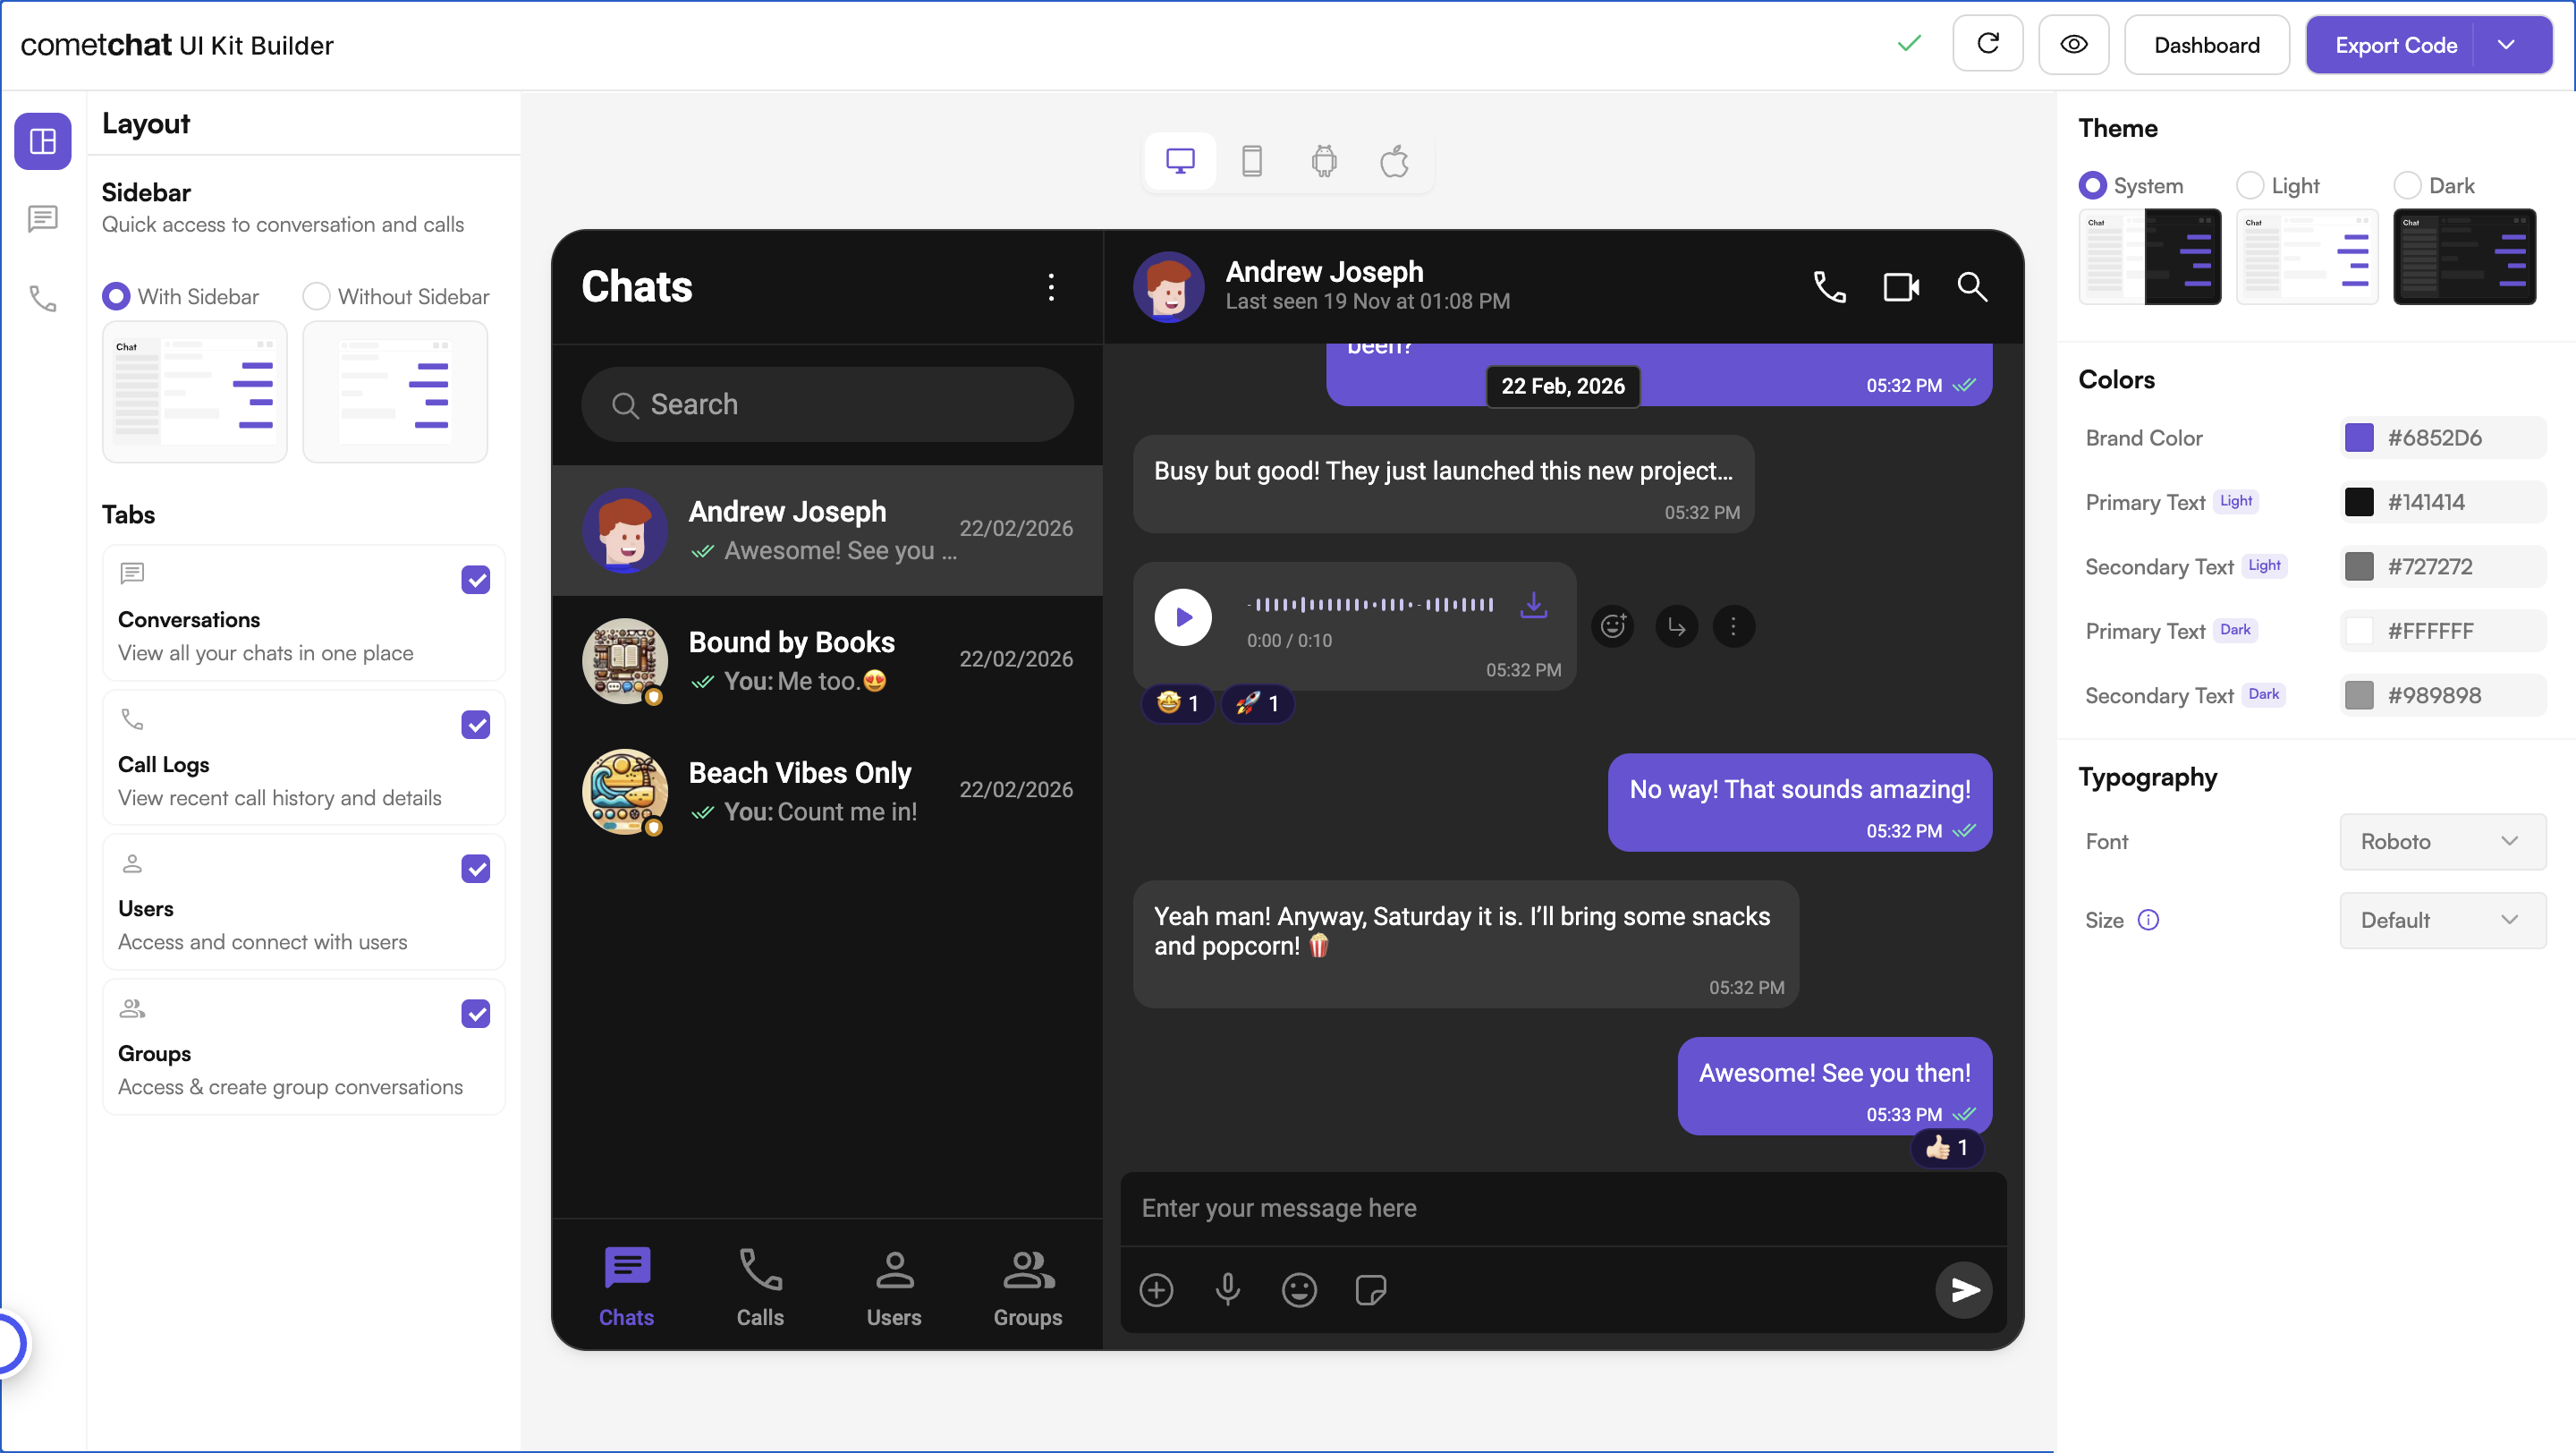
1. **Design Your Chat Experience** - Use the **UI Kit Builder** to customize layouts, features, and styling.
2. **Review and Export** - Review which features will be enabled in your Dashboard, toggle them on/off, and download the generated code package.
3. **Preview Customizations** - Optionally, preview the chat experience before integrating it into your project.
4. **Integration** - Integrate into your existing application.
5. **Customize Further** - Explore advanced customization options to tailor the chat experience.
***
## **Launch the UI Kit Builder**
1. Log in to your [**CometChat Dashboard**](https://app.cometchat.com).
2. Select your application from the list.
3. Navigate to **Chat & Messaging** → **Get Started**.
4. Choose your platform and click **Launch UI Kit Builder**.
***
## **Review Your Export**
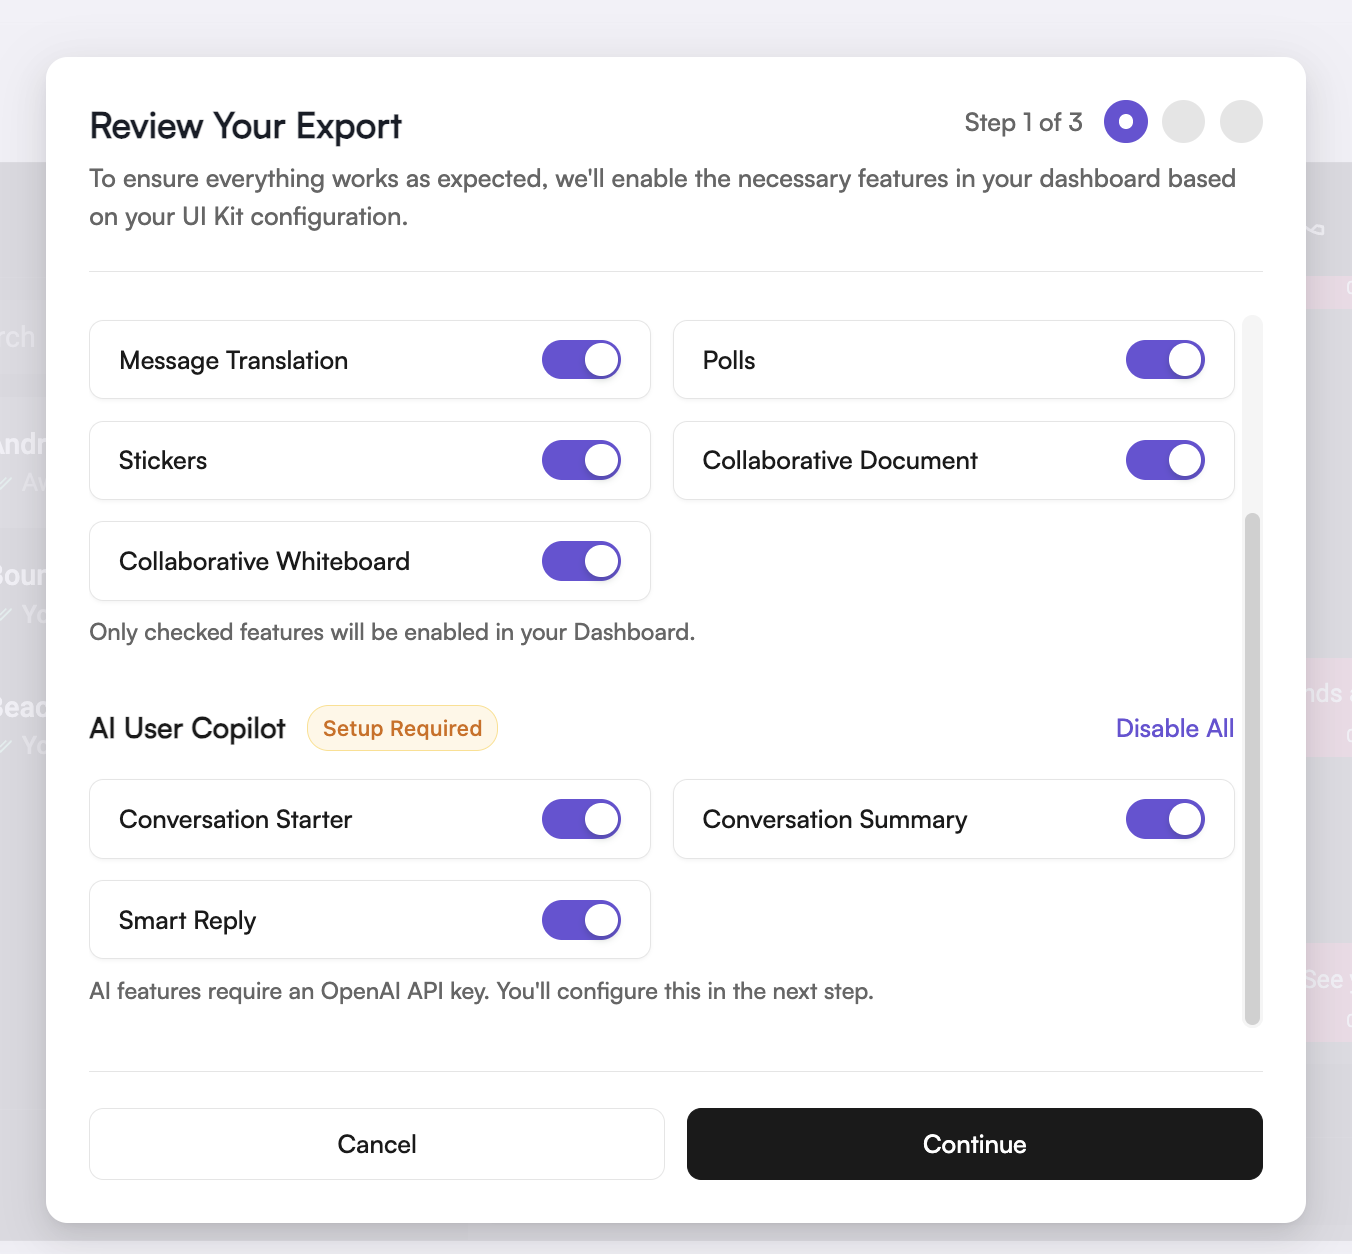
When you click **Export**, a "Review Your Export" modal appears (Step 1 of 3). This lets you:
* **Review features** — See which features will be enabled in your CometChat Dashboard based on your UI Kit configuration
* **Toggle features** — Turn individual features on/off before export
* **AI User Copilot** — Requires an OpenAI API key (you'll configure this in the next step)
Only checked features will be enabled in your Dashboard. You can always modify
these settings later in the [CometChat Dashboard](https://app.cometchat.com).
***
## **Preview Customizations (Optional)**
Before integrating the **UI Kit Builder** into your project, you can preview the chat experience by following these steps. This step is completely optional and can be skipped if you want to directly integrate the **UI Kit Builder** into your project.
> You can preview the experience:
>
> 1. Open the `cometchat-app-react` folder.
> 2. Install dependencies:
>
> ```
> npm i
> ```
>
> 3. Run the app:
>
> ```powershell theme={null}
> npm start
> ```
>
> Your app credentials are already prepopulated in the exported code.
***
## **Integrate into Your Project**
Follow these steps to integrate CometChat UI Kit Builder into your existing React Router project:
### **Step 1: Install Dependencies**
Run the following command to install the required dependencies:
```ruby theme={null}
npm install @cometchat/chat-uikit-react@6.3.11 @cometchat/calls-sdk-javascript
```
### **Step 2: Copy CometChat Folder**
Copy the `cometchat-app-react/src/CometChat` folder into your project's `src` directory.
### **Step 3: Initialize CometChat UI Kit**
Initialize CometChat in your app's entry file. Select your setup:
```tsx lines highlight={12-14} src/main.tsx theme={null}
import { createRoot } from "react-dom/client";
import "./index.css";
import App from "./App.tsx";
import {
UIKitSettingsBuilder,
CometChatUIKit,
} from "@cometchat/chat-uikit-react";
import { setupLocalization } from "./CometChat/utils/utils.ts";
import { CometChatProvider } from "./CometChat/context/CometChatContext";
export const COMETCHAT_CONSTANTS = {
APP_ID: "YOUR_APP_ID", // Replace with your App ID
REGION: "YOUR_REGION", // Replace with your App Region
AUTH_KEY: "YOUR_AUTH_KEY", // Replace with your Auth Key or leave blank if you are authenticating using Auth Token
};
const uiKitSettings = new UIKitSettingsBuilder()
.setAppId(COMETCHAT_CONSTANTS.APP_ID)
.setRegion(COMETCHAT_CONSTANTS.REGION)
.setAuthKey(COMETCHAT_CONSTANTS.AUTH_KEY)
.subscribePresenceForAllUsers()
.build();
CometChatUIKit.init(uiKitSettings)?.then(() => {
setupLocalization();
createRoot(document.getElementById("root")!).render(
,
);
});
```
```tsx lines highlight={12-14} src/index.tsx theme={null}
import React from "react";
import ReactDOM from "react-dom/client";
import App from "./App";
import {
UIKitSettingsBuilder,
CometChatUIKit,
} from "@cometchat/chat-uikit-react";
import { setupLocalization } from "./CometChat/utils/utils";
import { CometChatProvider } from "./CometChat/context/CometChatContext";
export const COMETCHAT_CONSTANTS = {
APP_ID: "YOUR_APP_ID", // Replace with your App ID
REGION: "YOUR_REGION", // Replace with your App Region
AUTH_KEY: "YOUR_AUTH_KEY", // Replace with your Auth Key or leave blank if you are authenticating using Auth Token
};
const uiKitSettings = new UIKitSettingsBuilder()
.setAppId(COMETCHAT_CONSTANTS.APP_ID)
.setRegion(COMETCHAT_CONSTANTS.REGION)
.setAuthKey(COMETCHAT_CONSTANTS.AUTH_KEY)
.subscribePresenceForAllUsers()
.build();
CometChatUIKit.init(uiKitSettings)?.then(() => {
setupLocalization();
ReactDOM.createRoot(document.getElementById("root") as HTMLElement).render(
,
);
});
```
Your app credentials (`APP_ID`, `AUTH_KEY`, `REGION`) are prepopulated in the exported code. If you need to use different credentials, you can find them in the Credentials block of your app's [Overview section](https://app.cometchat.com) on the CometChat Dashboard.
### **Step 4: User Authentication**
CometChat uses a UID (User ID) to identify each user. After initialization, authenticate users to enable chat functionality.
You can either:
1. **Create new users** on the **[CometChat Dashboard](https://app.cometchat.com)**, **[CometChat SDK Method](/ui-kit/react/methods#create-user)** or **[via the API](https://www.cometchat.com/docs/rest-api/users/create)**.
2. **Use pre-generated test users**: `cometchat-uid-1` through `cometchat-uid-5`
The **Login** method returns a **User object** containing all relevant details of the logged-in user.
**Login After Initialization**
Log in the user after initialization — useful when login happens later in your app flow (e.g., after a login form).
```ts lines highlight={3} theme={null}
import { CometChatUIKit } from "@cometchat/chat-uikit-react";
const UID = "YOUR_UID"; // Replace with your actual UID
CometChatUIKit.getLoggedinUser().then((user: CometChat.User | null) => {
if (!user) {
// If no user is logged in, proceed with login
CometChatUIKit.login(UID)
.then((user: CometChat.User) => {
console.log("Login Successful:", { user });
// Mount your app
})
.catch(console.log);
} else {
// If user is already logged in, mount your app
}
});
```
```js lines highlight={3} theme={null}
import { CometChatUIKit } from "@cometchat/chat-uikit-react";
const UID = "YOUR_UID"; // Replace with your actual UID
CometChatUIKit.getLoggedinUser().then((user) => {
if (!user) {
// If no user is logged in, proceed with login
CometChatUIKit.login(UID)
.then((user) => {
console.log("Login Successful:", { user });
// Mount your app
})
.catch(console.log);
} else {
// If user is already logged in, mount your app
}
});
```
**Login During Initialization**
Alternatively, log in the user immediately inside `CometChatUIKit.init()` — ideal for apps that authenticate on startup.
```ts lines highlight={12-14, 27} theme={null}
import React from "react";
import ReactDOM from "react-dom/client";
import App from "./App";
import {
UIKitSettingsBuilder,
CometChatUIKit,
} from "@cometchat/chat-uikit-react";
import { setupLocalization } from "./CometChat/utils/utils";
import { CometChatProvider } from "./CometChat/context/CometChatContext";
export const COMETCHAT_CONSTANTS = {
APP_ID: "YOUR_APP_ID", // Replace with your App ID
REGION: "YOUR_REGION", // Replace with your App Region
AUTH_KEY: "YOUR_AUTH_KEY", // Replace with your Auth Key or leave blank if you are authenticating using Auth Token
};
const uiKitSettings = new UIKitSettingsBuilder()
.setAppId(COMETCHAT_CONSTANTS.APP_ID)
.setRegion(COMETCHAT_CONSTANTS.REGION)
.setAuthKey(COMETCHAT_CONSTANTS.AUTH_KEY)
.subscribePresenceForAllUsers()
.build();
CometChatUIKit.init(uiKitSettings)?.then(() => {
setupLocalization();
const UID = "YOUR_UID"; // Replace with your actual UID
CometChatUIKit.getLoggedinUser().then((user: CometChat.User | null) => {
if (!user) {
CometChatUIKit.login(UID)
.then((loggedUser: CometChat.User) => {
console.log("Login Successful:", loggedUser);
// Mount your app
ReactDOM.createRoot(
document.getElementById("root") as HTMLElement,
).render(
,
);
})
.catch((error) => console.error("Login Failed:", error));
} else {
// User already logged in, mount app directly
console.log("User already logged in:", user);
ReactDOM.createRoot(
document.getElementById("root") as HTMLElement,
).render(
,
);
}
});
});
```
```js lines highlight={12-14, 27} theme={null}
import React from "react";
import ReactDOM from "react-dom/client";
import App from "./App";
import {
UIKitSettingsBuilder,
CometChatUIKit,
} from "@cometchat/chat-uikit-react";
import { setupLocalization } from "./CometChat/utils/utils";
import { CometChatProvider } from "./CometChat/context/CometChatContext";
export const COMETCHAT_CONSTANTS = {
APP_ID: "YOUR_APP_ID", // Replace with your App ID
REGION: "YOUR_REGION", // Replace with your App Region
AUTH_KEY: "YOUR_AUTH_KEY", // Replace with your Auth Key or leave blank if you are authenticating using Auth Token
};
const uiKitSettings = new UIKitSettingsBuilder()
.setAppId(COMETCHAT_CONSTANTS.APP_ID)
.setRegion(COMETCHAT_CONSTANTS.REGION)
.setAuthKey(COMETCHAT_CONSTANTS.AUTH_KEY)
.subscribePresenceForAllUsers()
.build();
CometChatUIKit.init(uiKitSettings)?.then(() => {
setupLocalization();
const UID = "YOUR_UID"; // Replace with your actual UID
CometChatUIKit.getLoggedinUser().then((user) => {
if (!user) {
CometChatUIKit.login(UID)
.then((loggedUser) => {
console.log("Login Successful:", loggedUser);
// Mount your app
ReactDOM.createRoot(document.getElementById("root")).render(
,
);
})
.catch((error) => console.error("Login Failed:", error));
} else {
// User already logged in, mount app directly
console.log("User already logged in:", user);
ReactDOM.createRoot(document.getElementById("root")).render(
,
);
}
});
});
```
**Auth Key vs Auth Token**
Auth Key is perfect for prototyping. For production apps, switch to Auth Token for secure authentication. See [Authentication and User Management](/fundamentals/user-auth) for details.
***
### **Step 5: Render the CometChatApp Component**
Render the chat UI by adding `CometChatApp` to your component:
```javascript lines theme={null}
import CometChatApp from "./CometChat/CometChatApp";
const App = () => {
return (
/* CometChatApp requires a parent with explicit height & width to render correctly.
Adjust the height and width as needed.
*/
);
};
export default App;
```
#### **Render with Default User and Group**
You can also render the component with default user and group selection:
```tsx lines highlight={12} theme={null}
import { useEffect, useState } from "react";
import { CometChat } from "@cometchat/chat-sdk-javascript";
import CometChatApp from "./CometChat/CometChatApp";
const App = () => {
const [selectedUser, setSelectedUser] = useState(
undefined,
);
const [selectedGroup, setSelectedGroup] = useState<
CometChat.Group | undefined
>(undefined);
useEffect(() => {
const UID = "cometchat-uid-2"; // Replace with your User ID
CometChat.getUser(UID).then(setSelectedUser).catch(console.error);
// const GUID = "cometchat-guid-1"; // Replace with your Group ID
// CometChat.getGroup(GUID).then(setSelectedGroup).catch(console.error);
}, []);
return (
/* CometChatApp requires a parent with explicit height & width to render correctly.
Adjust the height and width as needed.
*/
);
};
export default App;
```
```jsx lines highlight={8} theme={null}
import { useEffect, useState } from "react";
import { CometChat } from "@cometchat/chat-sdk-javascript";
import CometChatApp from "./CometChat/CometChatApp";
const App = () => {
const [selectedUser, setSelectedUser] = useState(undefined);
const [selectedGroup, setSelectedGroup] = useState(undefined);
useEffect(() => {
const UID = "cometchat-uid-2"; // Replace with your User ID
CometChat.getUser(UID).then(setSelectedUser).catch(console.error);
// const GUID = "cometchat-guid-1"; // Replace with your Group ID
// CometChat.getGroup(GUID).then(setSelectedGroup).catch(console.error);
}, []);
return (
/* CometChatApp requires a parent with explicit height & width to render correctly.
Adjust the height and width as needed.
*/
);
};
export default App;
```
#### Without Sidebar Mode
When the sidebar is hidden via the **Without Sidebar** option in UI Kit Builder, the component renders a single chat type based on the `chatType` prop:
| `chatType` | Behavior |
| ---------- | ------------------------------------------------------------------- |
| `"user"` | Displays one-on-one conversations with the selected or default user |
| `"group"` | Displays group conversations with the selected or default group |
Pass the `user` or `group` prop to specify which conversation opens by default.
### **Step 6: Run the App**
Start your application with the appropriate command based on your setup:
```bash theme={null}
npm run dev
```
```bash theme={null}
npm start
```
***
## **Troubleshooting**
If you face any issues while integrating the builder in your app project, please check if you have the following configurations added to your `tsConfig.json`:
```json theme={null}
{
"compilerOptions": {
"jsx": "react-jsx",
"resolveJsonModule": true
}
}
```
If your development server is running, restart it to ensure the new TypeScript configuration is picked up.
***
## **Next Steps**
You can continue customizing by editing the exported code directly — or return to the UI Kit Builder to adjust your configuration and re-export a fresh code package.
### **Customize in Code**
Modify the exported components, props, and styling directly in your project.
Adjust component props, behavior, and UI elements.
Understand the settings file and feature toggles.
See how the exported code is organized.
Customize colors, typography, and styling to match your brand.
### **Customize via UI Kit Builder**
Return to the Builder to update your configuration, then re-export and replace the code package. Any changes made in the UI Kit Builder will require you to re-export the code and follow the same integration steps above to integrate into your project.
Open the CometChat Dashboard to reconfigure and re-export.
 ## **Complete Integration Workflow**
1. **Design Your Chat Experience** - Use the **UI Kit Builder** to customize layouts, features, and styling.
2. **Review and Export** - Review which features will be enabled in your Dashboard, toggle them on/off, and download the generated code package.
3. **Preview Customizations** - Optionally, preview the chat experience before integrating it into your project.
4. **Integration** - Integrate into your existing application.
5. **Customize Further** - Explore advanced customization options to tailor the chat experience.
***
## **Launch the UI Kit Builder**
1. Log in to your [**CometChat Dashboard**](https://app.cometchat.com).
2. Select your application from the list.
3. Navigate to **Chat & Messaging** → **Get Started**.
4. Choose your platform and click **Launch UI Kit Builder**.
***
## **Review Your Export**
When you click **Export**, a "Review Your Export" modal appears (Step 1 of 3). This lets you:
* **Review features** — See which features will be enabled in your CometChat Dashboard based on your UI Kit configuration
* **Toggle features** — Turn individual features on/off before export
* **AI User Copilot** — Requires an OpenAI API key (you'll configure this in the next step)
## **Complete Integration Workflow**
1. **Design Your Chat Experience** - Use the **UI Kit Builder** to customize layouts, features, and styling.
2. **Review and Export** - Review which features will be enabled in your Dashboard, toggle them on/off, and download the generated code package.
3. **Preview Customizations** - Optionally, preview the chat experience before integrating it into your project.
4. **Integration** - Integrate into your existing application.
5. **Customize Further** - Explore advanced customization options to tailor the chat experience.
***
## **Launch the UI Kit Builder**
1. Log in to your [**CometChat Dashboard**](https://app.cometchat.com).
2. Select your application from the list.
3. Navigate to **Chat & Messaging** → **Get Started**.
4. Choose your platform and click **Launch UI Kit Builder**.
***
## **Review Your Export**
When you click **Export**, a "Review Your Export" modal appears (Step 1 of 3). This lets you:
* **Review features** — See which features will be enabled in your CometChat Dashboard based on your UI Kit configuration
* **Toggle features** — Turn individual features on/off before export
* **AI User Copilot** — Requires an OpenAI API key (you'll configure this in the next step)