> ## Documentation Index
> Fetch the complete documentation index at: https://www.cometchat.com/docs/llms.txt
> Use this file to discover all available pages before exploring further.

# UI Kit Builder Integration

> Step-by-step guide to integrating CometChat UI Kit Builder into your Next.js app with user login and SSR handling.

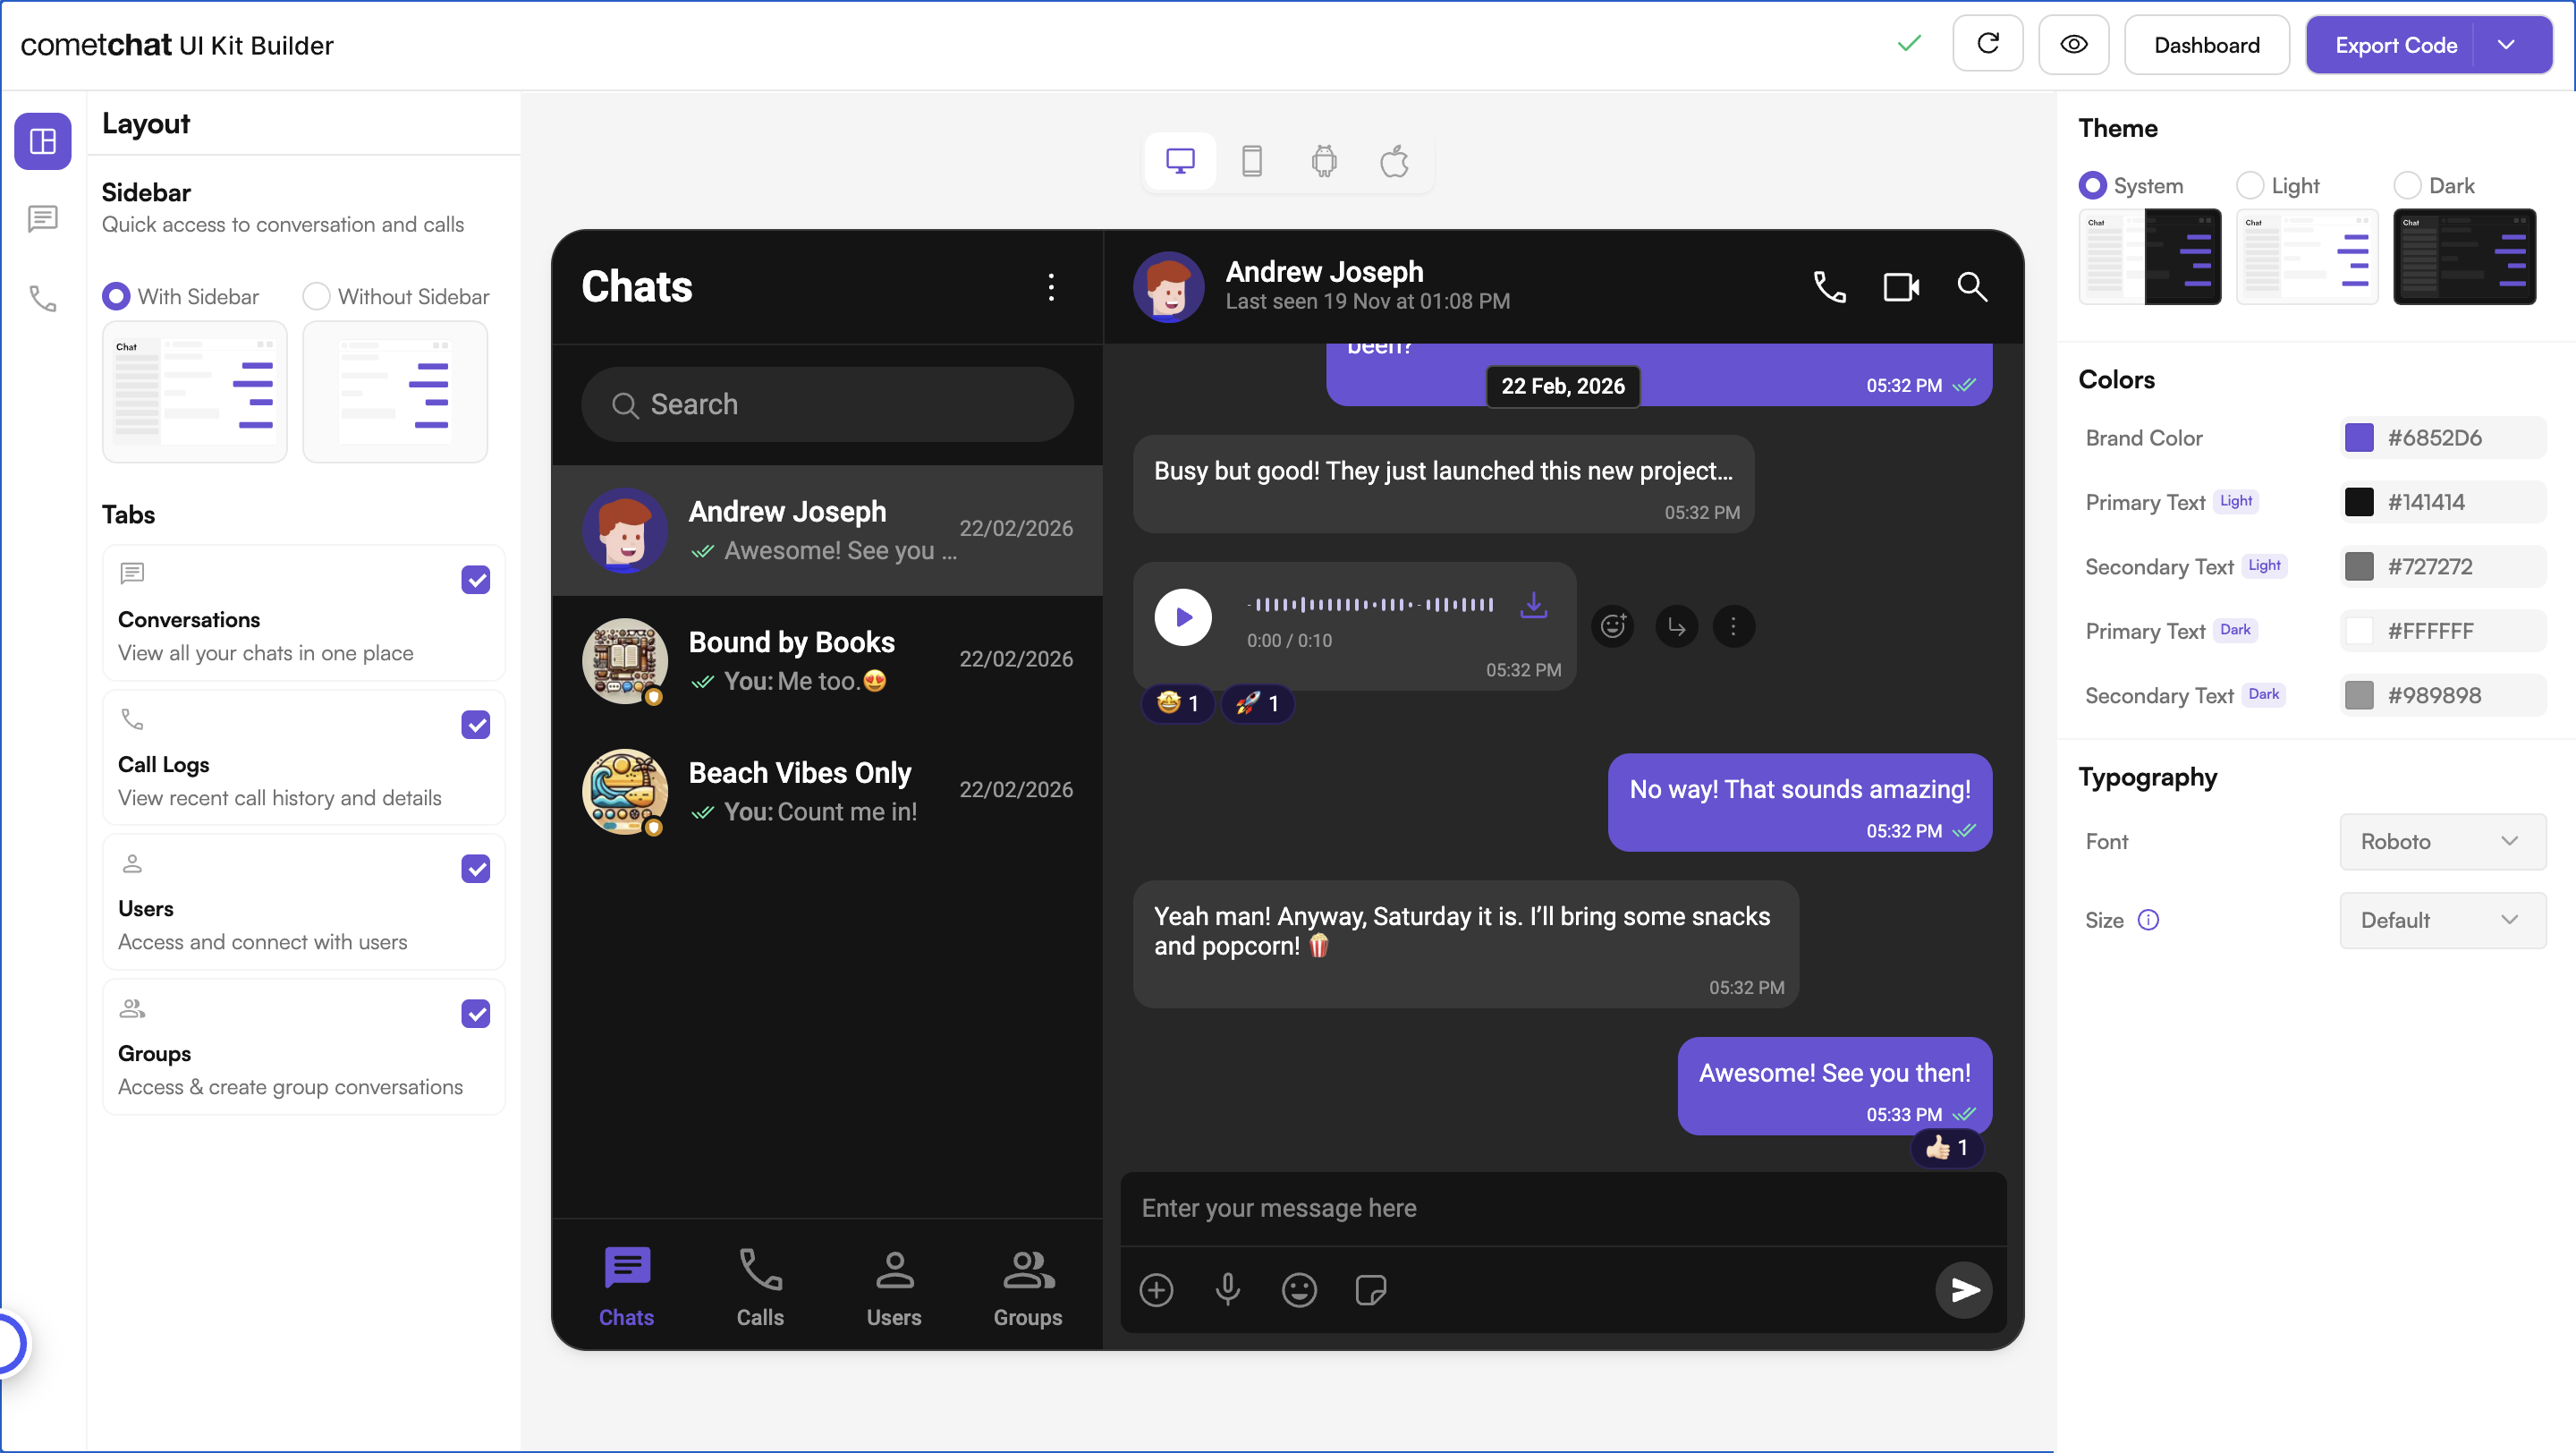
The **UI Kit Builder** simplifies integrating CometChat's UI Kit into your Next.js application — quickly set up chat, customize UI elements, and add features without extensive coding.

<Frame>
  <img src="https://mintcdn.com/cometchat-22654f5b/dJPACx1AKXUTpAHt/images/uikit-builder-preview.png?fit=max&auto=format&n=dJPACx1AKXUTpAHt&q=85&s=8a801797bb6c3c9af164502d41708a4a" width="2880" height="1624" data-path="images/uikit-builder-preview.png" />
</Frame>

## **Complete Integration Workflow**

1. **Design Your Chat Experience** - Use the **UI Kit Builder** to customize layouts, features, and styling.
2. **Review and Export** - Review which features will be enabled in your Dashboard, toggle them on/off, and download the generated code package.
3. **Preview Customizations** - Optionally, preview the chat experience before integrating it into your project.
4. **Integration** - Integrate into your existing application.
5. **Customize Further** - Explore advanced customization options to tailor the chat experience.

<Frame>
  <iframe width="100%" height="400" src="https://www.youtube.com/embed/0mmX_3Ohnz8" title="YouTube video" frameBorder="0" allow="accelerometer; autoplay; clipboard-write; encrypted-media; gyroscope; picture-in-picture; web-share" />
</Frame>

***

## **Launch the UI Kit Builder**

1. Log in to your [**CometChat Dashboard**](https://app.cometchat.com).
2. Select your application from the list.
3. Navigate to **Chat & Messaging** → **Get Started**.
4. Choose your platform and click **Launch UI Kit Builder**.

***

## **Review Your Export**

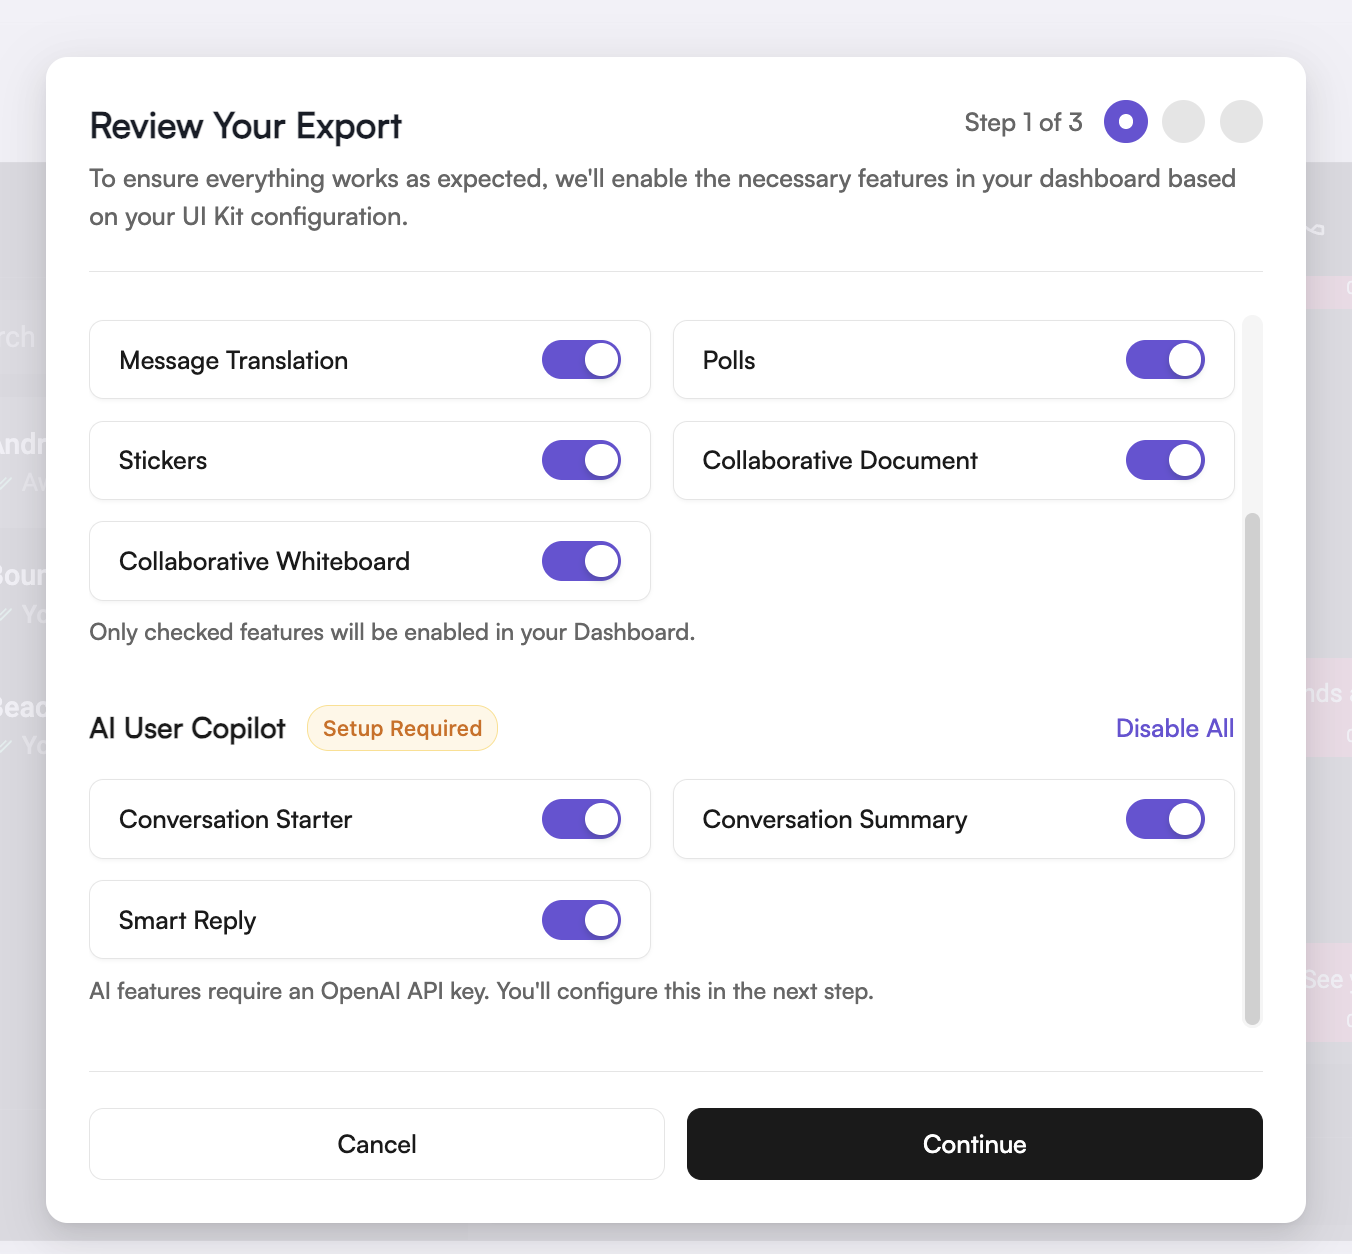
When you click **Export**, a "Review Your Export" modal appears (Step 1 of 3). This lets you:

* **Review features** — See which features will be enabled in your CometChat Dashboard based on your UI Kit configuration
* **Toggle features** — Turn individual features on/off before export
* **AI User Copilot** — Requires an OpenAI API key (you'll configure this in the next step)

<Frame>
  <img src="https://mintcdn.com/cometchat-22654f5b/dJPACx1AKXUTpAHt/images/ui-kit-builder-review-export.png?fit=max&auto=format&n=dJPACx1AKXUTpAHt&q=85&s=be0621d28ffccdd47bc536a399fe16a0" width="1352" height="1254" data-path="images/ui-kit-builder-review-export.png" />
</Frame>

<Note>
  Only checked features will be enabled in your Dashboard. You can always modify
  these settings later in the [CometChat Dashboard](https://app.cometchat.com).
</Note>

***

## **Preview Customizations (Optional)**

Before integrating the **UI Kit Builder** into your project, you can preview the chat experience by following these steps. This step is completely optional and can be skipped if you want to directly integrate the **UI Kit Builder** into your project.

> You can preview the experience:
>
> 1. Open the `cometchat-app-react` folder.
> 2. Install dependencies:
>
> ```
> npm i
> ```
>
> 3. Run the app:
>
> ```powershell theme={null}
> npm start
> ```
>
> Your app credentials are already prepopulated in the exported code.

***

## **Integrate into Your Project**

### **Step 1: Install Dependencies**

```ruby theme={null}
npm install @cometchat/chat-uikit-react@6.3.11 @cometchat/calls-sdk-javascript
```

### **Step 2: Copy CometChat Folder**

Copy the `cometchat-app-react/src/CometChat` folder inside your `src/app` directory.

***

### **Step 3: Create & Initialize `CometChatNoSSR.tsx`**

Directory Structure:

```swift lines theme={null}
src/app/
├── CometChat/
└── CometChatNoSSR/
    └── CometChatNoSSR.tsx
```

src/app/CometChatNoSSR/CometChatNoSSR.tsx

```javascript lines highlight={11-13} theme={null}
import React, { useEffect } from "react";
import {
  CometChatUIKit,
  UIKitSettingsBuilder,
} from "@cometchat/chat-uikit-react";
import CometChatApp from "../CometChat/CometChatApp";
import { CometChatProvider } from "../CometChat/context/CometChatContext";
import { setupLocalization } from "../CometChat/utils/utils";

export const COMETCHAT_CONSTANTS = {
  APP_ID: "YOUR_APP_ID", // Replace with your App ID
  REGION: "YOUR_REGION", // Replace with your App Region
  AUTH_KEY: "YOUR_AUTH_KEY", // Replace with your Auth Key or leave blank if you are authenticating using Auth Token
};

const CometChatNoSSR: React.FC = () => {
  useEffect(() => {
    const UIKitSettings = new UIKitSettingsBuilder()
      .setAppId(COMETCHAT_CONSTANTS.APP_ID)
      .setRegion(COMETCHAT_CONSTANTS.REGION)
      .setAuthKey(COMETCHAT_CONSTANTS.AUTH_KEY)
      .subscribePresenceForAllUsers()
      .build();

    CometChatUIKit.init(UIKitSettings)
      ?.then(() => {
        setupLocalization();
        console.log("Initialization completed successfully");
      })
      .catch((error) => console.error("Initialization failed", error));
  }, []);

  return (
    <div style={{ width: "100vw", height: "100vh" }}>
      <CometChatProvider>
        <CometChatApp />
      </CometChatProvider>
    </div>
  );
};

export default CometChatNoSSR;
```

<Info>
  Your app credentials (`APP_ID`, `AUTH_KEY`, `REGION`) are prepopulated in the exported code. If you need to use different credentials, you can find them in the Credentials block of your app's [Overview section](https://app.cometchat.com) on the CometChat Dashboard.
</Info>

***

### **Step 4: User Authentication**

CometChat uses a UID (User ID) to identify each user. After initialization, authenticate users to enable chat functionality.

You can either:

1. **Create new users** on the **[CometChat Dashboard](https://app.cometchat.com)**, **[CometChat SDK Method](/ui-kit/react/methods#create-user)** or **[via the API](https://www.cometchat.com/docs/rest-api/users/create)**.

2. **Use pre-generated test users**: `cometchat-uid-1` through `cometchat-uid-5`

The **Login** method returns a **User object** containing all relevant details of the logged-in user.

**Login After Initialization**

Log in the user after initialization — useful when login happens later in your app flow (e.g., after a login form).

<Tabs>
  <Tab title="TypeScript">
    ```ts lines highlight={3} theme={null}
    import { CometChatUIKit } from "@cometchat/chat-uikit-react";

    const UID = "YOUR_UID"; // Replace with your actual UID

    CometChatUIKit.getLoggedinUser().then((user: CometChat.User | null) => {
      if (!user) {
        // If no user is logged in, proceed with login
        CometChatUIKit.login(UID)
          .then((user: CometChat.User) => {
            console.log("Login Successful:", { user });
            // Mount your app
          })
          .catch(console.log);
      } else {
        // If user is already logged in, mount your app
      }
    });
    ```
  </Tab>

  <Tab title="JavaScript">
    ```js lines highlight={3} theme={null}
    import { CometChatUIKit } from "@cometchat/chat-uikit-react";

    const UID = "YOUR_UID"; // Replace with your actual UID

    CometChatUIKit.getLoggedinUser().then((user) => {
      if (!user) {
        // If no user is logged in, proceed with login
        CometChatUIKit.login(UID)
          .then((user) => {
            console.log("Login Successful:", { user });
            // Mount your app
          })
          .catch(console.log);
      } else {
        // If user is already logged in, mount your app
      }
    });
    ```
  </Tab>
</Tabs>

**Login During Initialization**

Alternatively, log in the user immediately inside `CometChatUIKit.init()` — ideal for apps that authenticate on startup.

<Tabs>
  <Tab title="TypeScript">
    ```ts lines highlight={11-13} theme={null}
    import React, { useEffect } from "react";
    import {
      CometChatUIKit,
      UIKitSettingsBuilder,
    } from "@cometchat/chat-uikit-react";
    import CometChatApp from "../CometChat/CometChatApp";
    import { CometChatProvider } from "../CometChat/context/CometChatContext";
    import { setupLocalization } from "../CometChat/utils/utils";

    export const COMETCHAT_CONSTANTS = {
      APP_ID: "YOUR_APP_ID", // Replace with your App ID
      REGION: "YOUR_REGION", // Replace with your App Region
      AUTH_KEY: "YOUR_AUTH_KEY", // Replace with your Auth Key or leave blank if you are authenticating using Auth Token
    };

    const CometChatNoSSR: React.FC = () => {
      useEffect(() => {
        const UIKitSettings = new UIKitSettingsBuilder()
          .setAppId(COMETCHAT_CONSTANTS.APP_ID)
          .setRegion(COMETCHAT_CONSTANTS.REGION)
          .setAuthKey(COMETCHAT_CONSTANTS.AUTH_KEY)
          .subscribePresenceForAllUsers()
          .build();

        CometChatUIKit.init(UIKitSettings)
          ?.then(() => {
            setupLocalization();
            console.log("Initialization completed successfully");

            const UID = "YOUR_UID"; // Replace with your actual UID

            CometChatUIKit.getLoggedinUser().then((user: CometChat.User | null) => {
              if (!user) {
                // If no user is logged in, proceed with login
                CometChatUIKit.login(UID)
                  .then((loggedInUser: CometChat.User) => {
                    console.log("Login Successful:", loggedInUser);
                    // Mount your app or perform post-login actions if needed
                  })
                  .catch((error) => {
                    console.error("Login failed:", error);
                  });
              } else {
                console.log("User already logged in:", user);
              }
            });
          })
          .catch((error) => console.error("Initialization failed", error));
      }, []);

      return (
        <div style={{ width: "100vw", height: "100vh" }}>
          <CometChatProvider>
            <CometChatApp />
          </CometChatProvider>
        </div>
      );
    };

    export default CometChatNoSSR;
    ```
  </Tab>

  <Tab title="JavaScript">
    ```js lines highlight={11-13} theme={null}
    import React, { useEffect } from "react";
    import {
      CometChatUIKit,
      UIKitSettingsBuilder,
    } from "@cometchat/chat-uikit-react";
    import CometChatApp from "../CometChat/CometChatApp";
    import { CometChatProvider } from "../CometChat/context/CometChatContext";
    import { setupLocalization } from "../CometChat/utils/utils";

    export const COMETCHAT_CONSTANTS = {
      APP_ID: "YOUR_APP_ID", // Replace with your App ID
      REGION: "YOUR_REGION", // Replace with your App Region
      AUTH_KEY: "YOUR_AUTH_KEY", // Replace with your Auth Key or leave blank if you are authenticating using Auth Token
    };

    const CometChatNoSSR = () => {
      useEffect(() => {
        const UIKitSettings = new UIKitSettingsBuilder()
          .setAppId(COMETCHAT_CONSTANTS.APP_ID)
          .setRegion(COMETCHAT_CONSTANTS.REGION)
          .setAuthKey(COMETCHAT_CONSTANTS.AUTH_KEY)
          .subscribePresenceForAllUsers()
          .build();

        CometChatUIKit.init(UIKitSettings)
          ?.then(() => {
            setupLocalization();
            console.log("Initialization completed successfully");

            const UID = "YOUR_UID"; // Replace with your actual UID

            CometChatUIKit.getLoggedinUser().then((user) => {
              if (!user) {
                // If no user is logged in, proceed with login
                CometChatUIKit.login(UID)
                  .then((loggedInUser) => {
                    console.log("Login Successful:", loggedInUser);
                    // Mount your app or perform post-login actions if needed
                  })
                  .catch((error) => {
                    console.error("Login failed:", error);
                  });
              } else {
                console.log("User already logged in:", user);
              }
            });
          })
          .catch((error) => console.error("Initialization failed", error));
      }, []);

      return (
        <div style={{ width: "100vw", height: "100vh" }}>
          <CometChatProvider>
            <CometChatApp />
          </CometChatProvider>
        </div>
      );
    };

    export default CometChatNoSSR;
    ```
  </Tab>
</Tabs>

<Note>
  **Auth Key vs Auth Token**

  Auth Key is perfect for prototyping. For production apps, switch to Auth Token for secure authentication. See [Authentication and User Management](/fundamentals/user-auth) for details.
</Note>

***

### **Step 5: Disable SSR & Render CometChat Component**

In this step, we’ll render the `CometChatApp` component and specifically disable **Server-Side Rendering (SSR)** for `CometChatNoSSR.tsx`. This targeted approach ensures the CometChat UI Kit Builder components load only on the client side, while the rest of your application remains fully compatible with SSR.

1. **Create a Wrapper File**: Add a new file that houses the `CometChatApp` component.
2. **Dynamically Import `CometChatNoSSR.tsx`**: In this file, use dynamic imports with `{ ssr: false }` to disable SSR only for the CometChat component, preventing SSR-related issues but preserving SSR for the rest of your code.

```javascript lines theme={null}
"use client";
import dynamic from "next/dynamic";

// Dynamically import CometChat component with SSR disabled
const CometChatComponent = dynamic(
  () => import("../app/CometChatNoSSR/CometChatNoSSR"),
  {
    ssr: false,
  },
);

export default function CometChatAppWrapper() {
  return (
    <div>
      <CometChatComponent />
    </div>
  );
}
```

Now, import and use the wrapper component in your project’s main entry file.

```javascript lines theme={null}
import CometChatAppWrapper from "./CometChatAppWrapper";

export default function Home() {
  return (
    <>
      {/* Other components or content */}
      <CometChatAppWrapper />
    </>
  );
}
```

<Note>
  Why disable SSR?

  CometChat UI Kit Builder relies on browser APIs like `window`, `document`, and WebSockets. Since Next.js renders on the server by default, we disable SSR for this component to avoid runtime errors.
</Note>

#### **Render with Default User and Group**

You can also render the component with default user and group selection:

```javascript lines highlight={12-14} theme={null}
import React, { useEffect, useState } from "react";
import {
  CometChatUIKit,
  UIKitSettingsBuilder,
} from "@cometchat/chat-uikit-react";
import CometChatApp from "../CometChat/CometChatApp";
import { CometChatProvider } from "../CometChat/context/CometChatContext";
import { setupLocalization } from "../CometChat/utils/utils";
import { CometChat } from "@cometchat/chat-sdk-javascript";

export const COMETCHAT_CONSTANTS = {
  APP_ID: "YOUR_APP_ID", // Replace with your App ID
  REGION: "YOUR_REGION", // Replace with your App Region
  AUTH_KEY: "YOUR_AUTH_KEY", // Replace with your Auth Key or leave blank if you are authenticating using Auth Token
};

// Functional Component
const CometChatNoSSR: React.FC = () => {
  const [user, setUser] = useState<CometChat.User | undefined>(undefined);

  const [selectedUser, setSelectedUser] = useState<CometChat.User | undefined>(
    undefined,
  );
  const [selectedGroup, setSelectedGroup] = useState<
    CometChat.Group | undefined
  >(undefined);

  useEffect(() => {
    const UIKitSettings = new UIKitSettingsBuilder()
      .setAppId(COMETCHAT_CONSTANTS.APP_ID)
      .setRegion(COMETCHAT_CONSTANTS.REGION)
      .setAuthKey(COMETCHAT_CONSTANTS.AUTH_KEY)
      .subscribePresenceForAllUsers()
      .build();
    // Initialize CometChat UIKit
    CometChatUIKit.init(UIKitSettings)
      ?.then(() => {
        setupLocalization();
        console.log("Initialization completed successfully");
        CometChatUIKit.getLoggedinUser().then((loggedInUser) => {
          if (!loggedInUser) {
            CometChatUIKit.login("cometchat-uid-1") // Replace with your logged in user UID
              .then((user) => {
                console.log("Login Successful", { user });
                setUser(user);
              })
              .catch((error) => console.error("Login failed", error));
          } else {
            console.log("Already logged-in", { loggedInUser });
            setUser(loggedInUser);
          }
        });
      })
      .catch((error) => console.error("Initialization failed", error));
  }, []);

  useEffect(() => {
    if (user) {
      // Fetch user or group from CometChat SDK whose chat you want to load.

      /** Fetching User */
      const UID = "cometchat-uid-2"; // Replace with your actual UID
      CometChat.getUser(UID).then(
        (user) => {
          setSelectedUser(user);
        },
        (error) => {
          console.log("User fetching failed with error:", error);
        },
      );

      /** Fetching Group */
      // const GUID = "cometchat-guid-1"; // Replace with your actual GUID
      // CometChat.getGroup(GUID).then(
      //   (group) => {
      //    setSelectedGroup(group);
      //  },
      //  (error) => {
      //    console.log("User fetching failed with error:", error);
      //  }
      // );
    }
  }, [user]);

  return (
    /* The CometChatApp component requires a parent element with an explicit height and width
   to render properly. Ensure the container has defined dimensions, and adjust them as needed
   based on your layout requirements. */
    <div style={{ width: "100vw", height: "100dvh" }}>
      <CometChatProvider>
        {(selectedUser || selectedGroup) && (
          <CometChatApp user={selectedUser} group={selectedGroup} />
        )}
      </CometChatProvider>
    </div>
  );
};

export default CometChatNoSSR;
```

#### Without Sidebar Mode

When the sidebar is hidden via the **Without Sidebar** option in UI Kit Builder, the component renders a single chat type based on the `chatType` prop:

| `chatType` | Behavior                                                            |
| ---------- | ------------------------------------------------------------------- |
| `"user"`   | Displays one-on-one conversations with the selected or default user |
| `"group"`  | Displays group conversations with the selected or default group     |

Pass the `user` or `group` prop to specify which conversation opens by default.

***

### **Step 6: Run Your App**

Start your development server:

```bash theme={null}
npm run dev
```

***

## **Troubleshooting**

If you face any issues while integrating the builder in your app project, please check if you have the following configurations added to your `tsConfig.json`:

```json lines theme={null}
{
  "compilerOptions": {
    "jsx": "react-jsx",
    "resolveJsonModule": true
  }
}
```

If your development server is running, restart it to ensure the new TypeScript configuration is picked up.

***

## **Next Steps**

You can continue customizing by editing the exported code directly — or return to the UI Kit Builder to adjust your configuration and re-export a fresh code package.

### **Customize in Code**

Modify the exported components, props, and styling directly in your project.

<CardGroup cols={2}>
  <Card title="Customizations" href="/chat-builder/nextjs/builder-customisations">
    Adjust component props, behavior, and UI elements.
  </Card>

  <Card title="UI Kit Builder Settings" href="/chat-builder/nextjs/builder-settings">
    Understand the settings file and feature toggles.
  </Card>

  <Card title="Directory Structure" href="/chat-builder/nextjs/builder-dir-structure">
    See how the exported code is organized.
  </Card>

  <Card title="Advanced Theming" href="/ui-kit/react/theme">
    Customize colors, typography, and styling to match your brand.
  </Card>
</CardGroup>

### **Customize via UI Kit Builder**

Return to the Builder to update your configuration, then re-export and replace the code package. Any changes made in the UI Kit Builder will require you to re-export the code and follow the same integration steps above to integrate into your project.

<CardGroup>
  <Card title="Launch UI Kit Builder" icon="arrow-up-right-from-square" href="https://app.cometchat.com">
    Open the CometChat Dashboard to reconfigure and re-export.
  </Card>
</CardGroup>