> ## Documentation Index
> Fetch the complete documentation index at: https://www.cometchat.com/docs/llms.txt
> Use this file to discover all available pages before exploring further.
# UI Kit Builder Integration
> Step-by-step guide to integrating CometChat UI Kit Builder into your Angular app with user login.
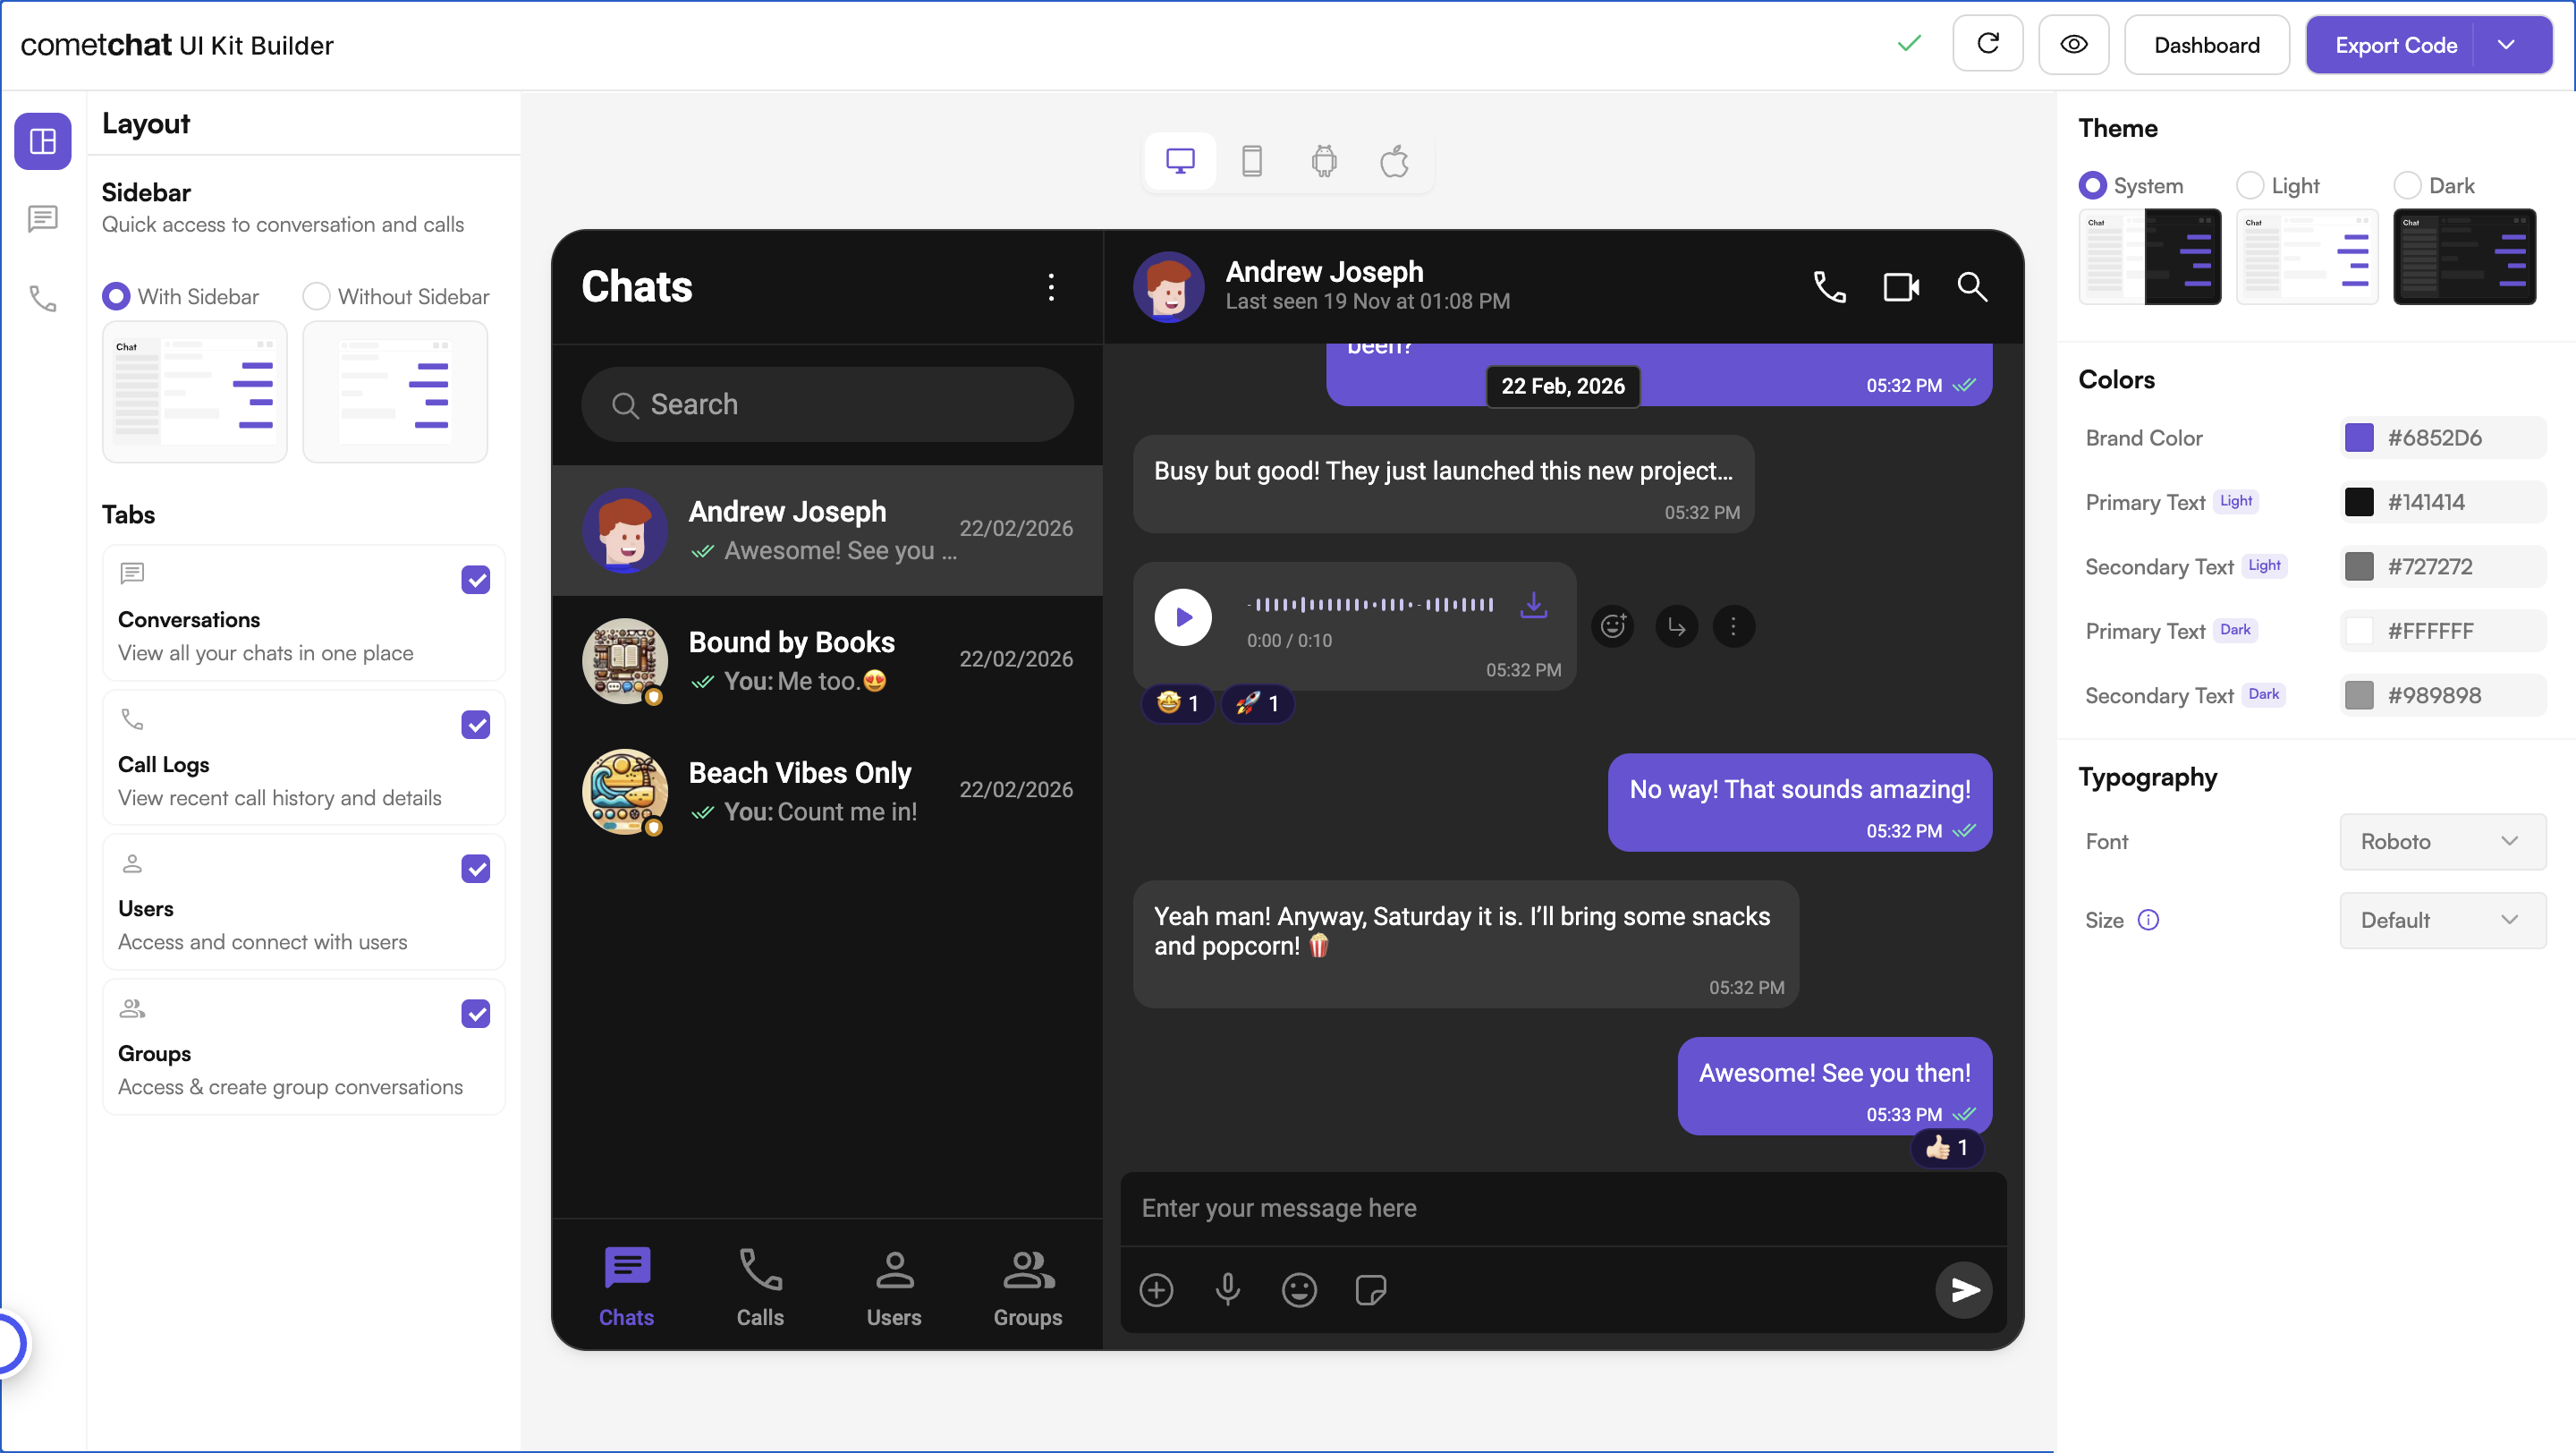
The **UI Kit Builder** simplifies integrating CometChat's UI Kit into your Angular application — quickly set up chat, customize UI elements, and add features without extensive coding.
 ## **Complete Integration Workflow**
1. **Design Your Chat Experience** - Use the **UI Kit Builder** to customize layouts, features, and styling.
2. **Review and Export** - Review which features will be enabled in your Dashboard, toggle them on/off, and download the generated code package.
3. **Preview Customizations** - Optionally, run the export on its own before integrating it into your project.
4. **Integration** - Integrate into your existing application.
5. **Customize Further** - Explore advanced customization options to tailor the chat experience.
***
## **Launch the UI Kit Builder**
1. Log in to your [**CometChat Dashboard**](https://app.cometchat.com).
2. Select your application from the list.
3. Navigate to **Chat & Messaging** → **Get Started**.
4. Choose **Angular** and click **Launch UI Kit Builder**.
***
## **Review Your Export**
When you click **Export**, a "Review Your Export" modal appears (Step 1 of 3). This lets you:
* **Review features** — See which features will be enabled in your CometChat Dashboard based on your UI Kit configuration
* **Toggle features** — Turn individual features on/off before export
* **AI User Copilot** — Requires an OpenAI API key (you'll configure this in the next step)
## **Complete Integration Workflow**
1. **Design Your Chat Experience** - Use the **UI Kit Builder** to customize layouts, features, and styling.
2. **Review and Export** - Review which features will be enabled in your Dashboard, toggle them on/off, and download the generated code package.
3. **Preview Customizations** - Optionally, run the export on its own before integrating it into your project.
4. **Integration** - Integrate into your existing application.
5. **Customize Further** - Explore advanced customization options to tailor the chat experience.
***
## **Launch the UI Kit Builder**
1. Log in to your [**CometChat Dashboard**](https://app.cometchat.com).
2. Select your application from the list.
3. Navigate to **Chat & Messaging** → **Get Started**.
4. Choose **Angular** and click **Launch UI Kit Builder**.
***
## **Review Your Export**
When you click **Export**, a "Review Your Export" modal appears (Step 1 of 3). This lets you:
* **Review features** — See which features will be enabled in your CometChat Dashboard based on your UI Kit configuration
* **Toggle features** — Turn individual features on/off before export
* **AI User Copilot** — Requires an OpenAI API key (you'll configure this in the next step)
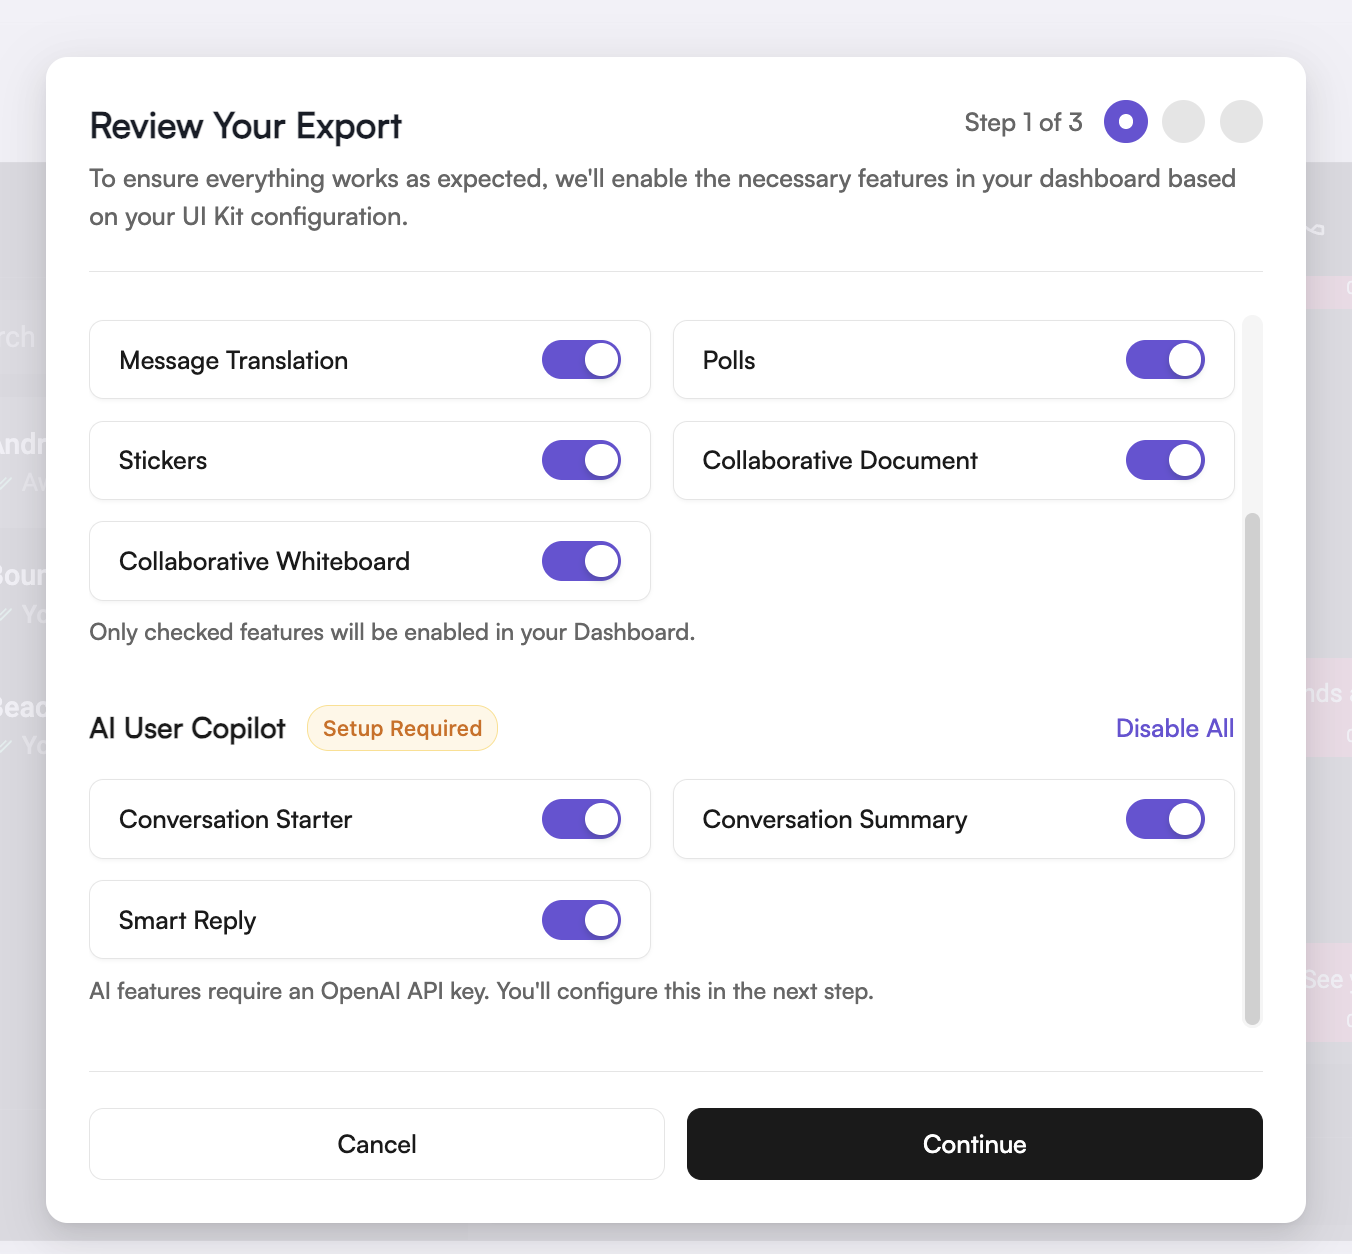 Only checked features will be enabled in your Dashboard. You can always modify
these settings later in the [CometChat Dashboard](https://app.cometchat.com).
***
## **Requirements**
| Requirement | Version |
| - | - |
| Node.js | 20.19+, 22.12+ or 24+ (Angular 21's supported ranges) |
| npm | 10 or later |
| Angular | 21.x — already pinned in the export's `package.json` |
***
## **Preview Customizations (Optional)**
The export is a complete, standalone Angular application. You can run it before integrating anything — this step is optional and can be skipped if you want to go straight to integration.
> 1. Unzip the export (`cometchat-builder-angular.zip`) into a new folder and open it. The archive is packed flat — `package.json` and `src/` are at the top level.
> 2. Install dependencies:
>
> ```bash theme={null}
> npm ci
> ```
>
> 3. Run the app:
>
> ```bash theme={null}
> npm start
> ```
>
> The app starts on `http://localhost:4200`. Sign in with one of the sample users on the login screen, or enter a UID from your own app.
>
> Your app credentials are already prepopulated in the exported code.
Use `npm ci` rather than `npm install`. The export ships a `package-lock.json`, and `npm ci` installs exactly the dependency tree the app was built and type-checked against.
***
## **Integrate into Your Project**
If you already have an Angular application, you do not need the export's shell — only the chat. The whole experience is one standalone component, ``.
### **Step 1: Install Dependencies**
```bash theme={null}
npm install @cometchat/chat-uikit-angular@5.2.1 @cometchat/chat-sdk-javascript@^4.2.0 @cometchat/calls-sdk-javascript@^5.0.6 @cometchat/cards-angular@^1.0.0 @cometchat/cards@^1.0.0 dompurify@^3.3.1
```
These match the versions pinned in the export's `package.json`.
### **Step 2: Copy the App Code**
Copy these from the export into your project, keeping the paths:
| From the export | What it is |
| - | - |
| `src/app/cometchat-app.component.ts` | The component you render |
| `src/app/components/` | The screens it is built from |
| `src/app/pages/home/` | The layout `` renders |
| `src/app/services/` | Shared state |
| `src/app/config/` | Your Builder settings and the flags that read them |
| `src/app/i18n/` | Translations |
| `src/assets/` | Icons used by these components |
| `src/environments/environment.ts` | Your App ID, region and Auth Key, read by `config/credentials.ts` |
If your app already has an `environment.ts`, add the `appId`, `region` and `authKey` keys to it instead of replacing it. `config/credentials.ts` imports it from `src/environments/environment`, so keep that path or update the import.
### **Step 3: Register the Styles and Assets**
In your `angular.json`, add the UI Kit's CSS variables ahead of your own stylesheet, and copy both asset folders:
```jsonc theme={null}
"styles": [
"node_modules/@cometchat/chat-uikit-angular/styles/css-variables.css",
"src/styles.css"
],
"assets": [
{ "glob": "**/*", "input": "src/assets", "output": "assets" },
{ "glob": "**/*", "input": "node_modules/@cometchat/chat-uikit-angular/src/lib/assets", "output": "assets" }
]
```
Without the second asset entry the chat renders but every icon is missing.
The copied components also rely on a few global layout rules. Angular host elements are inline by default, so without them the UI Kit components don't stretch to fill their panels. Copy these blocks from the export's `src/styles.css` into your global stylesheet:
* **UIKit Host Element Layout Fixes** — the `display: flex` / `flex: 1` rules for `cometchat-selector`, `cometchat-tabs`, `cometchat-messages`, `cometchat-threaded-messages`, `cometchat-message-list`, `cometchat-message-composer` and the other host elements
* **Thread panel** — the `.cometchat-threaded-messages` background override
* **Skip Navigation Link** — the `.cometchat-skip-link` rules, if you keep the skip link
The `html`, `body` and focus-ring rules in the same file are the standalone app's own page styles. Your app likely has its own, so they're optional.
### **Step 4: Apply Your Builder Settings at Startup**
In your `app.config.ts`:
```typescript app.config.ts theme={null}
import { ApplicationConfig, inject, provideAppInitializer } from '@angular/core';
import { builderSettings, SettingsService, ThemeStylesService } from './config';
export const appConfig: ApplicationConfig = {
providers: [
provideAppInitializer(() => {
inject(SettingsService).applySettings(builderSettings);
// Writes the Builder's colours and typography out as CSS variables. Nothing
// else injects it, so without this line it is never constructed.
inject(ThemeStylesService);
}),
// ...your own providers
],
};
```
Both injections are required. `SettingsService` applies the feature toggles and `ThemeStylesService` applies the appearance settings. If you omit the second, the app still runs, but the Builder's brand color, text colors, theme and typography are silently ignored.
This is synchronous — the settings are bundled rather than fetched, so there is no window in which the first screen renders against defaults.
**Angular 18:** `provideAppInitializer` was added in Angular 19. On 18, use the `APP_INITIALIZER` token with the same two injections:
```typescript theme={null}
import { APP_INITIALIZER, inject } from '@angular/core';
{
provide: APP_INITIALIZER,
multi: true,
useFactory: () => {
const settings = inject(SettingsService);
inject(ThemeStylesService);
return () => settings.applySettings(builderSettings);
},
}
```
### **Step 5: Initialize CometChat and Log In**
The UI Kit needs two calls before the component renders. In your `main.ts`:
```typescript main.ts theme={null}
import { bootstrapApplication } from '@angular/platform-browser';
import { CometChatLocalize, CometChatUIKit, UIKitSettingsBuilder } from '@cometchat/chat-uikit-angular';
import { AppComponent } from './app/app.component';
import { appConfig } from './app/app.config';
import { sampleAppTranslations } from './app/i18n';
import { environment } from './environments/environment';
const settings = new UIKitSettingsBuilder()
.setAppId(environment.appId)
.setRegion(environment.region)
.setAuthKey(environment.authKey)
.subscribePresenceForAllUsers()
.setCallingEnabled(true)
.build();
// init() returns undefined, not a rejected promise, when no app ID is set.
// Turn that into a rejection so the chain below still bootstraps.
(CometChatUIKit.init(settings) ?? Promise.reject(new Error('CometChat app ID is not set')))
.then(() => CometChatUIKit.login('YOUR_UID'))
.then(() => {
// The copied components use keys the UI Kit does not ship (for example
// create_group_title). Without this the UI shows raw keys.
CometChatLocalize.addTranslation(sampleAppTranslations);
})
.catch((err) => console.error('CometChat init failed:', err))
// Bootstrap either way, so a failed init or login doesn't blank the whole host app.
.finally(() => bootstrapApplication(AppComponent, appConfig).catch((err) => console.error(err)));
```
Chain the promises rather than using top-level `await`. Top-level `await` does not build in an app that uses zone.js, which is the default for existing Angular 18–20 apps. It fails with `Top-level await is not available in the configured target environment`. The export's own `src/main.ts` chains them the same way.
Your app credentials (`appId`, `region`, `authKey`) are prepopulated in the export's `src/environments/environment.ts`, which you copied in Step 2. If you need different credentials, you can find them in the Credentials block of your app's [Overview section](https://app.cometchat.com) on the CometChat Dashboard.
CometChat uses a UID (User ID) to identify each user. You can either:
1. **Create new users** on the **[CometChat Dashboard](https://app.cometchat.com)**, via a **[UI Kit method](/docs/ui-kit/angular/methods)**, or **[via the API](/docs/rest-api/users/create)**.
2. **Use pre-generated test users**: `cometchat-uid-1` through `cometchat-uid-5`
To avoid logging in a user who is already signed in, replace the `login` step in the chain above with a check:
```typescript main.ts theme={null}
(CometChatUIKit.init(settings) ?? Promise.reject(new Error('CometChat app ID is not set')))
.then(() => CometChatUIKit.getLoggedinUser())
.then((user) => user ?? CometChatUIKit.login('YOUR_UID'))
.then(() => CometChatLocalize.addTranslation(sampleAppTranslations))
.catch((err) => console.error('CometChat init failed:', err))
.finally(() => bootstrapApplication(AppComponent, appConfig).catch((err) => console.error(err)));
```
**Auth Key vs Auth Token**
Auth Key is perfect for prototyping. For production apps, switch to Auth Token for secure authentication and call `CometChatUIKit.loginWithAuthToken(authToken)` instead of `CometChatUIKit.login(uid)`. See [Authentication and User Management](/docs/fundamentals/user-auth) for details.
### **Step 6: Render the Component**
```html theme={null}
Only checked features will be enabled in your Dashboard. You can always modify
these settings later in the [CometChat Dashboard](https://app.cometchat.com).
***
## **Requirements**
| Requirement | Version |
| - | - |
| Node.js | 20.19+, 22.12+ or 24+ (Angular 21's supported ranges) |
| npm | 10 or later |
| Angular | 21.x — already pinned in the export's `package.json` |
***
## **Preview Customizations (Optional)**
The export is a complete, standalone Angular application. You can run it before integrating anything — this step is optional and can be skipped if you want to go straight to integration.
> 1. Unzip the export (`cometchat-builder-angular.zip`) into a new folder and open it. The archive is packed flat — `package.json` and `src/` are at the top level.
> 2. Install dependencies:
>
> ```bash theme={null}
> npm ci
> ```
>
> 3. Run the app:
>
> ```bash theme={null}
> npm start
> ```
>
> The app starts on `http://localhost:4200`. Sign in with one of the sample users on the login screen, or enter a UID from your own app.
>
> Your app credentials are already prepopulated in the exported code.
Use `npm ci` rather than `npm install`. The export ships a `package-lock.json`, and `npm ci` installs exactly the dependency tree the app was built and type-checked against.
***
## **Integrate into Your Project**
If you already have an Angular application, you do not need the export's shell — only the chat. The whole experience is one standalone component, ``.
### **Step 1: Install Dependencies**
```bash theme={null}
npm install @cometchat/chat-uikit-angular@5.2.1 @cometchat/chat-sdk-javascript@^4.2.0 @cometchat/calls-sdk-javascript@^5.0.6 @cometchat/cards-angular@^1.0.0 @cometchat/cards@^1.0.0 dompurify@^3.3.1
```
These match the versions pinned in the export's `package.json`.
### **Step 2: Copy the App Code**
Copy these from the export into your project, keeping the paths:
| From the export | What it is |
| - | - |
| `src/app/cometchat-app.component.ts` | The component you render |
| `src/app/components/` | The screens it is built from |
| `src/app/pages/home/` | The layout `` renders |
| `src/app/services/` | Shared state |
| `src/app/config/` | Your Builder settings and the flags that read them |
| `src/app/i18n/` | Translations |
| `src/assets/` | Icons used by these components |
| `src/environments/environment.ts` | Your App ID, region and Auth Key, read by `config/credentials.ts` |
If your app already has an `environment.ts`, add the `appId`, `region` and `authKey` keys to it instead of replacing it. `config/credentials.ts` imports it from `src/environments/environment`, so keep that path or update the import.
### **Step 3: Register the Styles and Assets**
In your `angular.json`, add the UI Kit's CSS variables ahead of your own stylesheet, and copy both asset folders:
```jsonc theme={null}
"styles": [
"node_modules/@cometchat/chat-uikit-angular/styles/css-variables.css",
"src/styles.css"
],
"assets": [
{ "glob": "**/*", "input": "src/assets", "output": "assets" },
{ "glob": "**/*", "input": "node_modules/@cometchat/chat-uikit-angular/src/lib/assets", "output": "assets" }
]
```
Without the second asset entry the chat renders but every icon is missing.
The copied components also rely on a few global layout rules. Angular host elements are inline by default, so without them the UI Kit components don't stretch to fill their panels. Copy these blocks from the export's `src/styles.css` into your global stylesheet:
* **UIKit Host Element Layout Fixes** — the `display: flex` / `flex: 1` rules for `cometchat-selector`, `cometchat-tabs`, `cometchat-messages`, `cometchat-threaded-messages`, `cometchat-message-list`, `cometchat-message-composer` and the other host elements
* **Thread panel** — the `.cometchat-threaded-messages` background override
* **Skip Navigation Link** — the `.cometchat-skip-link` rules, if you keep the skip link
The `html`, `body` and focus-ring rules in the same file are the standalone app's own page styles. Your app likely has its own, so they're optional.
### **Step 4: Apply Your Builder Settings at Startup**
In your `app.config.ts`:
```typescript app.config.ts theme={null}
import { ApplicationConfig, inject, provideAppInitializer } from '@angular/core';
import { builderSettings, SettingsService, ThemeStylesService } from './config';
export const appConfig: ApplicationConfig = {
providers: [
provideAppInitializer(() => {
inject(SettingsService).applySettings(builderSettings);
// Writes the Builder's colours and typography out as CSS variables. Nothing
// else injects it, so without this line it is never constructed.
inject(ThemeStylesService);
}),
// ...your own providers
],
};
```
Both injections are required. `SettingsService` applies the feature toggles and `ThemeStylesService` applies the appearance settings. If you omit the second, the app still runs, but the Builder's brand color, text colors, theme and typography are silently ignored.
This is synchronous — the settings are bundled rather than fetched, so there is no window in which the first screen renders against defaults.
**Angular 18:** `provideAppInitializer` was added in Angular 19. On 18, use the `APP_INITIALIZER` token with the same two injections:
```typescript theme={null}
import { APP_INITIALIZER, inject } from '@angular/core';
{
provide: APP_INITIALIZER,
multi: true,
useFactory: () => {
const settings = inject(SettingsService);
inject(ThemeStylesService);
return () => settings.applySettings(builderSettings);
},
}
```
### **Step 5: Initialize CometChat and Log In**
The UI Kit needs two calls before the component renders. In your `main.ts`:
```typescript main.ts theme={null}
import { bootstrapApplication } from '@angular/platform-browser';
import { CometChatLocalize, CometChatUIKit, UIKitSettingsBuilder } from '@cometchat/chat-uikit-angular';
import { AppComponent } from './app/app.component';
import { appConfig } from './app/app.config';
import { sampleAppTranslations } from './app/i18n';
import { environment } from './environments/environment';
const settings = new UIKitSettingsBuilder()
.setAppId(environment.appId)
.setRegion(environment.region)
.setAuthKey(environment.authKey)
.subscribePresenceForAllUsers()
.setCallingEnabled(true)
.build();
// init() returns undefined, not a rejected promise, when no app ID is set.
// Turn that into a rejection so the chain below still bootstraps.
(CometChatUIKit.init(settings) ?? Promise.reject(new Error('CometChat app ID is not set')))
.then(() => CometChatUIKit.login('YOUR_UID'))
.then(() => {
// The copied components use keys the UI Kit does not ship (for example
// create_group_title). Without this the UI shows raw keys.
CometChatLocalize.addTranslation(sampleAppTranslations);
})
.catch((err) => console.error('CometChat init failed:', err))
// Bootstrap either way, so a failed init or login doesn't blank the whole host app.
.finally(() => bootstrapApplication(AppComponent, appConfig).catch((err) => console.error(err)));
```
Chain the promises rather than using top-level `await`. Top-level `await` does not build in an app that uses zone.js, which is the default for existing Angular 18–20 apps. It fails with `Top-level await is not available in the configured target environment`. The export's own `src/main.ts` chains them the same way.
Your app credentials (`appId`, `region`, `authKey`) are prepopulated in the export's `src/environments/environment.ts`, which you copied in Step 2. If you need different credentials, you can find them in the Credentials block of your app's [Overview section](https://app.cometchat.com) on the CometChat Dashboard.
CometChat uses a UID (User ID) to identify each user. You can either:
1. **Create new users** on the **[CometChat Dashboard](https://app.cometchat.com)**, via a **[UI Kit method](/docs/ui-kit/angular/methods)**, or **[via the API](/docs/rest-api/users/create)**.
2. **Use pre-generated test users**: `cometchat-uid-1` through `cometchat-uid-5`
To avoid logging in a user who is already signed in, replace the `login` step in the chain above with a check:
```typescript main.ts theme={null}
(CometChatUIKit.init(settings) ?? Promise.reject(new Error('CometChat app ID is not set')))
.then(() => CometChatUIKit.getLoggedinUser())
.then((user) => user ?? CometChatUIKit.login('YOUR_UID'))
.then(() => CometChatLocalize.addTranslation(sampleAppTranslations))
.catch((err) => console.error('CometChat init failed:', err))
.finally(() => bootstrapApplication(AppComponent, appConfig).catch((err) => console.error(err)));
```
**Auth Key vs Auth Token**
Auth Key is perfect for prototyping. For production apps, switch to Auth Token for secure authentication and call `CometChatUIKit.loginWithAuthToken(authToken)` instead of `CometChatUIKit.login(uid)`. See [Authentication and User Management](/docs/fundamentals/user-auth) for details.
### **Step 6: Render the Component**
```html theme={null}
```
```css theme={null}
.chat-container {
height: 100vh; /* or any definite height */
}
```
**Give it a container with a definite height.** The component fills what it is given; in a container with `height: auto` it collapses to nothing.
Import it like any other standalone component:
```typescript src/app/app.component.ts theme={null}
import { Component } from '@angular/core';
import { CometChatAppComponent } from './cometchat-app.component';
@Component({
selector: 'app-root',
standalone: true,
imports: [CometChatAppComponent],
template: `
`,
styles: [`.chat-container { height: 100vh; }`],
})
export class AppComponent {}
```
#### **Open Straight Into a Conversation**
Three optional inputs let you choose what the chat opens on:
| Input | Type | What it does |
| - | - | - |
| `user` | `CometChat.User` | Opens a one-to-one conversation with this user on load |
| `group` | `CometChat.Group` | Opens this group on load |
| `defaultActiveTab` | `'chats' \| 'calls' \| 'users' \| 'groups'` | Which tab the sidebar starts on (default: `'chats'`) |
```html theme={null}
```
Rebinding them switches conversation without remounting, so a host can move the chat between conversations by changing the bound value.
When both `user` and `group` are bound, the Builder's `chatType` setting decides which one wins.
#### **Without Sidebar Mode**
When the sidebar is hidden via the **Without Sidebar** option in UI Kit Builder, the component renders a single chat type based on the `chatType` setting:
| `chatType` | Behavior |
| - | - |
| `"user"` | Displays one-on-one conversations with the selected or default user |
| `"group"` | Displays group conversations with the selected or default group |
Pass the `user` or `group` input to specify which conversation opens by default.
### **Step 7: Run the App**
```bash theme={null}
npm start
```
***
## **Troubleshooting**
| Symptom | Cause |
| - | - |
| The app opens on a credentials screen | Neither `environment.ts` nor stored credentials are configured |
| Chat area is blank or collapsed | The container has no definite height |
| Icons are missing | The UI Kit asset folder is not in `angular.json`'s `assets` |
| Login fails with an opaque error | App ID, region or Auth Key is wrong, or the region does not match the app |
| A feature you switched off still appears | `cometchat-builder-settings.json` was not copied, or was replaced after export |
| Styling looks unthemed | `css-variables.css` is missing from `angular.json`'s `styles`, or listed after your own stylesheet |
| Builder colors and fonts are ignored | `ThemeStylesService` is not injected in `provideAppInitializer` |
| UI shows raw keys such as `create_group_title` | `CometChatLocalize.addTranslation(sampleAppTranslations)` was not called after init |
| Panels don't fill their space | The host-element layout rules from the export's `src/styles.css` were not copied |
For issues with the UI Kit itself, see [Angular UI Kit Troubleshooting](/docs/ui-kit/angular/troubleshooting).
***
## **Next Steps**
You can continue customizing by editing the exported code directly — or return to the UI Kit Builder to adjust your configuration and re-export a fresh code package.
### **Customize in Code**
Modify the exported components, inputs, and styling directly in your project.
Adjust component inputs, behavior, and UI elements.
Understand the settings file and feature toggles.
See how the exported code is organized.
Customize colors, typography, and styling to match your brand.
### **Customize via UI Kit Builder**
Return to the Builder to update your configuration, then re-export and replace the code package. Any changes made in the UI Kit Builder will require you to re-export the code and follow the same integration steps above to integrate into your project.
Open the CometChat Dashboard to reconfigure and re-export.
***
This documentation is built and hosted on [Mintlify](https://mintlify.com), a developer documentation platform.