> ## Documentation Index
> Fetch the complete documentation index at: https://www.cometchat.com/docs/llms.txt
> Use this file to discover all available pages before exploring further.
# UI Kit Builder Integration
> Step-by-step guide to integrating CometChat's UI Kit Builder into your Android application using either the Gradle Plugin or Module Import method.
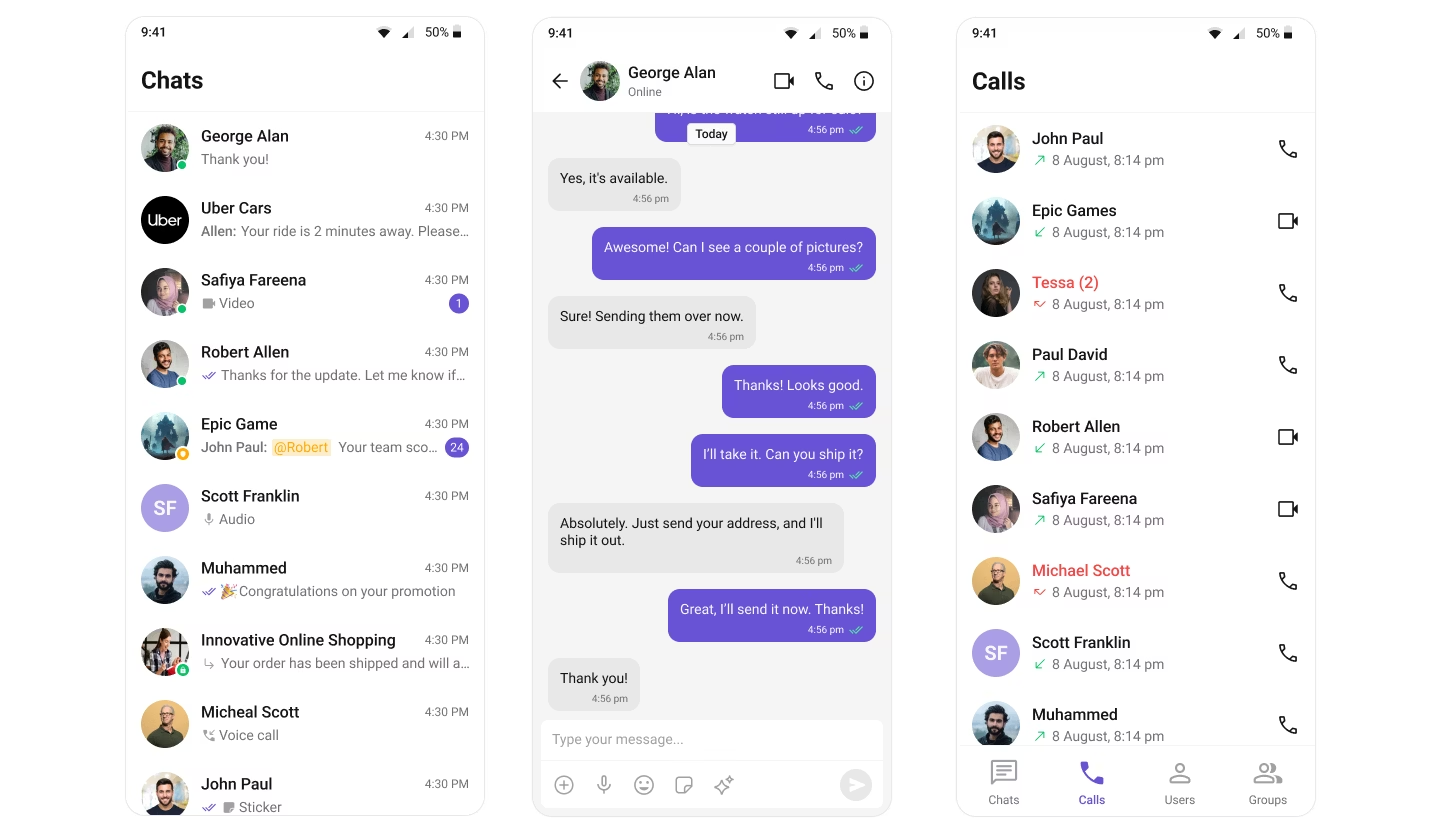
This guide demonstrates how to integrate the **UI Kit Builder** configuration system into your Android application. You can easily integrate the same configuration system into your own Android application by following these guided steps.
 ***
## Prerequisites
Before getting started, make sure you have:
* **Android Studio** (latest version recommended)
* **Android Device or Emulator** with Android API level 26 (Android 8.0) or above
* **Java 11** or above
* **Internet connection** (required for CometChat services)
***
## Complete Integration Workflow
1. **Design Your Chat Experience** - Use the UI Kit Builder to customize layouts, features, and styling.
2. **Review and Export** - Review which features will be enabled in your Dashboard, toggle them on/off, and download the generated code package.
3. **Preview Customizations** - Optionally, preview the chat experience before integrating it into your project.
4. **Integration** - Integrate into your existing application using either the Gradle Plugin or Module Import method.
5. **Customize Further** - Explore advanced customization options to tailor the chat experience.
***
## Launch the UI Kit Builder
1. Log in to your [CometChat Dashboard](https://app.cometchat.com).
2. Select your application from the list.
3. Navigate to **Chat & Messaging** → **Get Started / Integrate** → **Android** → **Launch UI Kit Builder**.
***
## Integration Options
Choose one of the following integration methods based on your needs:
| Option | Best For | Complexity |
| ------------------------------- | -------------------------------------------------------------------------------- | ---------- |
| **Gradle Plugin** (Recommended) | New projects or existing projects where you want full control over customization | Medium |
| **Module Import** | Quick integration when you want a ready-made module to plug-and-play | Easy |
***
## Option 1: Gradle Plugin Integration (Recommended)
This method gives you full control over customization and is recommended for most projects.
### Step 1: Add CometChat Repository
Add the CometChat Maven repository to your project-level `settings.gradle.kts` file in both `pluginManagement` and `dependencyResolutionManagement`:
```kotlin theme={null}
pluginManagement {
repositories {
google()
mavenCentral()
gradlePluginPortal()
maven("https://dl.cloudsmith.io/public/cometchat/cometchat/maven/")
}
}
dependencyResolutionManagement {
repositoriesMode.set(RepositoriesMode.FAIL_ON_PROJECT_REPOS)
repositories {
google()
mavenCentral()
maven("https://jitpack.io")
maven("https://dl.cloudsmith.io/public/cometchat/cometchat/maven/")
}
}
```
### Step 2: Add Jetifier Flag
Add the Jetifier flag to your `gradle.properties` file:
```properties theme={null}
android.enableJetifier=true
```
### Step 3: Add UI Kit Dependencies
Add the CometChat UI Kit dependencies to your app-level `build.gradle.kts`:
```kotlin theme={null}
dependencies {
// CometChat UIKit
implementation("com.cometchat:chat-uikit-android:5.2.+")
// (Optional) Include this if your app uses voice/video calling features
implementation("com.cometchat:calls-sdk-android:4.3.+")
}
```
Version 5.2.+ is required for all BuilderSettingsHelper APIs to work correctly.
### Step 4: Apply the Builder Settings Plugin
Add the UI Kit Builder Settings plugin to your app-level `build.gradle.kts`:
```kotlin theme={null}
plugins {
id("com.android.application")
kotlin("android")
// Apply the UI Kit Builder settings plugin
id("com.cometchat.builder.settings") version "5.0.1"
}
```
Sync your project to download the plugin dependencies.
### Step 5: Add Configuration JSON File
Copy the `cometchat-builder-settings.json` file from your exported code into your app module's root directory (same level as `build.gradle.kts`).
The `cometchat-builder-settings.json` file contains all your feature toggles, layout settings, and styling configuration from the UI Kit Builder.
### Step 6: Build to Generate Settings
Build your project using Android Studio or run:
```bash theme={null}
./gradlew build
```
The Builder plugin will automatically generate:
* `CometChatBuilderSettings.kt` — Contains all feature flags and configuration constants
* Necessary styles in your theme
### Step 7: Copy BuilderSettingsHelper
Copy the `BuilderSettingsHelper.kt` file from the sample app to your project:
* **Source:** `src/main/java/com/cometchat/builder/BuilderSettingsHelper.kt`
* **Destination:** `src/main/java/com/yourpackage/BuilderSettingsHelper.kt`
Update the package declaration in `BuilderSettingsHelper.kt` to match your project's package name. Also remove the `applySettingsToBottomNavigationView` method if you're not using the sample app's navigation structure.
### Step 7.1: Add Bottom Navigation Menu Resource
If you're using the sample app's navigation structure, copy the menu folder from the sample app to your project's resources:
* **Source:** `src/main/res/menu/builder_bottom_nav_menu.xml`
* **Destination:** `src/main/res/menu/builder_bottom_nav_menu.xml`
This menu resource is required if `BuilderSettingsHelper.kt` references `R.id.nav_chats`, `R.id.nav_calls`, `R.id.nav_users`, or `R.id.nav_groups`.
### Step 8: Add Font Resources
Copy the `font` folder from the sample app to your project's resources:
* **Source:** `src/main/res/font`
* **Destination:** `src/main/res/font`
### Step 8.1: Add Required Permissions
Add the following permissions to your `AndroidManifest.xml` for camera, audio, storage, and internet access:
```xml theme={null}
```
### Step 9: Set the Builder Theme
Update your `AndroidManifest.xml` to use the UI Kit Builder theme:
```xml theme={null}
```
### Step 9.1: Initialize CometChat UIKit
Before using any CometChat UI components, initialize the UIKit in your Application class or before launching any CometChat activities:
```kotlin theme={null}
val uiKitSettings = UIKitSettings.UIKitSettingsBuilder()
.setAppId("YOUR_APP_ID")
.setRegion("YOUR_REGION")
.setAuthKey("YOUR_AUTH_KEY")
.subscribePresenceForAllUsers()
.build()
CometChatUIKit.init(context, uiKitSettings, object : CometChat.CallbackListener() {
override fun onSuccess(successMessage: String?) {
// UIKit initialized successfully
}
override fun onError(e: CometChatException?) {
// Handle initialization error
}
})
```
Replace `YOUR_APP_ID`, `YOUR_REGION`, and `YOUR_AUTH_KEY` with your actual CometChat credentials from the Dashboard.
### Step 10: Apply Settings to UI Components
Use the `BuilderSettingsHelper` to apply your configuration to CometChat UI components:
```kotlin theme={null}
import com.yourpackage.BuilderSettingsHelper
class MessagesActivity : AppCompatActivity() {
override fun onCreate(savedInstanceState: Bundle?) {
super.onCreate(savedInstanceState)
// Apply Builder settings to your UI components
BuilderSettingsHelper.applySettingsToMessageHeader(binding.messageHeader)
BuilderSettingsHelper.applySettingsToMessageList(binding.messageList)
BuilderSettingsHelper.applySettingsToMessageComposer(binding.messageComposer)
}
}
```
**Apply settings to other components:**
```kotlin theme={null}
// For Users component
BuilderSettingsHelper.applySettingsToUsers(binding.users)
// For Call Logs
BuilderSettingsHelper.applySettingsToCallLogs(binding.callLog)
// For Group Members
BuilderSettingsHelper.applySettingToGroupMembers(binding.groupMembers)
```
### Step 11: Access Generated Constants
You can access the generated constants directly in your code:
```kotlin theme={null}
import com.cometchat.builder.CometChatBuilderSettings
// Check if a feature is enabled
if (CometChatBuilderSettings.ChatFeatures.CoreMessagingExperience.PHOTOSSHARING) {
// Enable photo sharing functionality
}
// Access styling constants
val brandColor = CometChatBuilderSettings.Style.Color.BRANDCOLOR
val fontSize = CometChatBuilderSettings.Style.Typography.SIZE
```
***
## Option 2: Import Sample App as Module
This method is ideal if you want a ready-made module to plug-and-play, or wish to migrate features from the sample app to your main app.
### Step 1: Run the Sample App
First, run the exported sample app from the CometChat Dashboard to verify it works correctly.
### Step 2: Update AndroidManifest.xml
In the sample app's `AndroidManifest.xml`:
* In the `` tag, **remove all attributes except** `android:name`
* If your app already has its own `Application` class, remove the sample app's `android:name` from the `` tag and extend your application class with `BuilderApplication`
### Step 3: Update build.gradle.kts
Modify the sample app's `build.gradle.kts`:
* Remove `com.cometchat.builder.settings` from the `plugins` block
* Change `id("com.android.application")` to `id("com.android.library")`
```kotlin theme={null}
plugins {
id("com.android.library")
kotlin("android")
}
```
If you have a Java project, change `kotlin("android")` to `id("org.jetbrains.kotlin.android") version "2.2.20"`.
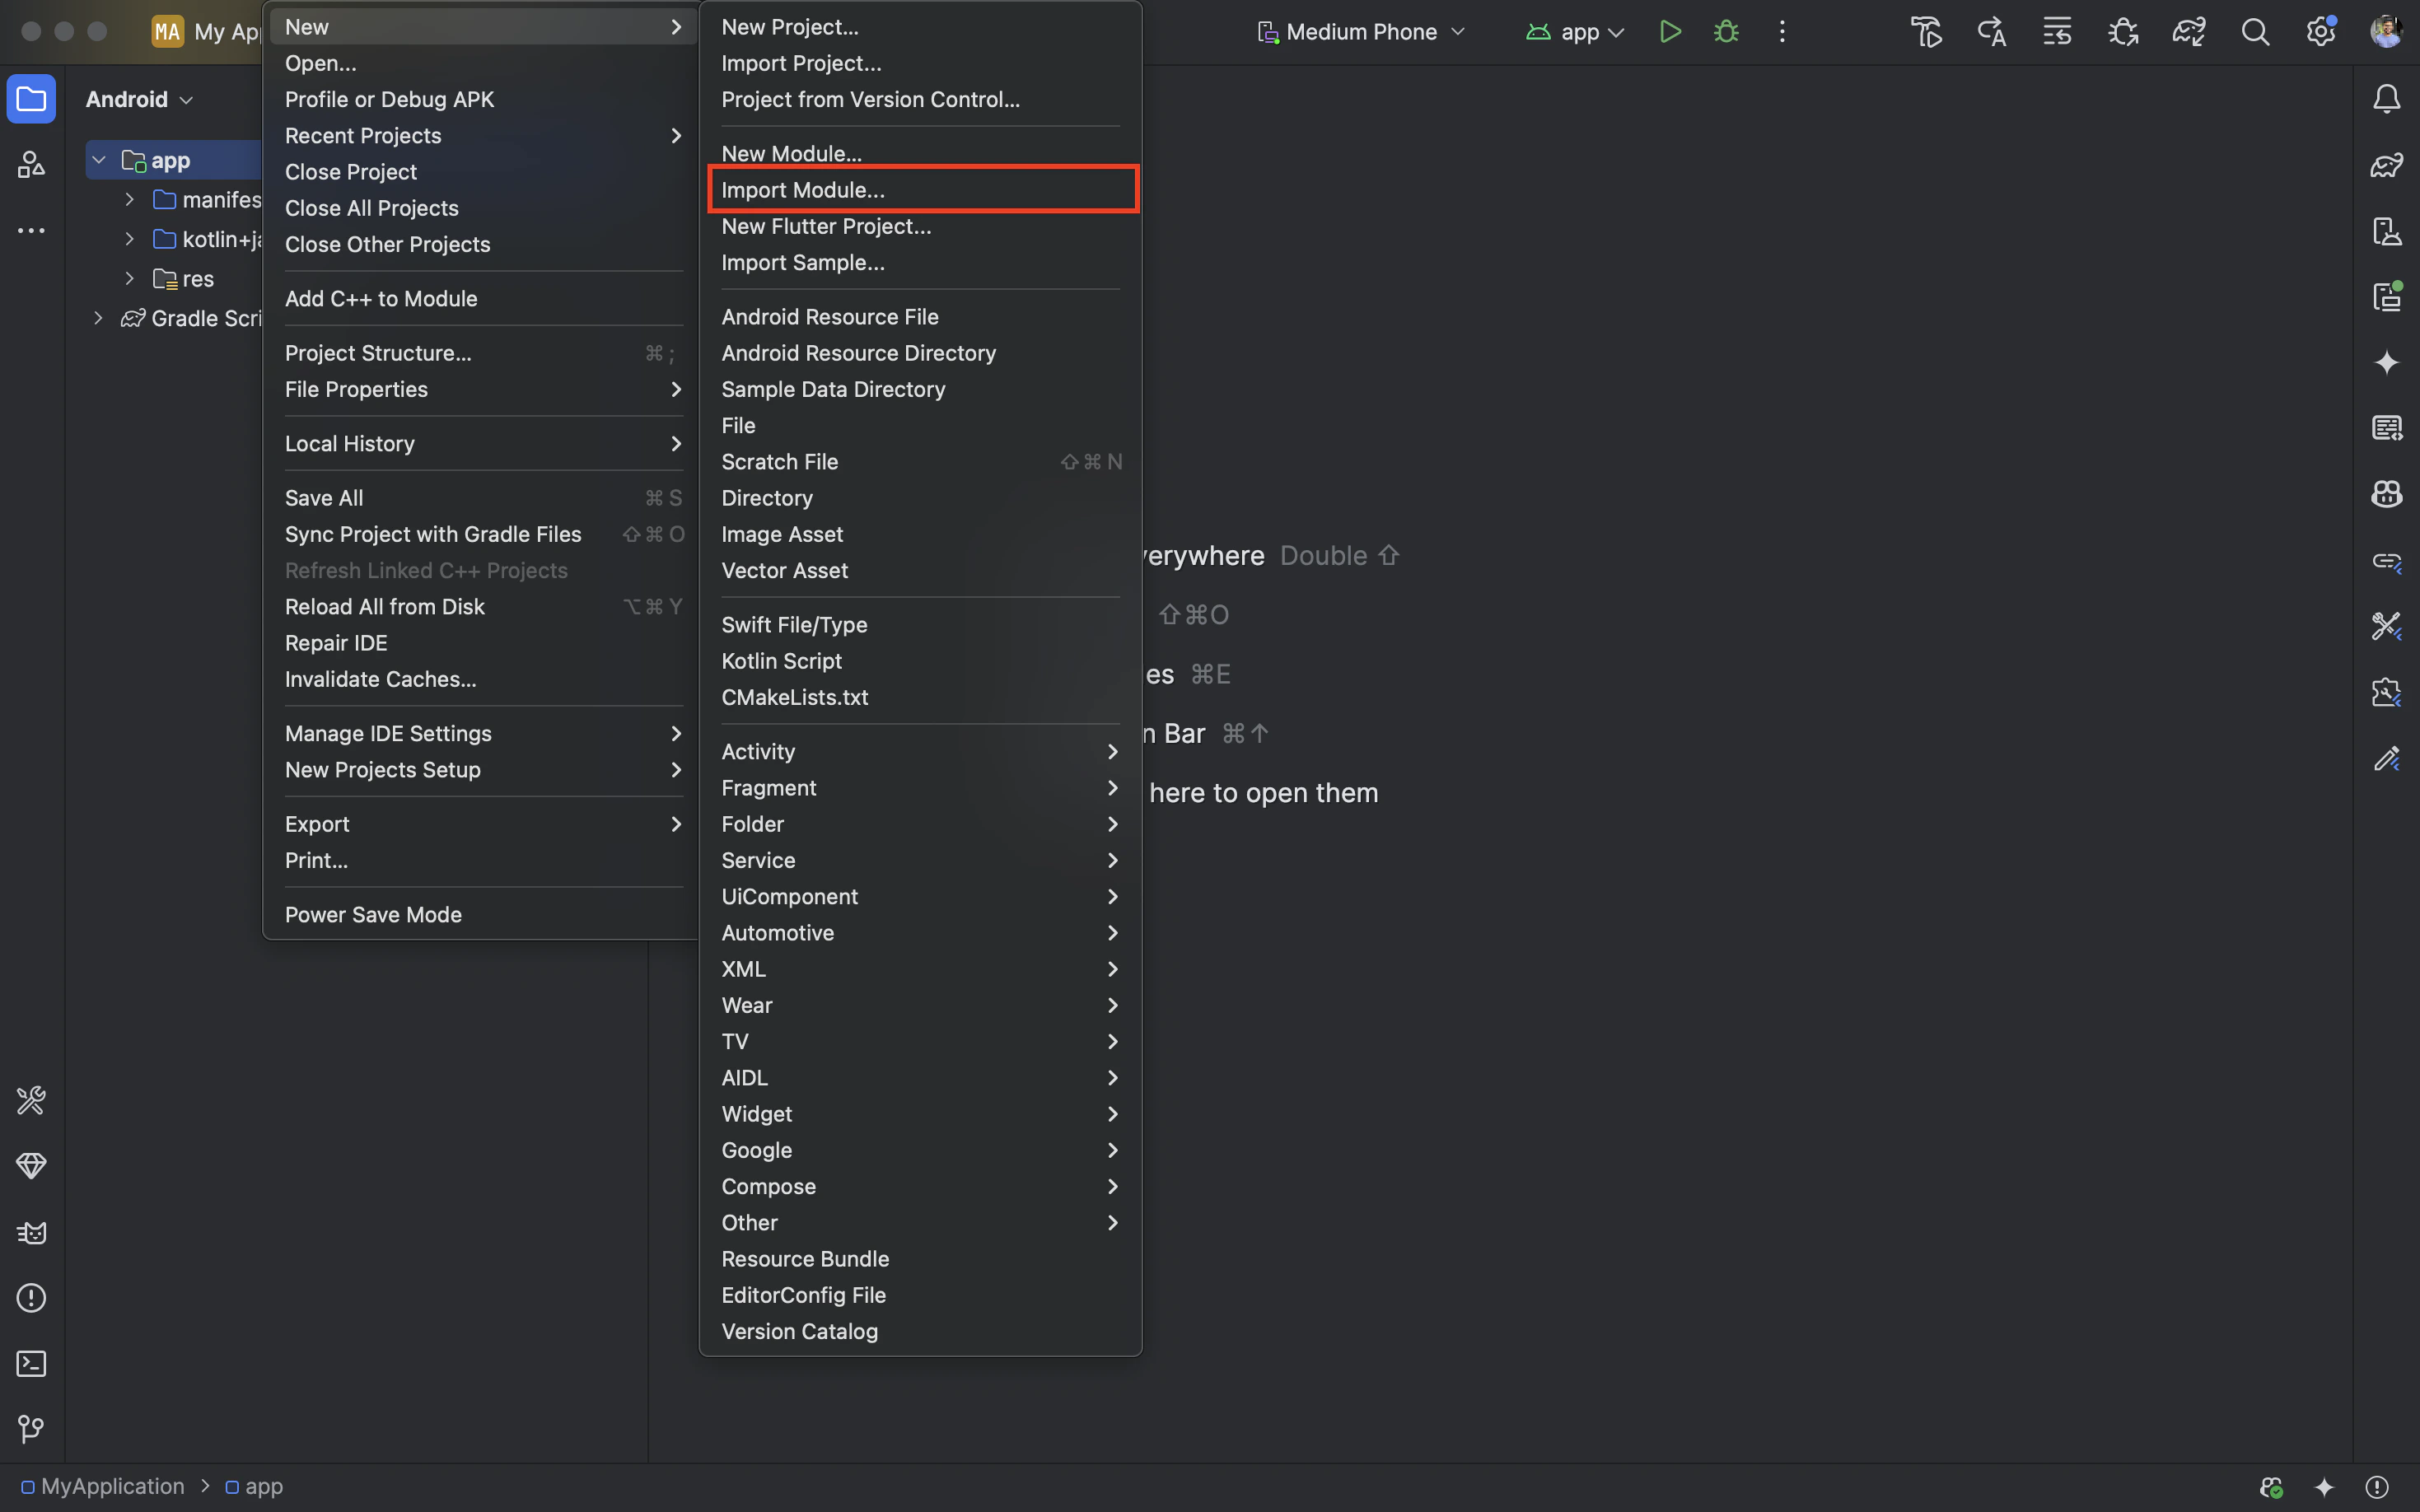
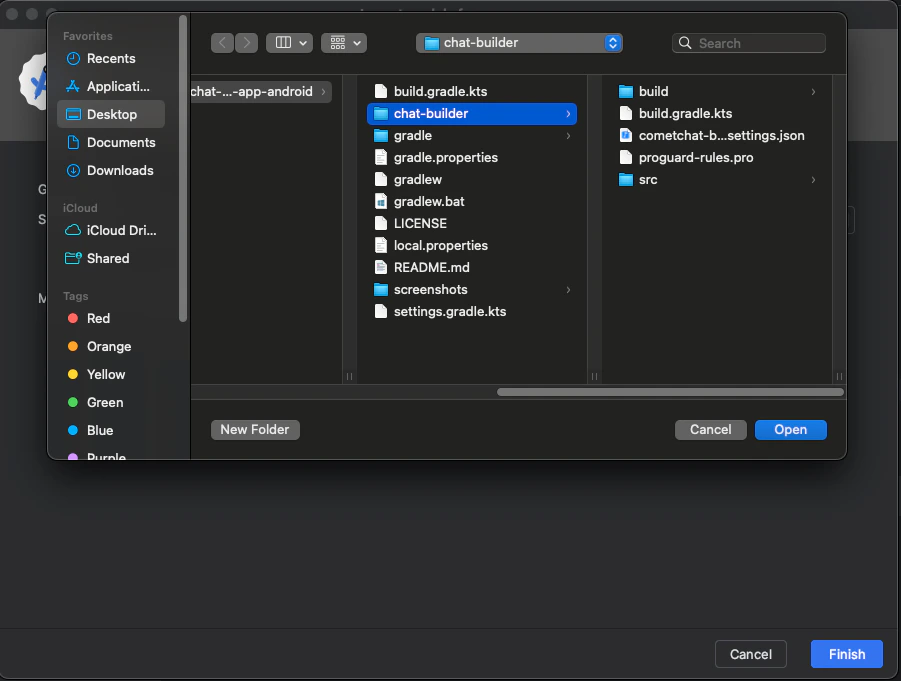
### Step 4: Import as Module
In Android Studio:
1. Go to **File** → **New** → **Import Module**
2. Select the sample app folder
3. Click **Finish**
***
## Prerequisites
Before getting started, make sure you have:
* **Android Studio** (latest version recommended)
* **Android Device or Emulator** with Android API level 26 (Android 8.0) or above
* **Java 11** or above
* **Internet connection** (required for CometChat services)
***
## Complete Integration Workflow
1. **Design Your Chat Experience** - Use the UI Kit Builder to customize layouts, features, and styling.
2. **Review and Export** - Review which features will be enabled in your Dashboard, toggle them on/off, and download the generated code package.
3. **Preview Customizations** - Optionally, preview the chat experience before integrating it into your project.
4. **Integration** - Integrate into your existing application using either the Gradle Plugin or Module Import method.
5. **Customize Further** - Explore advanced customization options to tailor the chat experience.
***
## Launch the UI Kit Builder
1. Log in to your [CometChat Dashboard](https://app.cometchat.com).
2. Select your application from the list.
3. Navigate to **Chat & Messaging** → **Get Started / Integrate** → **Android** → **Launch UI Kit Builder**.
***
## Integration Options
Choose one of the following integration methods based on your needs:
| Option | Best For | Complexity |
| ------------------------------- | -------------------------------------------------------------------------------- | ---------- |
| **Gradle Plugin** (Recommended) | New projects or existing projects where you want full control over customization | Medium |
| **Module Import** | Quick integration when you want a ready-made module to plug-and-play | Easy |
***
## Option 1: Gradle Plugin Integration (Recommended)
This method gives you full control over customization and is recommended for most projects.
### Step 1: Add CometChat Repository
Add the CometChat Maven repository to your project-level `settings.gradle.kts` file in both `pluginManagement` and `dependencyResolutionManagement`:
```kotlin theme={null}
pluginManagement {
repositories {
google()
mavenCentral()
gradlePluginPortal()
maven("https://dl.cloudsmith.io/public/cometchat/cometchat/maven/")
}
}
dependencyResolutionManagement {
repositoriesMode.set(RepositoriesMode.FAIL_ON_PROJECT_REPOS)
repositories {
google()
mavenCentral()
maven("https://jitpack.io")
maven("https://dl.cloudsmith.io/public/cometchat/cometchat/maven/")
}
}
```
### Step 2: Add Jetifier Flag
Add the Jetifier flag to your `gradle.properties` file:
```properties theme={null}
android.enableJetifier=true
```
### Step 3: Add UI Kit Dependencies
Add the CometChat UI Kit dependencies to your app-level `build.gradle.kts`:
```kotlin theme={null}
dependencies {
// CometChat UIKit
implementation("com.cometchat:chat-uikit-android:5.2.+")
// (Optional) Include this if your app uses voice/video calling features
implementation("com.cometchat:calls-sdk-android:4.3.+")
}
```
Version 5.2.+ is required for all BuilderSettingsHelper APIs to work correctly.
### Step 4: Apply the Builder Settings Plugin
Add the UI Kit Builder Settings plugin to your app-level `build.gradle.kts`:
```kotlin theme={null}
plugins {
id("com.android.application")
kotlin("android")
// Apply the UI Kit Builder settings plugin
id("com.cometchat.builder.settings") version "5.0.1"
}
```
Sync your project to download the plugin dependencies.
### Step 5: Add Configuration JSON File
Copy the `cometchat-builder-settings.json` file from your exported code into your app module's root directory (same level as `build.gradle.kts`).
The `cometchat-builder-settings.json` file contains all your feature toggles, layout settings, and styling configuration from the UI Kit Builder.
### Step 6: Build to Generate Settings
Build your project using Android Studio or run:
```bash theme={null}
./gradlew build
```
The Builder plugin will automatically generate:
* `CometChatBuilderSettings.kt` — Contains all feature flags and configuration constants
* Necessary styles in your theme
### Step 7: Copy BuilderSettingsHelper
Copy the `BuilderSettingsHelper.kt` file from the sample app to your project:
* **Source:** `src/main/java/com/cometchat/builder/BuilderSettingsHelper.kt`
* **Destination:** `src/main/java/com/yourpackage/BuilderSettingsHelper.kt`
Update the package declaration in `BuilderSettingsHelper.kt` to match your project's package name. Also remove the `applySettingsToBottomNavigationView` method if you're not using the sample app's navigation structure.
### Step 7.1: Add Bottom Navigation Menu Resource
If you're using the sample app's navigation structure, copy the menu folder from the sample app to your project's resources:
* **Source:** `src/main/res/menu/builder_bottom_nav_menu.xml`
* **Destination:** `src/main/res/menu/builder_bottom_nav_menu.xml`
This menu resource is required if `BuilderSettingsHelper.kt` references `R.id.nav_chats`, `R.id.nav_calls`, `R.id.nav_users`, or `R.id.nav_groups`.
### Step 8: Add Font Resources
Copy the `font` folder from the sample app to your project's resources:
* **Source:** `src/main/res/font`
* **Destination:** `src/main/res/font`
### Step 8.1: Add Required Permissions
Add the following permissions to your `AndroidManifest.xml` for camera, audio, storage, and internet access:
```xml theme={null}
```
### Step 9: Set the Builder Theme
Update your `AndroidManifest.xml` to use the UI Kit Builder theme:
```xml theme={null}
```
### Step 9.1: Initialize CometChat UIKit
Before using any CometChat UI components, initialize the UIKit in your Application class or before launching any CometChat activities:
```kotlin theme={null}
val uiKitSettings = UIKitSettings.UIKitSettingsBuilder()
.setAppId("YOUR_APP_ID")
.setRegion("YOUR_REGION")
.setAuthKey("YOUR_AUTH_KEY")
.subscribePresenceForAllUsers()
.build()
CometChatUIKit.init(context, uiKitSettings, object : CometChat.CallbackListener() {
override fun onSuccess(successMessage: String?) {
// UIKit initialized successfully
}
override fun onError(e: CometChatException?) {
// Handle initialization error
}
})
```
Replace `YOUR_APP_ID`, `YOUR_REGION`, and `YOUR_AUTH_KEY` with your actual CometChat credentials from the Dashboard.
### Step 10: Apply Settings to UI Components
Use the `BuilderSettingsHelper` to apply your configuration to CometChat UI components:
```kotlin theme={null}
import com.yourpackage.BuilderSettingsHelper
class MessagesActivity : AppCompatActivity() {
override fun onCreate(savedInstanceState: Bundle?) {
super.onCreate(savedInstanceState)
// Apply Builder settings to your UI components
BuilderSettingsHelper.applySettingsToMessageHeader(binding.messageHeader)
BuilderSettingsHelper.applySettingsToMessageList(binding.messageList)
BuilderSettingsHelper.applySettingsToMessageComposer(binding.messageComposer)
}
}
```
**Apply settings to other components:**
```kotlin theme={null}
// For Users component
BuilderSettingsHelper.applySettingsToUsers(binding.users)
// For Call Logs
BuilderSettingsHelper.applySettingsToCallLogs(binding.callLog)
// For Group Members
BuilderSettingsHelper.applySettingToGroupMembers(binding.groupMembers)
```
### Step 11: Access Generated Constants
You can access the generated constants directly in your code:
```kotlin theme={null}
import com.cometchat.builder.CometChatBuilderSettings
// Check if a feature is enabled
if (CometChatBuilderSettings.ChatFeatures.CoreMessagingExperience.PHOTOSSHARING) {
// Enable photo sharing functionality
}
// Access styling constants
val brandColor = CometChatBuilderSettings.Style.Color.BRANDCOLOR
val fontSize = CometChatBuilderSettings.Style.Typography.SIZE
```
***
## Option 2: Import Sample App as Module
This method is ideal if you want a ready-made module to plug-and-play, or wish to migrate features from the sample app to your main app.
### Step 1: Run the Sample App
First, run the exported sample app from the CometChat Dashboard to verify it works correctly.
### Step 2: Update AndroidManifest.xml
In the sample app's `AndroidManifest.xml`:
* In the `` tag, **remove all attributes except** `android:name`
* If your app already has its own `Application` class, remove the sample app's `android:name` from the `` tag and extend your application class with `BuilderApplication`
### Step 3: Update build.gradle.kts
Modify the sample app's `build.gradle.kts`:
* Remove `com.cometchat.builder.settings` from the `plugins` block
* Change `id("com.android.application")` to `id("com.android.library")`
```kotlin theme={null}
plugins {
id("com.android.library")
kotlin("android")
}
```
If you have a Java project, change `kotlin("android")` to `id("org.jetbrains.kotlin.android") version "2.2.20"`.
### Step 4: Import as Module
In Android Studio:
1. Go to **File** → **New** → **Import Module**
2. Select the sample app folder
3. Click **Finish**
 ### Step 5: Add Module Dependency
Add the module dependency to your app's `build.gradle.kts`:
```kotlin theme={null}
dependencies {
implementation(project(":chat-builder"))
}
```
### Step 5.1: Set Builder Theme
In your app's `AndroidManifest.xml`, set the theme to use the UI Kit Builder theme:
```xml theme={null}
```
### Step 6: Add Jetifier Flag
Add to your `gradle.properties`:
```properties theme={null}
android.enableJetifier=true
```
### Step 7: Add CometChat Repository
Add the CometChat repository to `settings.gradle.kts`:
```kotlin theme={null}
dependencyResolutionManagement {
repositories {
// ... other repositories
maven("https://dl.cloudsmith.io/public/cometchat/cometchat/maven/")
}
}
```
### Step 8: Verify the Module
Ensure the imported module is visible in your project and contains all necessary files.
### Step 9: Launch Activities
Launch CometChat activities based on your app's state. Here's a complete MainActivity example:
```kotlin theme={null}
class MainActivity : AppCompatActivity() {
override fun onCreate(savedInstanceState: Bundle?) {
super.onCreate(savedInstanceState)
// Check login state and navigate accordingly
if (CometChatUIKit.isInitialized() && CometChat.getLoggedInUser() != null) {
startActivity(Intent(this, HomeActivity::class.java))
} else {
startActivity(Intent(this, SplashActivity::class.java))
}
finish()
}
}
```
**If CometChat is not initialized or user is not logged in:**
```kotlin theme={null}
val intent = Intent(this@YourActivity, SplashActivity::class.java)
startActivity(intent)
```
**If the user is already logged in:**
```kotlin theme={null}
val intent = Intent(this@YourActivity, HomeActivity::class.java)
startActivity(intent)
```
**Open Messages screen for a User:**
```kotlin theme={null}
val UID: String = "UID"
val intent = Intent(this@YourActivity, MessagesActivity::class.java)
CometChat.getUser(UID, object : CometChat.CallbackListener() {
override fun onSuccess(user: User?) {
intent.putExtra("user", com.google.gson.Gson().toJson(user))
startActivity(intent)
}
override fun onError(e: CometChatException?) {
Log.e("TAG", "Error fetching user: ${e?.message}")
}
})
```
**Open Messages screen for a Group:**
```kotlin theme={null}
val GUID: String = "GUID"
val intent = Intent(this@YourActivity, MessagesActivity::class.java)
CometChat.getGroup(GUID, object : CometChat.CallbackListener() {
override fun onSuccess(group: Group?) {
intent.putExtra("group", com.google.gson.Gson().toJson(group))
startActivity(intent)
}
override fun onError(e: CometChatException?) {
Log.e("TAG", "Error fetching group: ${e?.message}")
}
})
```
***
## Important Guidelines for Changes
**Functional Changes:**
For enabling or disabling features and adjusting configurations, make the necessary updates in the `CometChatBuilderSettings.kt` file. This file contains all the feature flags and configuration constants.
**UI and Theme-related Changes:**
For any updates related to UI, such as colors, fonts, and styles, you should apply your changes in the `themes.xml` file of the module itself.
***
## Troubleshooting
### Plugin Not Found
* Ensure you have internet connectivity during Gradle sync
* Check that the plugin version is correct: `5.0.1`
* Verify the CometChat Maven repository is added to `pluginManagement` in `settings.gradle.kts`
### CometChatBuilderSettings Not Generated
* Make sure `cometchat-builder-settings.json` is in the correct location (app module root directory)
* Clean and rebuild your project: **Build > Clean Project > Rebuild Project**
* Check the Gradle build output for any errors
### BuilderSettingsHelper Import Errors
* Verify you've updated the package declaration to match your project
* Check that all `CometChatBuilderSettings` imports are correct
* Ensure the Builder plugin has generated the settings file
***
## Next Steps
Understand the settings file and feature toggles.
Adjust component props, behavior, and UI elements.
See how the exported code is organized.
Customize colors, typography, and styling to match your brand.
### Step 5: Add Module Dependency
Add the module dependency to your app's `build.gradle.kts`:
```kotlin theme={null}
dependencies {
implementation(project(":chat-builder"))
}
```
### Step 5.1: Set Builder Theme
In your app's `AndroidManifest.xml`, set the theme to use the UI Kit Builder theme:
```xml theme={null}
```
### Step 6: Add Jetifier Flag
Add to your `gradle.properties`:
```properties theme={null}
android.enableJetifier=true
```
### Step 7: Add CometChat Repository
Add the CometChat repository to `settings.gradle.kts`:
```kotlin theme={null}
dependencyResolutionManagement {
repositories {
// ... other repositories
maven("https://dl.cloudsmith.io/public/cometchat/cometchat/maven/")
}
}
```
### Step 8: Verify the Module
Ensure the imported module is visible in your project and contains all necessary files.
### Step 9: Launch Activities
Launch CometChat activities based on your app's state. Here's a complete MainActivity example:
```kotlin theme={null}
class MainActivity : AppCompatActivity() {
override fun onCreate(savedInstanceState: Bundle?) {
super.onCreate(savedInstanceState)
// Check login state and navigate accordingly
if (CometChatUIKit.isInitialized() && CometChat.getLoggedInUser() != null) {
startActivity(Intent(this, HomeActivity::class.java))
} else {
startActivity(Intent(this, SplashActivity::class.java))
}
finish()
}
}
```
**If CometChat is not initialized or user is not logged in:**
```kotlin theme={null}
val intent = Intent(this@YourActivity, SplashActivity::class.java)
startActivity(intent)
```
**If the user is already logged in:**
```kotlin theme={null}
val intent = Intent(this@YourActivity, HomeActivity::class.java)
startActivity(intent)
```
**Open Messages screen for a User:**
```kotlin theme={null}
val UID: String = "UID"
val intent = Intent(this@YourActivity, MessagesActivity::class.java)
CometChat.getUser(UID, object : CometChat.CallbackListener() {
override fun onSuccess(user: User?) {
intent.putExtra("user", com.google.gson.Gson().toJson(user))
startActivity(intent)
}
override fun onError(e: CometChatException?) {
Log.e("TAG", "Error fetching user: ${e?.message}")
}
})
```
**Open Messages screen for a Group:**
```kotlin theme={null}
val GUID: String = "GUID"
val intent = Intent(this@YourActivity, MessagesActivity::class.java)
CometChat.getGroup(GUID, object : CometChat.CallbackListener() {
override fun onSuccess(group: Group?) {
intent.putExtra("group", com.google.gson.Gson().toJson(group))
startActivity(intent)
}
override fun onError(e: CometChatException?) {
Log.e("TAG", "Error fetching group: ${e?.message}")
}
})
```
***
## Important Guidelines for Changes
**Functional Changes:**
For enabling or disabling features and adjusting configurations, make the necessary updates in the `CometChatBuilderSettings.kt` file. This file contains all the feature flags and configuration constants.
**UI and Theme-related Changes:**
For any updates related to UI, such as colors, fonts, and styles, you should apply your changes in the `themes.xml` file of the module itself.
***
## Troubleshooting
### Plugin Not Found
* Ensure you have internet connectivity during Gradle sync
* Check that the plugin version is correct: `5.0.1`
* Verify the CometChat Maven repository is added to `pluginManagement` in `settings.gradle.kts`
### CometChatBuilderSettings Not Generated
* Make sure `cometchat-builder-settings.json` is in the correct location (app module root directory)
* Clean and rebuild your project: **Build > Clean Project > Rebuild Project**
* Check the Gradle build output for any errors
### BuilderSettingsHelper Import Errors
* Verify you've updated the package declaration to match your project
* Check that all `CometChatBuilderSettings` imports are correct
* Ensure the Builder plugin has generated the settings file
***
## Next Steps
Understand the settings file and feature toggles.
Adjust component props, behavior, and UI elements.
See how the exported code is organized.
Customize colors, typography, and styling to match your brand.